26 September 2016

What's New in Microsoft Dynamics NAV 2017​

Hi All,


What's New in Microsoft Dynamics NAV 2017​?

Below are the new features/enhancements for NAV 2017 as per the the link shared on Microsoft Partner Source. What's new in Microsoft Dynamics NAV 2017


1) In Office 365 experience : 

Stay Connected with all the parts of your business. Microsoft Dynamics NAV is directly Linked to Office 365, which means you can easily review, analyze, and share data. You can navigate effortlessly between your Microsoft Dynamics NAV data and your office tools for ex : (Microsoft Outlook, Microsoft Bookings, or Microsoft Excel.


2) Embedded Power BI : 

We can now use embedded Power BI to easily create insightful charts & reports, and then make them available with in your MS Dynamics NAV 2017 role center.


3) Setup & Configuration : 

Getup and running faster. Save time & avoid unnecessary manual tasks with the assisted setup wizard that helps you import data, setup integration with Office 365, and enjoy a simplified setup experience, with predefined setup data and limited customer interaction. 

Use the assisted setup feature to guide you through setup scenarios. For ex: follow wizards to setup workflows for approvals, set fiscal year, etc.

It is now easy to setup and adjust cash flow forecasting ,gathering data from all relevant sources to provide you with a complete overview.


4) User Experience :

You can accomplish even more in your browser based interface. for ex : Switch views to see and identify your list of records, including seeing picture thumbnails in different sizes , and use wizards to learn new concepts or simplify data entry. 

In the web client, you can also use popular shortcuts ; for ex, press escape to instantly exit a page or F5 to refresh the latest data in your browser.


5) Finance :

Work with ready-to-use financial statements  and gain accessible insights into the financial performance of your business. The new  default Account Schedules means that no setup is required, making it quick to produce financial reports that you need, and point in time reporting means you can view the financial state of your business for any given time. Reporting is also made easier with the new Account categories that provide structure to your chart of accounts.


6) Jobs :

Working with Jobs is now more straightforward, helping you manage projects more easily and get more visibility into the details, setup jobs and enter time sheets using the new Jobs setup wizard and quickly access common tasks , new charts, and a new My Jobs list using the updated Project Manager role center.


7)  CRM :

Use a new wizard to guide you through the setup process, which enables seamless coupling of MS Dynamics CRM records with MS Dynamics NAV 2017 records. The MS Dynamics NAV Integration Solution on the CRM side is automatically deployed through the wizard.


8) Items :

Organize and classify your products the way you want, performing advanced searches on your catalog in just a few clicks and displaying only the information you need. you can create custom item attributes and assign an item attribute value according to your business needs, helping you manage items or create sales documents.

When you add your attributes and values to an item, you can see them all in fact box,on both the card and the list. And you can filter your items based on attribute values making it more efficient to add items to sales & purchase documents and limiting the list of items to choose from or take action on.


9) E-everyting :

Make it easier to your customers to pay your invoices online by including hyperlinks to payment services such as PayPal. Even provide PayPal Standards payment links in Invoices, supporting multiple ways of accepting payments, including credit cards & PayPal accounts


10) Cortana Intelligence :

Built-in Cortana Intelligence takes advantage of historical data and improves your insights into your predicted sales, helping you manage your stock and respond to your customers. Based on the forecast, the Sales and Inventory extension helps create replenishment requests for vendors, saving you time.

You can be confident that you are working with the best predictions , because system uses different machine learning algorithms and compares the results, returning the predictions with the highest quality.


11) PowerApps & Microsoft Flow :

Microsoft Dynamics NAV 2017 includes an entirely new integration with Microsoft Power BI.

Connect to your MS Dynamics NAV Instance and immediately have access to business performance insights into your business. This app is designed specially for Small and Mid-sized Business (SMB) owners, managers, and executives to provide details about customers,sales & finance.


12) Extensions :

Modify your MS Dynamics NAV system without directly altering the source resources, making it easier to deploy, manage, and upgrade customization's or extensions. Navigate through an install with only a few clicks and easily view extension information, such as name , description, version, publisher, and links.

You can also install and uninstall extensions easily using the Extension Management page and quickly choose the extensions  you want using the easily -recognizable logos.


Thanks & Regards,
Nandesh Gowda

Report Builder was unable to paste successfully RDLC/SSRS Reports

Hi All,

Report Builder was unable to paste successfully:

Many of you will be aware of above error while copying a text box or any Report Item for that matter.


This issue has been there for a quite a long time now. This issue comes when there is a Custom Code in your expression.


There is no direct method to copy an item as of now, but below are few methods to copy the text box by work around.

1) Using Apostrophe before expression so that it will be considered as a comment. After copying you need to remove the Apostrophe.

Or

Using Double Quote at start and end of expression so that it can be treated as String. After copying you need to remove the Double Quote.


2) Adding a blank text box, then select the expression. Copy & paste the expression to new text box.


Thanks & Regards,
Nandesh Gowda

Exporting and Importing Companies and Other Data .navdata file NAV 2013 R2 , NAV 2016

Hi All,

You can export a company from a Microsoft Dynamics NAV database and import it into another database, and you can export and import other types of data such as global data, application data, and application objects.

The below option in NAV 2013 R2 was part of NAV 2013 R2 CU 8 Release.

1) Exporting data to .navdata file.

 Search for Export to a Data file Page in NAV Windows RTC.


Please select the options, whether to export all companies, only Application objects, etc. and Click OK. Below is the description of the same.


Type of dataDescription
CompanyExports the specified company or companies, or all companies in the database. This includes the company-specific business data but no other data.
Global dataExports data that is common to all companies in the database. This includes the report list, user IDs, and printer selections, but no company-specific business data.
Application dataExports the data that defines the application in the database. This includes the permissions, permission sets, profiles, and style sheets.
ApplicationExports all application objects. Data is not included.This is similar to exporting all objects to an .fob file.

 Select the path to store the file.


2) Now to Import data back from .navdata file.

Please select Import from a data file Page. Select the .navdata file.

Choose the companies and select the other options as applicable and then click OK. If the company name already exist in database then it will not import.


To use Windows PowerShell cmdlets to import and export data. Please refer below MSDN link

https://msdn.microsoft.com/en-us/library/dn789510(v=nav.90).aspx


Thanks & Regards,
Nandesh Gowda

Error Code 85132273 NAV

Hi All,

Error Code 85132273 :

Recently one of my friend had encountered this error.

The above error can come during migration from lower version to NAV 2013 R2. The possible reason is you have not compiled the system objects in NAV 2013 before converting it to NAV 2013 R2 or  the changes of Application layer is not in sync. with Database.

You can run the below Command from Microsoft Dynamics NAV 2013 R2 Administrator Shell to sync the database schema of Application Server to Database Server. Please run as Administrator.
 Run it on Application Server ( Service Tier layer).

Sync-NAVTenant –ServerInstance


For Microsoft Dynamics NAV Server Instance configured to be a multi-tenant instance then run below command.

Sync-NAVTenant –ServerInstance -Tenant


The other possible reason can be due to code not written correctly.

You can refer below link for the same.

https://blogs.msdn.microsoft.com/nav/2014/12/16/understanding-error-code-85132273-in-connection-with-getlasterrorcode-statements/


Thanks & Regards,
Nandesh Gowda

22 September 2016

Auto Bank Reconciliation NAV 2016 from Variable Text Format


Hi All,

You can exchange data between Microsoft Dynamics NAV and external files or streams in connection with common business tasks, such as sending and receiving electronic documents and importing and exporting bank files.

Before you can send and receive electronic documents or import and export bank files, you must set up the Data Exchange Framework to process the involved data files or streams.


Auto Bank Reconciliation NAV 2016 for variable text using Data Exchange Framework

Below are the steps for Importing Variable Text CSV Bank File .

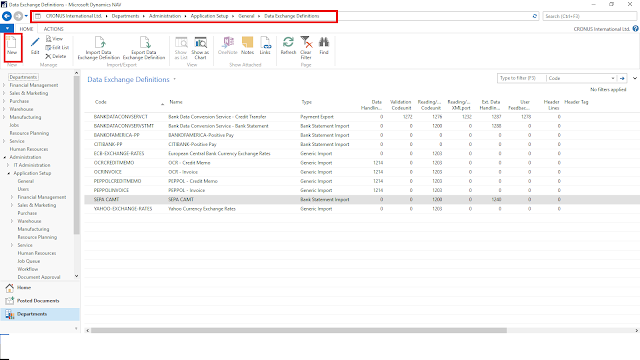
Step 1: Search for Data Exchange Definition Page and click New.


Step 2: Enter the following details :
  • Enter the Code and Name
  • Select File Type as Variable Text. ( There are options for Fixed Text, XML, Json)
  • Select Type as bank Statement Import.
  • File Encoding as Windows
  • Column Separator  as Comma.
  • You can specify No. of Header Lines in the file, if there are any. If yes then are there any Header and Footer Tags. So that rows can be skipped during Import.
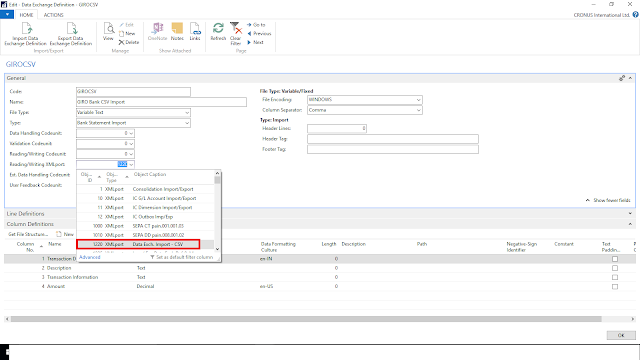
  • Select Reading/Writing XMLport as 1220


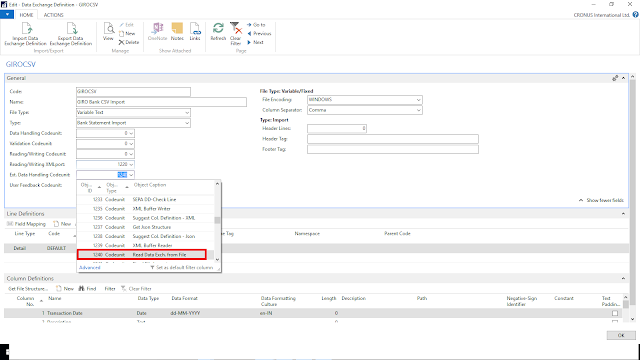
  • Select Ext. Data Handling Codeunit as 1240


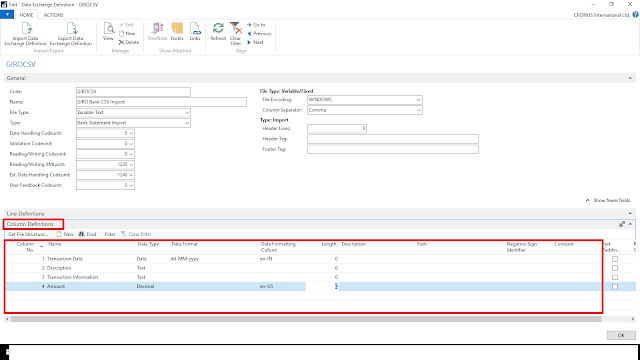
Step 3: Column Definition Tab : Here we need to define all the fields in the bank statement file with the format of each field.
  • Enter Column No. & Name
  • Select Datatype of Colum whether text or date, Decimal, etc.
  • If its Date Column Specify the  Date Format
  • If its Date & Decimal Columns Specify the Data formatting Culture ( en-US, etc.) for Regional Formats.
  • You can give other information for columns as well. ( Length, Description, Padding, etc.)


Step 4: Now define Line Definitions and Field mapping with Bank Account Ledger Entry.
  • Select Line Type as Detail. ( Available options are Detail, Header, Footer as files can have Header and Footer rows)
  • Enter Code and Name.
  • Enter Column Count as 4 as have selected four columns.
  • Now got to Field Mapping


Step 5 : Field Mapping
  • Click on New
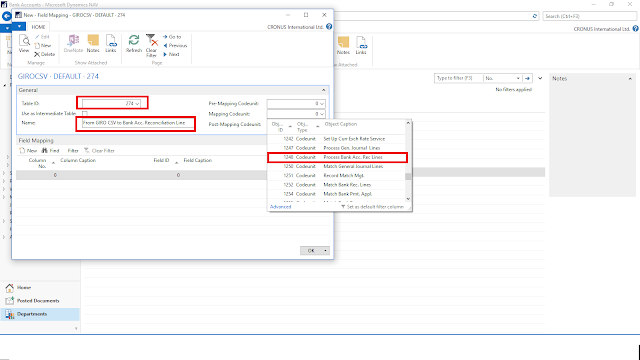
  • Select Table ID as 274 for Bank Acc. Reconciliation Line.
  • Give some descriptive Name.
  • Select Mapping Codeunit as 1248
 
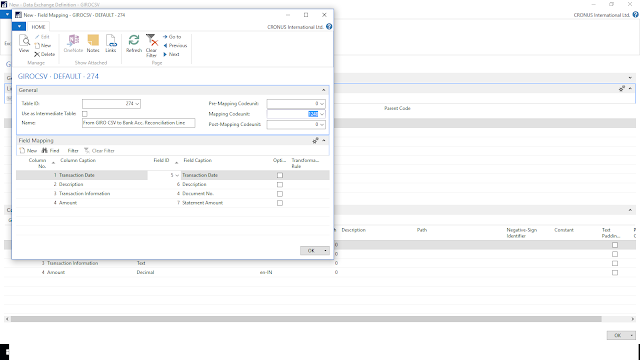
  • Now Add Field Mapping Lines as shown below. We need to Map the Bank Statement File Fields with Bank Account Ledger Entry Fields.


Now it should look like this after mapping all four fields


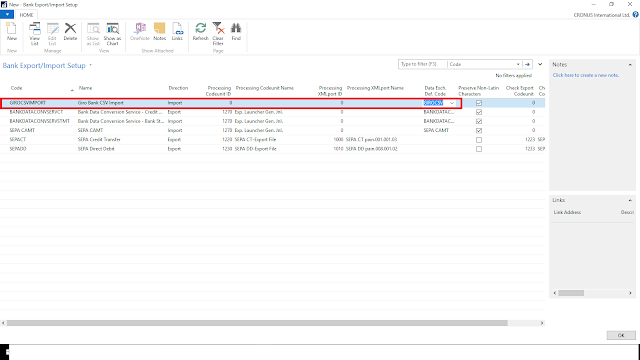
Step 6: Now Add the Data Exchange Definition in Bank Export/Import Setup.
  • Enter Code and Name
  • Select Direction as Import
  • Select Data Exch. Def. Code as GIROCSV which we created.


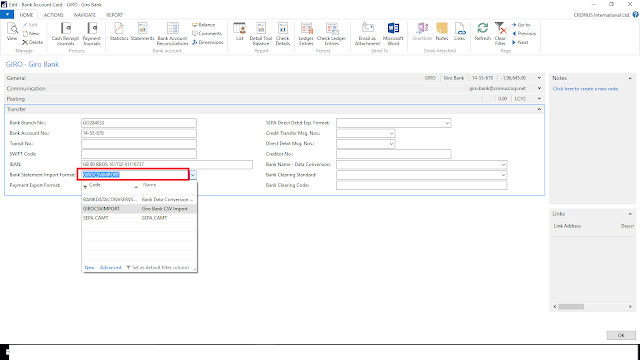
Step 7: Now tag the same on Bank Account Master.


 Step 8: Create Bank Acc. Reconciliation
  • Search for Bank Acc. Reconciliation Page 
  • Click on New
  • Select Bank Account No.
  • Enter Statement No.
  • Select Statement Date for which you are doing Reconciliation.
  • Right Hand side will show the Open Bank Account Ledger Entries.
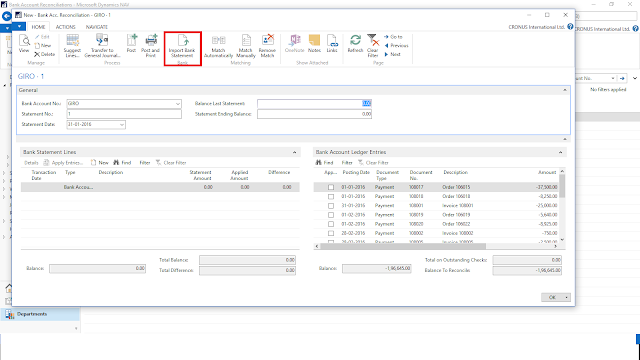
  • Now Click on Import Bank Statement and Select the CSV bank Statement File.


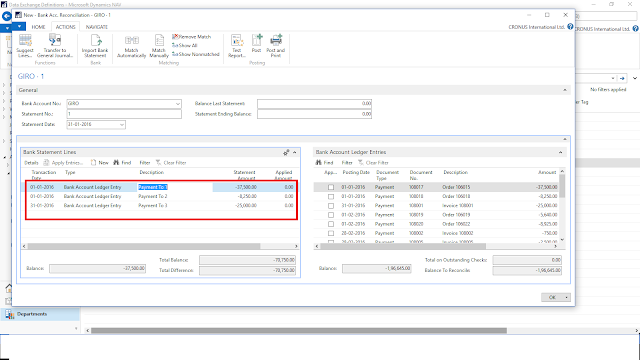
Sample Data of CSV file
01-01-2016,Payment To 1,108017,-37500
01-01-2016,Payment To 2,108018,-8250
31-01-2016,Payment To 3,108001,-25000

After Importing.


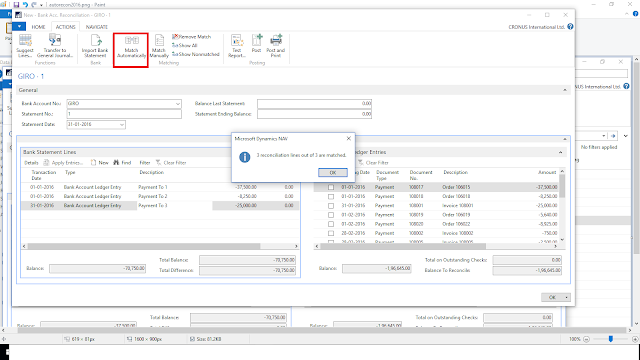
Step 9 : Auto Reconcile by clicking on Match Automatically marked in Red. Give the Tolerance days and Click Ok.


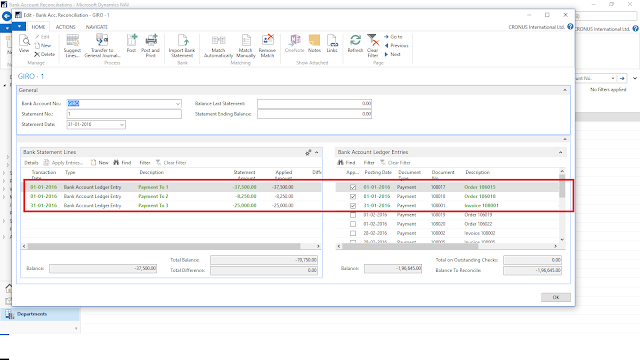
3 rows are in Green which got matched.


Matching is done on some criteria and priority. Please check below link for the same
https://msdn.microsoft.com/en-us/library/dn414563(v=nav.90).aspx


Thanks & Regards,
Nandesh Gowda

17 September 2016

Workflow in NAV 2016

Hi All,


Workflow NAV 2016

You can set up and use workflows that connect business-process tasks performed by different users. System tasks, such as automatic posting, can be included as steps in workflows, preceded or followed by user tasks. Requesting and granting approval to create new records are typical workflow steps.

In the Workflow window, you create a workflow by listing the involved steps on the lines. Each step consists of a workflow event, moderated by event conditions, and a workflow response, moderated by response options. You define workflow steps by filling fields on workflow lines from fixed lists of event and response values representing scenarios that are supported by the application code.


1) Before you create workflows you must setup workflow users.

Go to Workflow User Groups and define the users which will be part of this workflow. This is necessary, for example, to specify who will receive a notification to act on a workflow step.

See below for the screenshot :
To select user's here you need to add the user's first in Approval Users Page.


2) Setting Up Workflow Notifications :

All workflow notifications are sent through a job queue. Make sure that the job queue in your installation of Microsoft Dynamics NAV is set up to handle workflow notifications, and that the Start Automatically From NAS check box is selected.

Notification Method can be by Email or Note.


3) Notification Setup and Notification Schedule :

Here I am setting up notification for Approval. Below is the screenshot for Notification setup.


4) Setup SMTP E-Mail


5)  Creating Work flows
Below is the Screenshot for default Purchase Order workflow created from Workflow Template, you can define new workflow based on your requirement.

Here as  you can see you can create multiple steps based on some event.


You can select the event by clicking on Event field


For ex : If a document is rejected what should be the response for it that can be defined here.

Also, you can give Condition/Filters for an event as shown below in the screenshot.


For creating Approval Request and follow Approval Chain you select "Create an approval request for the record using approver type %1 and %2" . 

Below Options for the selected Response tab will be activated . (Please see Workflow Response/Event Combination Page for more information on predefined responses based on Events)

You can select the Appover Type based on your requirement. We have 3 options.
Approver Type : Salesperson/Purchaser, Approver, Workflow User Group.


If you select Approver Type as Workflow User Group, then Workflow User Group Code will get visible and you can select Workflow User Group defined. 

The Approval Process will follow the Workflow User Group Sequence.


Now if you select Approver Type as Approver  or Salesperson/Purchaser, then Approval Limit Type will get visible and you can select below options :

1) Approver Chain  : Specifies that approval request entries are created for all the requester’s approvers up to and including the first qualified approver

2) Direct Approver  : Specifies that an approval request entry is only created for the requester’s immediate approver, regardless of the approver’s approval limit.

3) First Qualified Approver : Specifies that an approval request entry is only created for the requester’s first qualified approver


For Ex: 
Requester 1 requests approval of a purchase invoice with an amount of 900.

The following approval user setup exists.

UserApproverApproval Limit               
Requester 1Approver 1100
Approver 1Approver 2500
Approver 2Approver 31000


Note that Approver 2 is the only qualified approver.

Approval request entries are created as follows, depending on the option in the Approver Limit Type field:
  • Approver Chain: Approval request entries are created for Requester 1, Approver 1, and Approver 2, although only Approver 2 can approve the request.
  • Direct Approver: An approval request is created for Approver 1.
  • First Qualified Approver: An approval request entry is created for Approver 2.


Once the above setup is done you can start doing transactions to see the Notifications.


To create a New Workflow Event and Response, and Register it in Workflow Response/Event Combination. Please refer below MSDN link for detailed explanation.

https://msdn.microsoft.com/en-us/library/mt574349(v=nav.90).aspx


1) Workflow Response/Event Combination : Here you define the Responses for an Event.


 2) Workflow Hierarchies


Thanks & Regards,
Nandesh Gowda

Power BI with NAV - Simple Report

Hi All,

Power BI with NAV - Basics : This topic will help you to create a simple report.

You can refer to my below post on how to connect to NAV OData Service from Power BI and see the default dashboard created by Power BI.
https://nandeshgowda-navblog.blogspot.in/2016/09/power-bi-and-dynamics-nav-2016-getting.html


You can refer  below link for basic Concepts of Power BI Service
https://powerbi.microsoft.com/en-us/documentation/powerbi-service-basic-concepts/

You can build report with other data sources as well  for ex : Files ( CSV, Excel), Azure Database, etc.

Now we will use existing Microsoft Dynamics NAV Dataset to create a report.

1) Click on your Dataset on which you will create your reports, it will open a blank page with the Dataset fields on right hand side.

2) You can create a copy of existing report by using Save as option.

3) You can see Visualization Tool on the right hand side.


4)  Add a Line Chart Visualization Tool from right hand side Tool window. Select the fields  for the Visualization. I have selected  Posting Date and Sales Amount Actual fields. you can drag and drop the fields.

You can set Report level filters to the Report.


5) You can Save  the report by giving Report Name.


6) Saved Report will be Visible under Report section


7) Finally you can pin the Page to Dashboard.


Thanks & Regards,
Nandesh Gowda

Power BI and Dynamics NAV 2016 Getting Started

Hi All,

Power BI and Dynamics NAV 2016  : Getting Started

Microsoft Power BI helps you stay up to date with the information that matters to you. 

With Power BI, dashboards help you keep a finger on the pulse of your business. 

Your dashboards display tiles that you can click to open reports for exploring further.  Connect to multiple datasets to bring all of the relevant data together in one place 


To use Power BI with NAV you need to enable OData Web service in NAV server Instance.


1) Sign in To Power BI with your credentials. Else follow the steps given to create a free account.


2) Choose content packs from online services that you use. Click on Get


3) Select Microsoft Dynamics NAV for Power BI and click on Get.


4)  You can Add the OData web service URL with following option.

  • You can use secure https to connect to OData Services         


Please select Basic Authentication and give the User Name and Password


                       OR
  • You can use Windows Authentication, but here you may run into authentication issue as the connection accepts secure connection with instance registered.
For this you may need to download and install  On Premises Data Gateway under download section of your Power BI Login. After Installing, login to Data Gateway with the same credentials used for power BI.


5 ) Power BI will retrieve your Microsoft Dynamics NAV data and create a ready-to-use dashboard and report for you. 


Thanks & Regards,
Nandesh Gowda