21 January 2017

Defer Revenues and Expenses, Deferral Templates NAV

Hi All,

To recognize revenues and expenses in periods other than the period in which the transaction is posted, you can use functionality to automatically defer revenues and expenses over a specified schedule.

Deferral functionality is available on sales documents, purchase documents, and in the general journal. The functionality provides benefits, such as:
  • Reduced time and effort to defer revenues and expenses after transactions are posted.
  • Easy reporting on deferred amounts for customers, vendors, and G/L accounts.

Here we will discuss on Deferring Expenses pertaining to Advertising for 1 year and how to distribute the Amount to respective period.

1)  To set up a G/L account for deferred expenses 

Go to Chart of Accounts and create a New G/L Account of Type Balance Sheet , where the deferred expenses will be posted to. Name the account, for example, Prepaid Advertising Expenses.


2) To set up a deferral template

Search for Deferral Template Page and create New Template. Select the G/L Account created in above step to post deferred expenses.


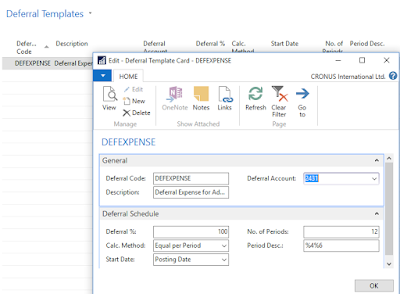
Please refer below table on how to fill in the Deferral template.
FieldDescription
Deferral Code
Identify the deferral template.
Description
Describe the deferral template.
Deferral Account
Specify the G/L account that the deferred expenses are posted to.
Deferral %
Specify how much of the total amount will be deferred.
Calc. Method
Specify how the Amount field for each period in the Deferral Schedule window is calculated. You can choose between the following options:
  • Straight-Line: The periodic deferral amounts are calculated according to the number of periods, distributed according to period length.
  • Equal Per Period: The periodic deferral amounts are calculated according to the number of periods, distributed evenly on periods.
  • Days Per Period: The periodic deferral amounts are calculated according to the number of days in the period.
  • User-Defined: The periodic deferral amounts are not calculated. You must manually fill the Amount field for each period in the Deferral Schedule window. For more information, see the “To change a deferral schedule from a purchase invoice” section.
Start Date
Specify when to start calculating deferral amounts. You can choose between the following options:
  • Posting Date: The start date used when calculating deferral amounts is the posting date of the invoice.
  • Beginning of Period: The start date used when calculating deferral amounts is the first day of the accounting period in which the posting date falls.
  • End of Period: The start date used when calculating deferral amounts is the last day of the accounting period in which the posting date falls.
  • Beginning of Next Period: The start date used when calculating deferral amounts is the first day of the accounting period that follows the accounting period in which the posting date falls.
No. of Periods
Specify how many accounting periods the total amounts will be deferred to.
Period Desc.
Specify a description that will be shown on entries for the deferral posting.
You can enter the following placeholder codes for typical values, which will be inserted automatically when the period description is displayed.
  • %1 = The day number of the period posting date
  • %2 = The week number of the period posting date
  • %3 = The month number of the period posting date
  • %4 = The month name of the period posting date
  • %5 = The accounting period name of the period posting date
  • %6 = The fiscal year of the period posting date
Example: The posting date is 02/06/2016. If you enter “Expenses deferral for %4 %6”, then the description displayed will be Expenses deferral for February 2016.

3)  To assign a deferral template to an Item, G/L Account, etc.

Assign the Deferral Template to an Expense Account


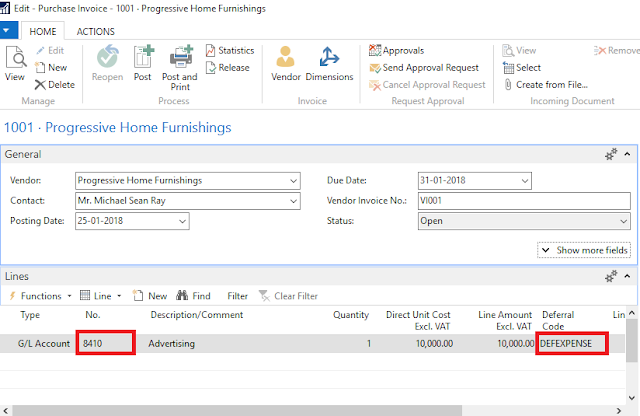
4) Create a Purchase Invoice taking the G/L Account to which we tagged Deferral Template.

As soon as we select the G/L Account, the Deferral Code is filled in by default.


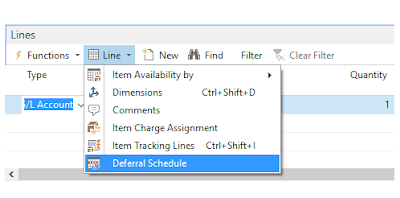
Now go to Lines FastTab-->Line --> Deferral Schedule to view the Deferral Calculation.


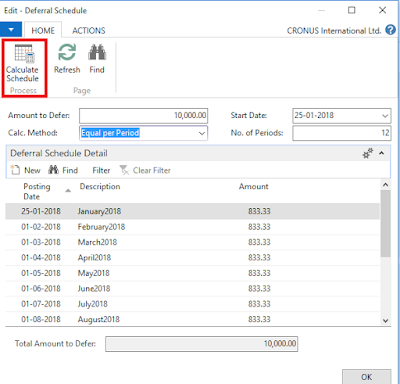
You can see system has divided the Amount into no of periods we specified in the setup.

You can also change the Deferral Amount here as well on Header or Line and then click Calculate Schedule


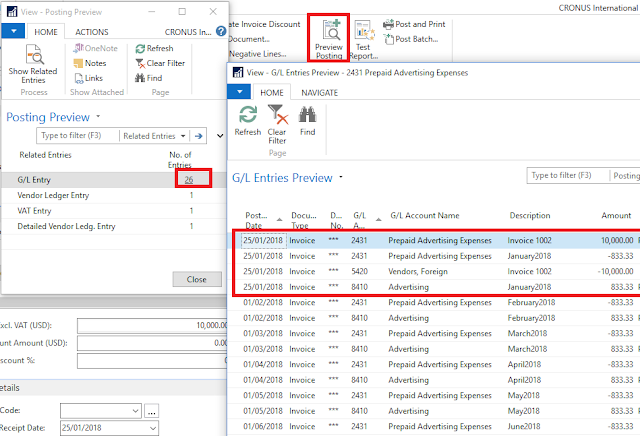
5)  You can Preview how deferral expenses will be posted to GL. You can see initially the Expense will be posted to Deferral Account and then the expenses are moved to actual Expense Account for each period.


6) Now post the entries, to review posted deferrals run Purchasing Deferral Summary report.


Similarly you can  Defer Revenues to the Period of Delivery .
Please refer below link
https://msdn.microsoft.com/en-us/library/mt574363(v=nav.90).aspx


Thanks & Regards,
Nandesh Gowda

Invalid file reference. The path to the file is invalid, or one or more of the referenced schemas could not be found. Configuration Package NAV

Hi All,

Invalid file reference. The path to the file is invalid, or one or more of the referenced schemas could not be found.


I got above error while trying to export to excel Item Journal Line table from configuration Packages.

After analysing, I was able to identify the field due to which this error was coming. The field name was "Line No"

But the data in that field was fine, after further analysing I realized that while exporting to excel system creates an XML Schema Mapping for all the fields.

The XML Schema Name for standard field "Line No." was "LineNo", so while creating for customized field "Line No" system was throwing this error as the Name was getting conflicted.

So finally we excluded that field and exported the data as it was not a relevant field for us.


Thanks & Regards,
Nandesh Gowda

01 January 2017

Inventory Revaluation NAV


Hi All,

The inventory value of an item can change over time, for example, as a result of damage or age.

If you want to change the inventory value of an item or a specific item ledger entry, you must use the revaluation journal in NAV.

You can also use the revaluation journal to correct incorrect posted documents.

You must first run the Adjust Cost - Item Entries batch job before you revalue the inventory so that all the cost is adjusted.

To update cost of items with costing method as Standard the process is little different.

For ex : To revalue items other than Standard Costing method we can follow below process

Screenshot of Item Card


Go to Revaluation Journal Page

There are two ways of filling in the journal with information about the current, calculated value of the specified item:

You can enter a line manually and link it to an item ledger entry in the Applies-to Entry field. This will change the inventory value of all units of this item ledger entry. It will also change the inventory value of the units that are applied to this item ledger entry, regardless of their posting date.

OR

You can fill in the journal by using the Calculate Inventory Value batch job. This method allows you to specify exactly how the revaluation will change the inventory value of an item or item ledger entry. The revaluation will be valid for entries relating to this item or item ledger entry from the posting date of the revaluation journal.

Using Calculate Inventory Value batch job.


Posting Date : You can set the date on which you want to revalue.

Calculate Per : Whether you need to sum inventory value by Item (Location, variant) or Per Item Ledger Entry.

Update Standard Cost :Select this field if you want the program to update the standard cost on the item card. If the item is in stock on the posting date of the revaluation, a revaluation journal line will be created.

The standard cost on the item card will then be updated when the revaluation journal line is posted. If the item is not in stock on the posting date, then the standard cost on the item card will be updated immediately.

Calculation Base: In this field, you can specify how the revaluation journal will suggest a new value for the Unit Cost (Revalued) field.

The options are:
: The revaluation journal will suggest the same value as in the Unit Cost (Calculated) field .

• Last Direct Unit Cost: The revaluation journal will calculate the value in the field based on the Last Direct Unit Cost on the Stockkeeping Unit card or the Item card.

• Standard Cost - Assembly List: The revaluation journal will calculate the value in the field based on the bill of materials.

• Standard Cost - Manufacturing : The revaluation journal will calculate the value in the field based on the production BOM.


Now you can change the Unit Cost (Revalued) field with the new value and post the revaluation journal.


Alternatively you can enter revaluation journal  manually by selecting the Item No. and Applies-to Entry if you need to correct any single entry.


Once posted we can see the changes on Item card, system will pass a value entry and corresponding journal entries.


Process for Standard Cost Update :

1) Run the Adjust Cost - Item Entries batch job.
2) Run the Post Inventory Cost to G/L batch job.
3) Open the Standard Cost Worksheet and use one or more of the following functions:

  • Run the Suggest Item Standard Cost batch job.
  • Review the results and make changes as necessary.
  • Run the Suggest Work/Mach Ctr Std Cost batch job.
  • Review the results and make changes as necessary.

4) Run the Roll Up Standard Cost batch job.
5) Review the results and make changes as necessary.
6) Run the Implement Standard Cost Change batch job.
  • Enter the Posting Date, Document No. and the Item Journal Template & Batch.


7) Review and post the Revaluation Journal, which has been populated with entries from previous step in this process.


Thanks & Regards,
Nandesh Gowda

Item Charges NAV

Hi All,

Item Charges Functionality is used in NAV to enter/add charges such as Freight, Custom, Insurance, Clearing, etc. which is pertaining to Items and then link the charges to that Item to arrive at the exact cost of that item.

The item charge can be entered on a separate invoice or in the document where the items that the cost relates to are listed.

It is strongly recommended to pass all the expenses related to Item through Item Charges so that you can finally arrive at Landed Cost of the item being purchased instead of expensing it out using G/L Account directly.

Also, you can use Item Charges for any price difference for purchase or sale transactions.

To create a new Item Charge go to Item Charges page as shown below.

Enter the No. and Description and tag the Gen. Prod Posting Group to allow system to pick the expense account for charges.


Here we will create a separate Invoice and load the charge amount to Purchase receipt Lines.

Please create a Purchase Document and select Charge(Item) for Item Charges as shown below.
Enter the Quantity and Amount in Direct Unit Cost.


Now Go to Line and select the Item Charge Assignment Option


You can Load Charges on Purchase, Sales, Transfers and Return transactions.
Here we will load on Purchase Receipt Lines. so click on Get Receipt Lines and select the relevant Purchase Receipt Lines. Once selected click on OK.


System will give option to split the charge amount Equally or based on Amount. If you have Multiple Items or Multiple Purchase Receipts you may need to split the Charge Amount between those Item Lines.

or

Alternatively you can enter Qty to Assign to split the Amount.


After Assigning the Item Charge we will post the document and see the impact of the Item Charge on the main Item.


If you Navigate to the Purchase Receipt on which you loaded the Item Charge Amount , you will see system has created one more Value Entry with the Amount you distributed during assigning item charge. So the Cost of the Item for that particular receipt has increased by the Charge Amount.


Thanks & Regards,
Nandesh Gowda

Power BI reports in Microsoft Dynamics NAV 2017 Role Center

Hi All,

Today, I will demonstrate how to configure Power BI Services and a Power BI account, as well as add Power BI reports to a user’s NAV 2017 Role Center

1)  Setup Azure Active directory to register an application so that it enables on premise application to communicate with Power BI services, Office 365 Exchange Online and other Azure services.

Go to--> Assisted Setup--> Setup Azure Active Directory--> Next


2) We need to register the NAV 2017 application with Azure Directory and obtain the Application ID and Key from Azure Portal so that NAV 2017 can communicate with Azure services.


3) To register NAV 2017 please sign into Azure Portal with your credentials.

Click on Azure Directory Icon --> App registrations --> Add

Name: Give the Name for App Registration
Application Type : Select Native
Redirect URI : Select from Reply URL from the above screen.

Finally click on Create to register the NAV App. It will generate Application ID.


4) Now give Permission to various API's available, in our case Power BI Services.

Click on Required permissions--> Add --> Select an API--> Power BI Services --> Select


Give the required permissions and complete the process


5) Now generate the Key

Give Description, Expires and then Save, it will generate a key.


6) Now come back to Step 2 and enter the Application ID and Key and then Finish the setup.

We registered in Azure Active Directory, and permissions to the Power BI Service API are set, now we are ready to start working with Power BI reports in Dynamics NAV

7) Now go to to Role Center and click on Get Started with Power BI.


8) Click on Authorize Azure Services to give data access permissions to Azure resources.


9) Sign in with your Azure directory credentials and click on Accept to complete the process.


10) Now Power BI Reports are available on your Role Center dashboard.

Select the reports from the list of reports you have created in Power BI.


11) As shown below you can view the report data, move between other reports and expand the view layout.


Thanks & Regards,
Nandesh Gowda