16 November 2016

Developing Extension package NAV

Hi All,

Please refer my previous post on Extensions Overview.
https://nandeshgowda-navblog.blogspot.in/2016/11/extending-microsoft-dynamics-nav-using.html

Today we will discuss on how to develop & use Extensions.

We can build extension packages that add functionality to a Dynamics NAV deployment. Unlike the familiar development and deployment of Dynamics NAV functionality, building an extension relies on the exported version of an application to .TXT files.

We can export the application from the development environment, use the development environment commands, or use the Windows PowerShell cmdlet that is available in the Microsoft Dynamics NAV 2017 Development Shell, Export-NAVApplicationObjectLanguage.

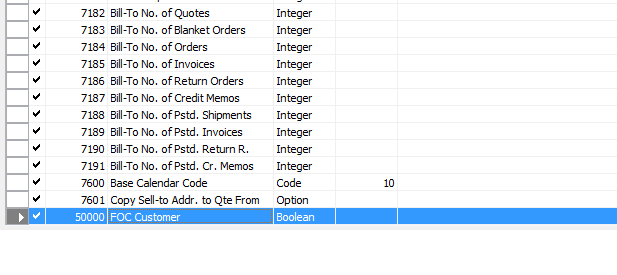
I will create a new field on Customer table and put some validation on that field using Events.

Please refer my below post on how to implement Events
https://nandeshgowda-navblog.blogspot.in/2016/09/implementing-events-in-nav-2016.html


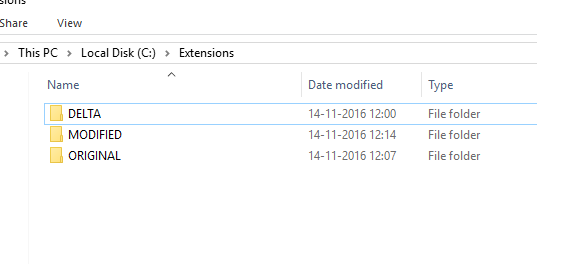
1) To start with please create a folder structure similar to below so that while creating a extension package we can use below path for Cmdlets for converting/merging and creating delta.


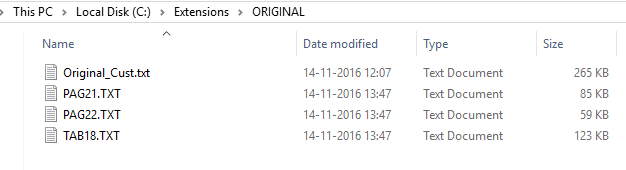
2)  The foundation for our extension is the exported .txt files of the objects we are modifying. We can export just the objects that we want to modify, or we can export the entire Dynamics NAV application. We can use  Export-NAVApplicationObjectLanguage cmdlet to export the objects.


3) Now we need to create a functionality using Events, In my example I have just added a field in Customer table and added a validation on onBeforeValidateEvent of new field created. I have used Events for the code changes.


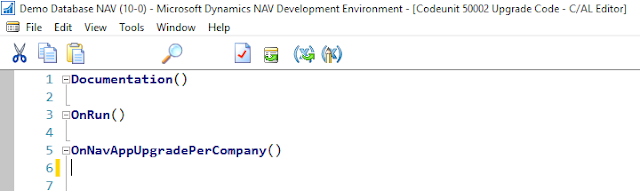
4)  Write extension upgrade code for new or modified tables. This is needed as we may get error while building the Extensions. For time being you can just create upgrade codeunit and add the functions in it.

To write upgrade code for an extension

Create new codeunit.

Important

This must be a codeunit of type Normal, not an Upgrade codeunit.

Add upgrade functions to the codeunit. Make sure the function is declared as global so that the Local property is set to No.

Add the OnNavAppUpgradePerDatabase() function if the extension contains cross-company tables.

Add the OnNavAppUpgradePerCompany() function if the extension contains per-company tables.


5)  Now I will verify whether the changes are working from RTC Client.


6) Now Export the Modified objects in text format.


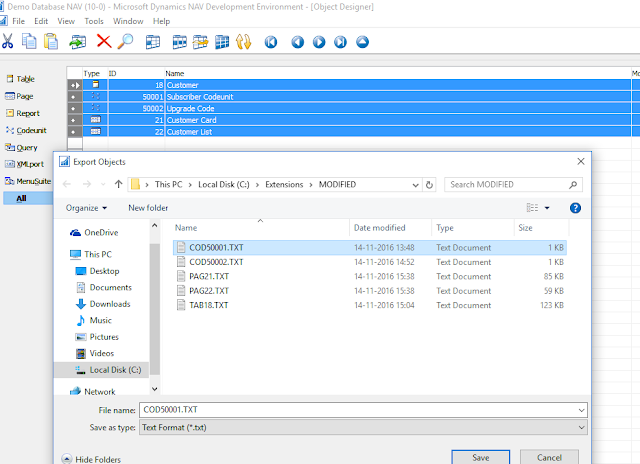
7) Our delta files must be one-to-one with the objects we have added or modified.

We cannot include a single merged delta file. If we output our export file as a single file use the Split-NAVAppplicationObjectFile cmdlet to create the individual files.

Go to  "Microsoft Dynamics NAV 2017 Development Shell" and type the command to split the file into individual objects


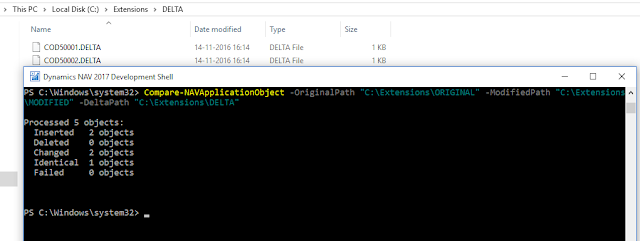
8) Create DELTA files using the Microsoft Dynamics NAV 2017 Development Shell cmdlets.

Extension packages are based on application object deltas. Again, we use the application merge utilities in the Microsoft Dynamics NAV 2017 Development Shell to distill the changes in the form of application object differences that are stored in DELTA files.

We use the Compare-NAVApplicationObject cmdlet to create these delta files.


If we will be adding Multilanguage translations for captions or constant. Use below cmdlet.

Compare-NAVAppApplicationObjectLanguage -OriginalPath MLORIGINAL -ModifiedPath MLMODIFIED -DeltaPath MLDELTA

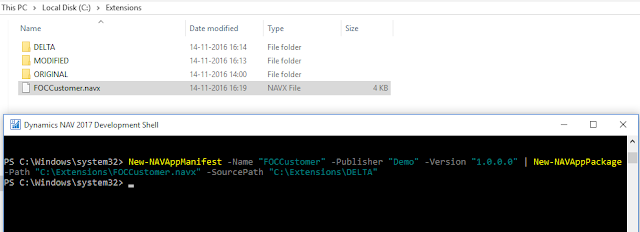
9) Build Extension package.

Use the New-NAVAppManifest and New-NAVAppPackage cmdlets to build the manifest and package file.

The following is an example of how to create a new extension .NAVX package file with a new manifest.


10)  Signing a NAVxfile.

Code signing is a common practice for many applications. We must have a certificate on the computer (as a file or in the certificate store) that includes code signing for the intended purpose.

It is recommended that we use a certificate from a third party certificate authority. For testing purposes, it is acceptable to create a self-signed certificate using the New-SelfSignedCertificate cmdlet in PowerShell on Windows 10 or MakeCert.

I will Skip this process of Signing in this Demo. We will use unsigned extension package to Publish and Install.


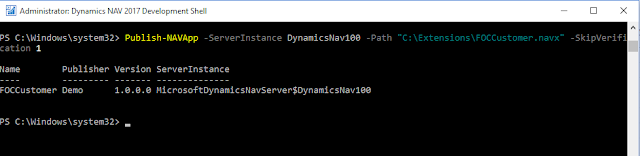
11) Publish and Install extension :

We have packaged our extension so it is ready to be published and installed on a target server.

Please take a new & clean database without any customisations done to publish and install the extensions.

Use Publish-NAVApp cmdlet to publish the Extension for the service Instance


To Install we can use Install-NAVApp cmdlet

Install-NAVApp -ServerInstance YourDynamicsNAVServer -Name ”My Extension” –Tenant Tenant1, Tenant3

OR

We can install the same from RTC NAV Client

Go to Extension Management and install the published extension in our case FOCCustomer.


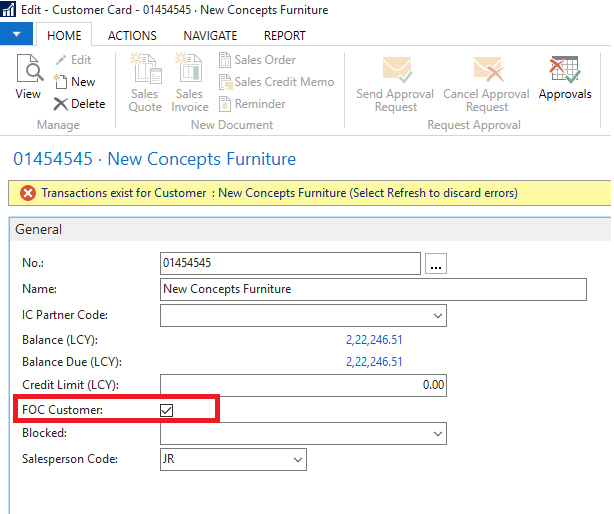
Now after installing we can verify whether our changes are reflecting on customer card.


NOTES :

1) Objects must be exported as .TXT files. We cannot build an extension based on a .FOB file.

2) DO NOT make C/AL code modifications.

3) DO use subscribing to events to execute code.

4) DO NOT change restricted page and table properties.

5) The packaging process adds a description of the extension to the manifest, such as whether it changes pages or adds tables. While not explicitly being enforced currently, this can be used to determine whether to install an extension, or not.

6) If we want to publish an unsigned extension package, we need explicitly state that by using the –SkipVerification parameter on the Publish-NAVApp cmdlet.

7) When we install an extension that includes changes to the menu suites, this does not take effect for any user until we sign out and then sign in again.


Please refer below MSDN links for Extensions

1) Developing Extensions for NAV 2017
https://msdn.microsoft.com/en-us/dynamics-nav/how-to--develop-an-extension

2) Create an Extension package for NAV 2017
https://msdn.microsoft.com/en-us/dynamics-nav/how-to--create-an-extension-package

3) Publish and Install Extension for NAV 2017
https://msdn.microsoft.com/en-us/dynamics-nav/how-to--publish-and-install-an-extension

4)  How to Write Extension Upgrade Code for NAV 2017
https://msdn.microsoft.com/en-us/dynamics-nav/extensions-upgrade-howto

5)  Extension Packages Capability Support Matrix for NAV 2017
https://msdn.microsoft.com/en-us/dynamics-nav/extension-packages-capability-support-matrix


Thanks & Regards,
Nandesh Gowda

Extending Microsoft Dynamics NAV Using Extension Packages

Hi All,

You can extend and customize a Dynamics NAV deployment without modifying the original application objects. With extension packages, you install, upgrade, and uninstall functionality in on-premises deployments or for select tenants in a multitenant deployment. Customers can easily add or remove horizontal or customized functionality to their solution that upgrade much easier than past solutions.

The main difference from classical development is that source code modifications are not allowed. Instead, you use C/AL events to extend and customize objects.

Extensions are delivered as .navx package files. A .navx package contains the various artifacts that deliver the new functionality to the Dynamics NAV deployment as well as a manifest that specifies the name, publisher, version, and other attributes of the extension. You manage .navx packages with a series of Windows PowerShell cmdlets that are available in the Microsoft Dynamics NAV 2017 Administration Shell. There are also cmdlets available to ISVs and developers in the Microsoft Dynamics NAV 2017 Development Shell that help create packages.


How Extensions Work

Extensions are in the simplest terms the runtime application of objects and object deltas for a specific combination of an extension package and a tenant. When an extension is published to a Dynamics NAV deployment, it compiles the objects in it against the current application database. Then, when the extension installs for a tenant, it stores the association and builds the relevant database schema. At runtime, Dynamics NAV simply loads the associated objects for that extension and tenant.

You can publish multiple extensions to a Dynamics NAV deployment and, in multitenant deployments, install any combination of published extensions for each tenant. For example, consider a scenario with a multitenant deployment with extensions A, B, C, and D published to it. Each tenant can have their own unique combination of extensions. So tenants 2, 3, and 4 can have the same extensions (extensions B and C) while tenants 1 and 5 only have one extension each, extension A and D, respectively. This provides for a great degree of customer functionality choice while at the same time maximizes the server hardware and administration workload.

In most cases, two extension packages can coexist and work independently of each other; however there is the possibility that two apps will try to modify the same object properties. In those cases, if the conflict cannot be resolved, the installation of the conflicting extension fails.


You can refer below MSDN Link for detailed explanation about Extensions.

https://msdn.microsoft.com/en-us/dynamics-nav/extending-microsoft-dynamics-nav-using-extension-packages


As per my understanding we will have a dilemma whether to go for extensions or use the traditional development methods.

We can have below consideration while choosing Extensions :

1) Is the database going to be heavily customized or not?

2) Is the development done can be easily maintained and monitored?

3) How frequently the changes will come in your existing extensions ?

4) What  level of IT hardware & Configuration needed for extension?

5) More the extensions used, more consideration to be given for Server hardware configuration as the extensions will be loaded by NAV at run time.

6) Upgrade Flexibility

7) Multi Tenant Environment Flexibility

8) Using extensions for third party App, ISV, etc.


Anyways we need to move forward and start using Extension packages for most of our developments.
.
I feel in future Extensions will be heavily concentrated on and improvements will come in this regard. As its obvious from NAV 2016 and NAV 2017 releases and changes w.r.t to Extensions.


Thanks & Regards,
Nandesh Gowda

Cannot add the Field Trigger or cannot add variable NAV Extensions

Hi All,

Cannot add the Field Trigger to.

Above error may come when creating Extension package using New-NAVAppPackage cmdlet.

The above error may come if you have written some code on Triggers of page or table for a field.

So please remove the code and use the Events to implement your code.

We have default trigger events available for table or page to write our code on when you subscribe to table/page object.

Cannot add variable to

Again this is similar kind of error, please remove the variable defined from the object and implement the logic using Events.

Thanks & Regards,
Nandesh Gowda

Publish-NAVApp : Merge Conflict: Could not update Codeunit NAV Extensions

Hi All,

Publish-NAVApp : Merge Conflict: Could not update Codeunit XXXX

Above error may come while using Publish-NAVApp cmdlet, if the customized objects which are added for development are already available in NAV Database.


Thanks & Regards,
Nandesh Gowda

09 November 2016

Account Categories and Account Subcategories on Chart of Accounts NAV2017

Hi All,

New fields have been added on chart of accounts for categorization of Accounts.

To start with we will discuss G/L Account Category

NAV 2017 comes with five predefined Account Category.

You can add new Subcategories from G/L Account Category Page. Basically Account Subcategories are grouping under Account categories.

You can use Generate Account Schedules that will update predefined financial reports such as Balance Sheet, P&L, etc. ( through Account Schedules).


On Chart of Accounts you can see Account Category field with five predefined values

Account Category : 


Account Subcategory :

It's a variable on G/L Account Card.

It's value is picked from G/L Account Category based on the Account category selected.


Benefits of using Account Categories :
  • Various Financial Reports (Balance Sheets, P&L, etc.) are readily available from Account Categories.
  • We can group the G/L Accounts into Categories for better user understanding.
  • We can see balances as per Categories and Subcategories.
  • We can use the Categories for developing various kinds of Analysis reporting.


Thanks & Regards,
Nandesh Gowda

Notifications in UI NAV 2017

Hi All,

Notifications provide a programmatic way to send non-intrusive information to the user interface (UI) in the Dynamics NAV Web client. Notifications differ from messages initiated by the MESSAGE function. Messages are modal, which means users are typically required to address the message and take some form of corrective action before they continue working. On the other hand, notifications are non-modal. Their purpose is to give users information about a current situation, but do not require any immediate action or block users from continuing with their current task. For example, you could have a notification that a customer's credit limit is exceeded.


Notifications in the UI :

In the UI, notifications appear in the Notification bar (similar to validation errors) at the top of the page on which a user is currently working. The user can then choose to dismiss the notification, which clears it. Or if actions are defined on notification, the user can choose one of the actions.

  • There can be multiple notifications. The notifications appear chronological order from top to bottom.
  • Notifications remain for duration of the page instance or until the user dismisses them or takes action on them.
  • Notifications that are defined on sub-pages, for example in parts and FactBoxes, appear in the same Notification bar.
  • Validation errors on the page will be shown first.

Notifications in the development environment :

By using the Notification and NotificationScope data types and functions in C/AL, you can add code to send notifications to users. The following table provides an overview of the available functions. The sections that follow provide additional information about how to create notifications.


FunctionDescription
MESSAGESpecifies the content of the notification that appears in the UI.
SCOPESpecifies the scope in which the notification appears.
SENDSends the notification to be displayed by the client.
ADDACTIONAdds an action on the notification.
SETDATASets a data property value for the notification
GETDATAGets a data property value from the notification.
RECALLRecalls a sent notification.

Creating and sending a notification:


You create a notification by using the MESSAGE and SEND functions. The MESSAGE function defines the message part of the notification. When the SEND function is called, the notification is sent to the client and content of the message is displayed.
MyNotification.MESSAGE := 'This is a notification';
MyNotification.SEND;
The SEND function call should be the last statement in the notification code, after any ADDACTION or SETDATA function calls for the notification instance.

Defining the notification scope :

The scope is the realm in which a notification is broadcast in the client. There are two different scopes: LocalScope and GlobalScope.
  • LocalScope notification appears in context of the user's current task, that is, on the page the user is currently working on. LocalScope is the default.
  • GlobalScope notification is not directly related to the current task. Note:GlobalScope is currently not supported, so do not use it. This will be implemented in a future release.
The following code creates a notification in the LocalScope:
MyNotification.MESSAGE := 'This is a notification';
MyNotification.SCOPE := NOTIFICATIONSCOPE::LocalScope;
MyNotification.SEND;

Adding actions on a notification :

You add actions on notifications by using the ADDACTION function. This function provides a way for you to create interactive notifications. By default, users have the option to dismiss the notifications. However, there might be cases where you want to provide users with different actions that they can take to address the notification, like opening an associated page for modifying data.
Conceptually, a notification action calls a function in a specified codeunit, passing the notification object in the call. The function includes the business logic for handling the action.
MyNotification.MESSAGE := 'This is a notification';
MyNotification.SCOPE := NOTIFICATIONSCOPE::LocalScope;
MyNotification.ADDACTION('Action 1',CODEUNIT::"Action Handler",'RunAction1');
MyNotification.ADDACTION('Action 2',CODEUNIT::"Action Handler",'RunAction2');
MyNotification.SEND;
The basic steps for adding an action are as follows:
  1. Create a global function in a new or existing codeunit. The function must have a Notification data type parameter for receiving the notification object.
  2. Add C/AL code to the function for handling the action.
  3. Specify the codeunit and function in the ADDACTION function call.
Important
You can have more than one action on a notification. A LocalScope notification can have up to 3 actions. A GlobalScope notification can have up to 2 actions.

Sending data with a notification :


You use the SETDATA and GETDATA functions to add data to a notification, which is typically needed when actions are invoked. The SETDATA function sets, or adds, data to the notification. The data is defined as text in a key-value pair. With the GETDATA function, you can then retrieve the data again.
The following code sets data for a notification:
MyNotification.MESSAGE := 'This is a notification';
MyNotification.SCOPE := NOTIFICATIONSCOPE::LocalScope;
MyNotification.SETDATA('Created',FORMAT(CURRENTDATETIME,0,9));
MyNotification.SETDATA('ID',FORMAT(CREATEGUID,0,9));
MyNotification.ADDACTION('Action 1',CODEUNIT::"Action Handler",'RunAction1');
MyNotification.ADDACTION('Action 2',CODEUNIT::"Action Handler",'RunAction2');
MyNotification.SEND;
The following code gets the data for a notification:
DataValue := MyNotification.GETDATA('Created');
DataValue := MyNotification.GETDATA('ID');
Example :


This simple example illustrates how notifications work and provides some insight into how you can use them. This example uses page 42 Sales Order of the CRONUS International Ltd. demonstration database according to the following.
  • The code compares a customer's balance with their credit limit. If the balance exceeds the credit limit, a notification is sent to the client.
  • The notification includes an action, which has the caption Change credit limit, that opens page 21 Customer Card. This enables the user to increase the credit limit.
To complete the example, follow these steps:
  1. In C/AL code for page 42 Sales Order, add the following variables and text constants:
    Variable NameData TypeSubtype
    CustomerRecordCustomer
    CreditBalanceNotificationNotification
    OpenCustomerText
    Text Constant NameConstValue
    Text003The customer's current balance exceeds their credit limit.
    Text004Change credit limit
  2. Add the notification code on page 42 Sales Order.
    For this example, add the code on OnOpenPage tigger in C/AL .
  3. Create a codeunit, called Action Handler, for handling the notification action as follows:
    • Add a global function called OpenCustomer that has a Notification data type parameter called CreditBalanceNotification for receiving the Notification object.
    • Add the following C/AL variables to the codeunit:
      Variable NameData TypeSubtype
      CustNumberText
      CustNoText
      CustRecRecordCustomer
      CustPagePageCustomer Card
    • Add the following code to the OpenCustomer function:


Thanks & Regards,
Nandesh Gowda

07 November 2016

UI Elements Removal : NAV Server Configuration Setting

Hi All,

This Setting was available in NAV 2013 R2 as a boolean, later it got changed to a option field.

What is the relevance of this configuration setting :

Depending on the setting in the UI Elements Removal field in the Microsoft Dynamics NAV Server Administration tool, only user interface (UI) elements on objects in the license or on objects that the user has permissions to will appear in the user interface.

All types of UI elements will be removed if they relate to objects that are not included in the license or the user does not have the required permission to the objects:

1) Fields

2) Actions

3) Page parts

UI elements that are directly related to an object through the TableRelation or the CalcFormula property can be removed automatically according to the license file and/or user permissions.

For UI elements that are not directly related to an object, you can use the AccessByPermission property to remove the element according to the user’s permission to a related object. For more information, see How to: Remove UI Elements Using the AccessByPermission Property.

Below are the options available to select:

OptionDescription
NoneAll UI elements are displayed, even if the license file does not include the related object and the user does not have permissions to the related object.
LicenseFileA UI element is removed if the related object is not included in the license file.
LicenseFileAndUserPermissionsA UI element is removed if the related object is not included in the license file and the user does not have permissions to the object as defined in the AccessByPermission property for the related UI element.

By default, this option is selected.


Thanks & Regards,
Nandesh Gowda

03 November 2016

Upgrading to Microsoft Dynamics NAV 2017

Hi All,

Upgrading to Microsoft Dynamics NAV 2017

Below Link on MSDN provides an overview of how to upgrade to Microsoft Dynamics NAV 2017. The upgrade process depends on different factors, such as the version of Dynamics NAV that you are upgrading from, and the degree to which your solution differs from the standard version of Dynamics NAV. The mains tasks range from converting the database to upgrading application code and data.


https://msdn.microsoft.com/en-us/dynamics-nav/upgrading-to-microsoft-dynamics-nav-2017

Thanks & Regards,
Nandesh Gowda

Reporting data setup tool NAV 2017 using Assisted Setup

Hi All,

Reporting data setup tool NAV 2017 using Assisted Setup

Assisted Setup : Its a wizard kind of feature introduced in NAV 2017 to help users complete the setup with ease.

Below in the screenshot you can see pre defined Assisted setup's readily available in NAV 2017.


We will discuss on report data set setup in this post.

Microsoft Dynamics NAV 2017 contains an easy to use tool that enables any user the ability to create rich and impactful datasets that they may use in Excel, PowerBI, or any other reporting tool that has the ability to connect to an OData source.

The age old problem with these types of tools is that you need to have in-depth knowledge of the data structure for your financial application.  This tool is different.  Simply select from data sources that are familiar to the user, such as a customer list or sales invoice list and begin defining your data immediately.

Available Data sources include:

  • List Pages
  • Queries


1) Search for Assisted Setup Page

The assisted setup is another new feature in NAV 2017 that enables users to perform setup functionality in an easy to use wizard format.

2) From the Assisted Setup page, Please select option for Set up reporting.


3) This will open the wizard to create a new OData end point that can be used in Excel, Power BI, PowerApps, or Microsoft Flow. Click on Next.


4) We will get 3 options i.e. Create a new data set, Create a copy of an existing data set and Edit an existing data set.

We will create a new reporting data set.Click on Next.


5) Please specify the Name for data set, we can choose from Page and Query Data Source Type.
I have selected Page Data Source Type and Item List page.

6) Please select the fields needed in the data set, and we can also give filters for the data set.


7) Finally Publish the data set. System will create OData Endpoint that can be used in Excel, Power BI, PowerApps, or Microsoft Flow.


8) We can verify the data set from excel. please open excel and connect to OData EndPoint


9) Connect to OData Endpoint with your NAV credentials and select the Item List data set.


10) Click on Next and then Finish. You can see the Item list data in excel.


Thanks & Regards,
Nandesh Gowda

Custom Email Cover Layouts Microsoft Dynamics NAV 2017

Hi All,

In Microsoft Dynamics NAV 2017 you can now create beautiful, professional looking email cover letter templates, including images, and invoice information such as totals, due date and payment terms, and use these when sending emails to customers.

The cover letters are created using the RDLC or Word report layout customization features, allowing visual consistency with any attached, detailed PDF documents.

Below is small demo :

1) Go to Customers and click on Document Layouts 

2) Select Usage whether for Quote, Order, Invoice, etc and then select Report ID for the same as shown below in screenshot.

3) Below I have selected for  Invoice. You can also enter an email address for the document if you want it to be sent to a different address than the one specified on the customer card.

4)  Use for Email Body if ticked  and you don't specify Email Body Layout Description then system will pick the default Layout for the Report as a template for email message.


5) If Email Body Layout Description is selected then the Email Template will be as per the selected Layout.


6) We can test the same from Posted Sales Invoices. Click on Send Action Item and Then  Press OK.


7) Now you can see the Email Body reflecting the one selected in Document Layouts on Customer Card,

8) You can choose from Message Content whether to use the default Email template specified on customer card or you can write your own Custom Message as well.


9) You can create your own Word Layouts and Import it in Custom Report Layouts.


Thanks & Regards,
Nandesh Gowda


Build Restriction NAV Server Configuration Setting

Hi All,

Build Restriction Configuration Setting is available in NAV 2017 as well where in we can restrict NAV Clients connecting to NAV Server having different build.

Values :

AlwaysConnect :

WarnClient :
Before connecting the client to the server instance, a message appears that informs the user that the build versions for the client and server instance are different. The user can choose to continue or cancel the connection.

DoNotAllow :
A message appears that informs the user that the client and server instance build versions are different, and the client does not connect to the server instance.

Default: WarnClient


Note: With the Microsoft Dynamics NAV Web client and Microsoft Dynamics NAV Tablet client, this setting compares the build version of the Microsoft Dynamics NAV Web Server components on IIS with the Microsoft Dynamics NAV Server instance. It controls the connection between Microsoft Dynamics NAV Web Server components and the server instance.

Thanks & Regards,
Nandesh Gowda

Smart Notification for Customers NAV 2017

Hi All,

Smart Notification for Customers NAV 2017

You may be aware of the Credit Limit warning that we get during creation of Sales Order if the Credit Limit exceeds for the customer.

Similarly there are other warnings/notifications like the Item availability, Posting outside fiscal year, etc.

All these Warnings/Notifications can now be controlled from My Notifications Page.

User can see the Notifications at top of the page in the notification bar as shown below in the screenshot and user can continue working as it doesn't require user action. These Notifications are non-modal and are part of UI Notifications.


My Notifications Page

We can disable the warning by unticking the Enabled Column.


Also, we can give filters to Notifications as shown below.


Thanks & Regards,
Nandesh Gowda

Item Attributes & Item Categories NAV 2017

Hi All,

Item Attributes NAV 2017:

You can use item attributes to add custom data, such as color, country of manufacture, size, or product dimensions, to applicable items, supplementing built-in global item fields.


You can define your own type of attribute options, including list, text, integer, and decimal, along with unit of measure for the two latter numeric types. You can also block attributes or attribute option values from being used in the future, for example, if they are no longer applicable.


You can add Item attributes as shown below from Item master. You can see the Item Attributes in the factbox as well after adding.


When you add items to sales and purchase documents, or just organize your items, you can view and filter on the attribute values to limit the list of items to choose from or take action on.


Item Categories :

You can use item categories to group items into a hierarchical structure and you can define your own custom categories, assigning attributes to each category.

When you add items to a category, the items inherit the attributes of the category, ensuring a common set of attributes on items in the same category, and saving you time. If required, you can still assign item specific attributes to particular items.


Thanks & Regards,
Nandesh Gowda

Disable Save as Excel or Word on Request Page of RDLC Report and Save as Button from Report Preview NAV 2017

Hi All,

Enable Save as Excel or Word on Request Page of RDLC - Layout Reports and  Enable Save from Report Preview : NAV 2017

These Configuration settings were available from previous versions but anyways we will discuss the same now with NAV 2017 as well.

When we run the report we get option on request page to Save as Excel, Word or PDF.


Similarly when we preview the report we get Save as option as shown below in Screenshot.


We can disable the Save as Word and Excel  from Print Button of Request Page of Reports and Save as option from preview Report by unticking below configuration.


Please save and restart the service. Now we can see the options are hidden.


Thanks & Regards,
Nandesh Gowda