25 December 2016

Developing Extensions in Visual Studio Code with New Development environment NAV

Hi All,

Visual Studio Code and the AL Extension lets you do the following tasks
  • Create new files for your solution
  • Get assistance with creating the appropriate configuration and setting files
  • Use code snippets that provide templates for coding application objects
  • Get compiler validation while coding
  • Press F5 to publish your changes and see your code running
Visual Studio Code manages projects by including all files from a directory. Whatever files exist in that directory are then part of your project.

In addition there are two other configuration files; app.json and launch.json. You can define these yourself, possibly by copying the files from sample code or you can have the system autogenerate them for you.

Building the solution (Ctrl+Shift+B) will create the app.json file and publishing (F5) will generate the launch.json file. Within these files, you’ll need to set up some parameters to connect to your server.

Ex: Here we will create an Extension to an Item table with a new field and add a validation to the new field created.

1) First Create a Project Folder and select that Folder from Visual Studio Code. Or you can start from Visual Studio Code and create folder and files from there itself.
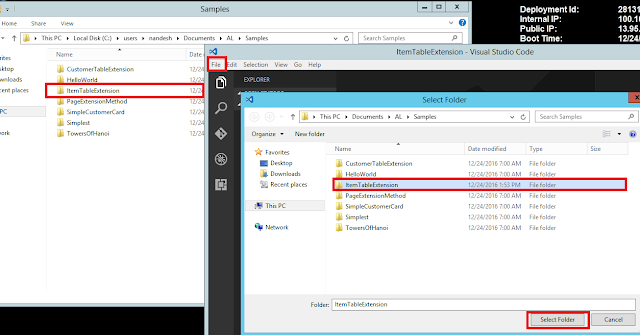


2) You can Copy the launch.json and app.json file from other sample projects or else you can allow visual studio to create it automatically during building and publishing the project.

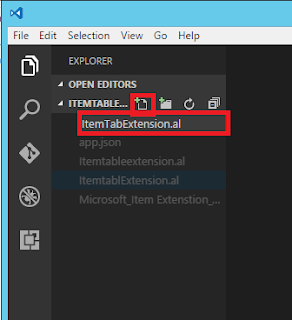
3) Add New file by clicking on New Icon and give it a Name and save it as .al extension. Saving it in .al extension will activate the AL Language Extension for Visual Studio Code. In the same file we will add our code.


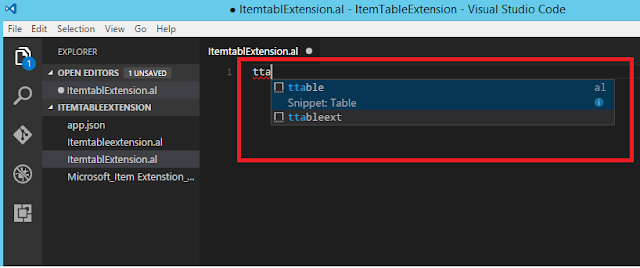
4) Now in the Code Editor type in ttableext and the IntelliSense will bring in the code snippet for you.


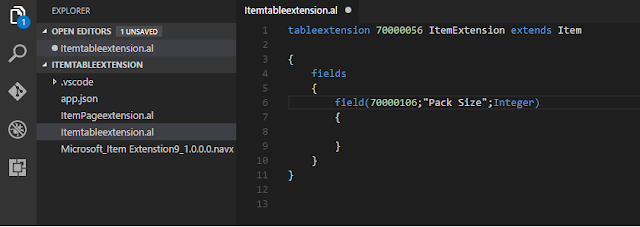
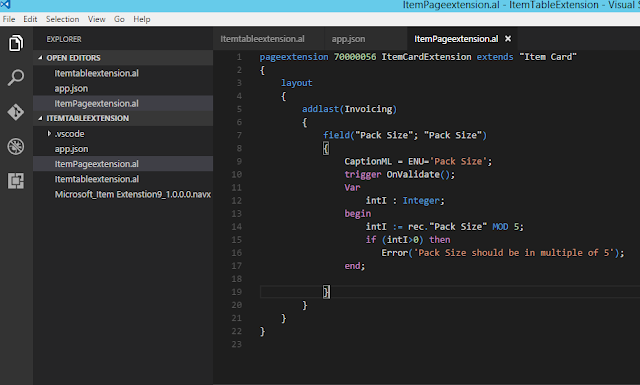
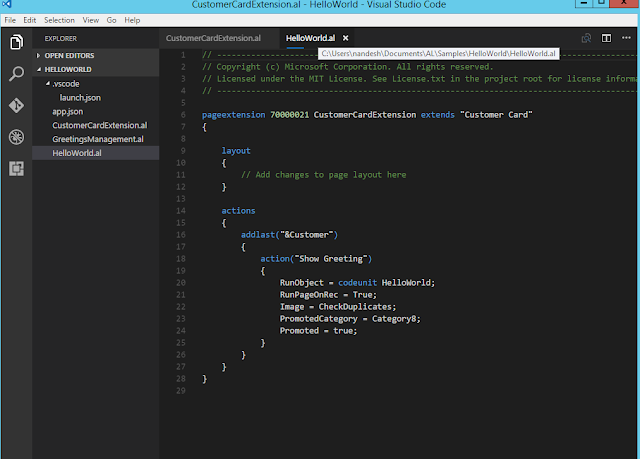
5) Now change the code to add new field on Item table and similarly add the new field on item card page with validation on it by using page extension.

Below is for table extension


Below is for page extension


6) Now press Ctrl+Shift+B to build the solution and resolve if any errors. It will create .navx extension file.


And press F5 to publish the Package which is created on to NAV server.


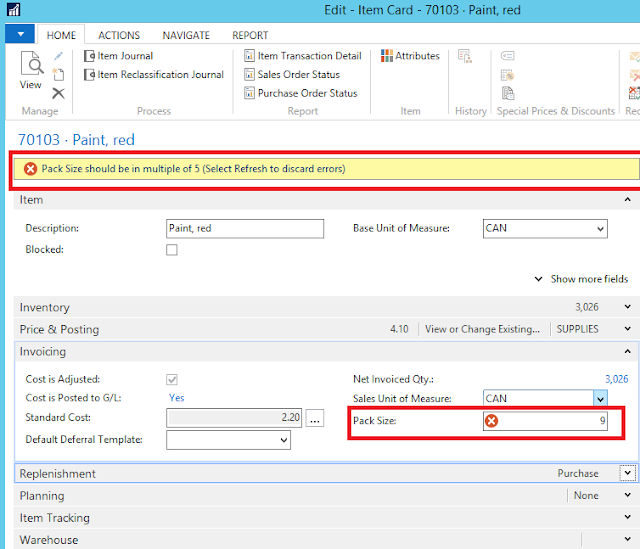
7) Now let us verify whether the field has been added from NAV RTC and whether our validation is working. You can also see the published/installed extensions under Extensions Page in NAV RTC.


Note:

Below are the settings available in app.json and launch.json files.

Settings in the app.json file:
SettingMandatoryValue
idYesThe unique ID of the extension. When app.json file is automatically created, the ID is set to a new GUID value.
nameYesThe unique extension name.
publisherYesThe name of your publisher, for example: NAV PartnerLLC
applicationYes, if base application objects are extended or referencedThe minimal supported version and locale of the base application to extend, for example: { "version": "10.0.0.0", "locale": "W1" }
platformYes, if system tables are referenced in the extensionThe minimal supported version of the platform symbol package file, for example: "10.0.0.0". See the List of objects in the platform symbol file section below for the list of object symbols contained in the platform symbol package file.
packageCachePathYes, if base application is extended or system tables are referencedThe path to the folder where referenced symbol package files are located. The path could either be absolute or relative to the current extension working directory, for example: "../../resources"
Settings in the launch.json file:
SettingMandatoryValue
serverYes, if connecting to an on-premises serverThe HTTP URL of your server, for example: http://localhost
serverInstanceYes, if connecting to an on-premises serverThe instance name of your server, for example: NAV
portNoThe port on which the development endpoint is running on the server, default value: 7049
tenantNoThe tenant ID in case the server is configured for multitenancy.
windowsAuthenticationNoSpecifies whether Windows or Azure authentication should be used for publishing the extension. Currently only Windows authentication is supported.
startupObjectIdNoThe ID of the startup object to launch when you press F5. Currently only objects of type Page are supported.


Thanks & Regards,
Nandesh Gowda
24 December 2016

Understanding Objects and Sample Code Snippet Extensions for New Development Environment

Hi All,

In my last post I discussed on how to setup Azure 30 days free trial subscription and install a New VM for trying out New Development Environment. Below is the link for the same post.

https://nandeshgowda-navblog.blogspot.in/2016/12/developing-extensions-using-new.html


Understanding Objects in Dynamics NAV

All functionality in Dynamics NAV is coded in objects. Table objects define the table schema that holds data, page objects represent the pages seen in the user interface and codeunits contain code for logical calculations and for the application behavior. These objects are stored as code, known as AL code, and are saved in files with the .al file extension.

Note
A single .al file may contain multiple objects.

For Table Object please refer below MSDN Link
https://msdn.microsoft.com/en-us/dynamics-nav/newdev-table-object

For Page Object please refer below MSDN Link
https://msdn.microsoft.com/en-us/dynamics-nav/newdev-page-object

For Codeunit Object please refer below MSDN Link
https://msdn.microsoft.com/en-us/dynamics-nav/newdev-codeunit-object

There are two other special objects which are specifically used for building extensions. Table extension objects and page extension objects are used for defining additive or overriding changes to table or page objects.

For example, an extension for managing a business that sells organic food may define a table extension object for the Item table that contains an additional field Organic and Produced Locally. The Organic and Produced Locally fields aren't usually present in the Item table, but through the table extension these data fields will now be available to store data in and to access from code.

You can then use the page extension object to display the fields that you added to the table object.

Note :
Table and page extension objects can have a name with a maximum length of 30 characters.


1) Table Extension Object :

The table extension object allows you to add additional fields or to change some properties on a table provided by the Dynamics NAV service. In this way, you can add data to the same table and treat it as a single table.

For example, you may wish to create a table extension for a retail winter sports store. In your solution you want to have ShoeSize as an additional field on the customer table. Adding this as an extension allows you to write code for the customer record and also include values for the ShoeSize.

Along with defining other fields, the table extension is where you write trigger code for your additional fields.

Snippet support :
Typing the shortcut ttableext will create the basic layout for a table extension object when using the AL Extension in Visual Studio Code.

Properties:
Using a table extension allows you to overwrite some properties on fields in the base table. The following properties can be changed.

  • OptionCaptionML
  • ClosingDates
  • Description
  • Width

Table Extension example :
This table extension object extends the Customer table object by adding a field ShoeSize, with ID 70000900 and the data type Integer. It also contains a procedure to check if the ShoeSize field is filled in.
tableextension 70000020 RetailWinterSportsStore extends Customer
{
    fields
    {
        field(70000900;ShoeSize;Integer) 
        {
            trigger OnValidate();
            begin
                if (rec.ShoeSize < 0) then
                begin
                   message('Shoe size not valid: %1', rec.ShoeSize);
                end;                    
            end;
        }
    }

    procedure HasShoeSize() : Boolean;
    begin
        exit(ShoeSize <> 0);
    end;

    trigger OnBeforeInsert();
    begin
        if not HasShoeSize then
            ShoeSize := Random(42);
    end;
}

2) Page Extension Object

The page extension object extends a Dynamics NAV page object and adds or overrides the functionality.

The structure of a page is hierarchical and breaks down into three sections. The first block contains metadata for the overall page; the type of the page and the source table it is showing data from. The next section; the layout, describes the visual parts on the page. The final section details the actions that are published on the page.

In the layout section, you can use the following functions to place page fields and groups on the page. Similarly, in the actions section, you use these functions to place actions in the ribbon.

Function exampleApplies to...
addfirst(General)Groups only
addlast(General)Groups only
addafter(AddressDetails; "Post Code")Fields and groups
addbefore(AddressDetails; "Post Code")Fields and groups
movefirst(General)Groups only
movelast(General)Groups only
moveafter(AddressDetails; "Post Code")Fields and groups
movebefore(AddressDetails; "Post Code")Fields and groups

If you want to modify existing fields and groups on a page, you use the modify() function. See the code example below for syntax.

Snippet support :
Typing the shortcut tpageext will create the basic layout for a table object when using the AL Extension in Visual Studio Code.

Page Extension example :
The following page extension object extends the Customer Card page object by adding a field control ShoeSize to the General group on the page. The field control is added as the last control in the group using the addlast function. In the actions area, you can see what the syntax looks like for actions that execute triggers and actions that run objects.

pageextension 70000020 CustomerCardExtension extends "Customer Card"
{
    layout
    {
        addlast(General)
        {
            field("Shoe Size"; ShoeSize)
            {
                CaptionML = ENU='ShoeSize';

                trigger OnValidate();
                begin
                    if ShoeSize < 10 then
                        Error('Feet too small');
                end;
            }
        }

        modify("Address 2")
        {
            CaptionML = ENU='New Address 2';
        }
    }

    actions
    {
        addlast(Creation)
        {
            group(MyActionGroup)
            {
                Action(MyAction1)
                {
                    CaptionML = ENU='Hello!';

                    trigger OnAction();
                    begin
                        Message('My message');
                    end;
                }

                Action(MyAction2)
                {
                    RunObject = codeunit "Activities Mgt.";
                }
            }
        }
    }

   var
        Msg : TextConst ENU='Hello from my method';

    trigger OnOpenPage();
    begin
        Message(Msg);
    end;
}


Thanks & Regards,
Nandesh Gowda

Using the New Dynamics NAV In-Client Designer

Hi All,

Using the Dynamics NAV In-Client Designer

With the Dynamics NAV in-client designer, you can create extensions using drag-and-drop inside the client. With this preview of the in-client designer, you can:
  • Enter and exit design mode
  • Move fields around
  • Add existing fields
  • Preview your design (desktop, tablet, and phone preview)
  • Save the extension for the tenant
Adding a field

The in-client designer is switched on by choosing the design icon in the ribbon top right corner from any page that you want to make modifications to, and then choosing More.

In design mode you modify the current page; you can add existing table fields, move fields around, or remove fields from the page.


Note :
With this preview you can only add existing table fields. Adding pages, groups, parts, and actions is not yet supported.

Use the add field functionality to add a field to the page. You will get a pane to the right where you can see all of the table fields that are available for the specific page.

The table fields displayed are based on the underlying table or tables. The field can have a status of Placed, which means that the field already exists on the page.
A status of Ready means that the field doesn't already exist on the page, and that you can place it.

You can Remove field by clicking on any of the field on the page.


When you modify subpages on a given page, a square is displayed to mark the area that you can move a field within. This is also true for FactBoxes.


Change a FastTab caption by clicking the caption and start writing.


The display type icons let you preview the changes you made on desktop, tablet, and phone clients. This way you can make sure that your design will work on the intended display target(s).
You can flip to display tablet and phone designs in landscape as well.


All the UI changes are stored as Extensions.


Thanks & Regards,
Nandesh Gowda

Developing Extensions Using the New Development Environment Getting Started NAV

Hi All,

The Microsoft Dynamics NAV ‘Tenerife’ Developer Preview is still evolving with frequent update.

Extensions are a programming model where functionality is defined as an addition to existing objects and defines how they are different or modify the behavior of the solution.

Below link on MSDN section explains how you can develop extensions using the new development environment for Dynamics NAV.

https://msdn.microsoft.com/en-us/dynamics-nav/newdev-dev-overview.

For previous post on Extensions on my blog please refer below links.

https://nandeshgowda-navblog.blogspot.in/2016/11/extending-microsoft-dynamics-nav-using.html

https://nandeshgowda-navblog.blogspot.in/2016/11/developing-extension-package-nav.html


Here we will discuss on how to get started with the new Development Environment.

To get started writing extensions for Dynamics NAV you will need a Dynamics NAV tenant, and Visual Studio Code. Visual Studio Code is a cross platform editor that you will use for coding and debugging.

For the preview, you will download a VM from the Microsoft Azure Gallery which is set up for trying out the new development environment.
Steps :
1) First, you will need an Azure subscription. You can sign up for a free subscription.

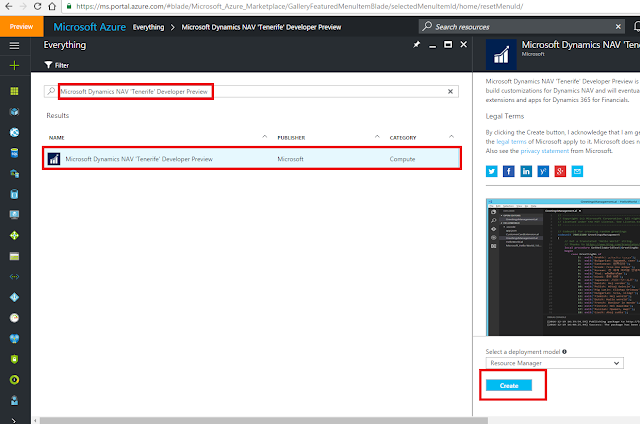
2) Go to Microsoft Azure Marketplace and search for Microsoft Dynamics NAV Developer Preview. Then click on Create to create new Virtual Machine.


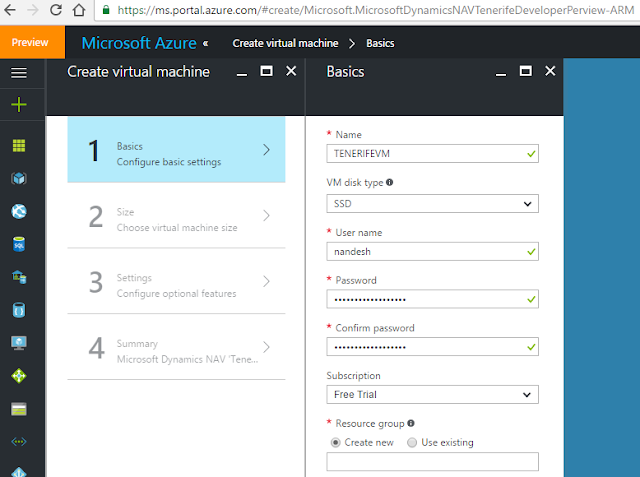
3) Fill in the various details and create a new virtual machine. It will take 10-15 mins to create the same.


4) Now connect to VM with the Login credentials given while creating VM.


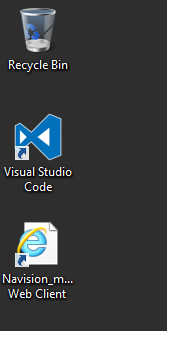
5)  If you can't see Visual Studio Shortcut on Desktop, Open C:\Demo folder and run the script called Install New Developer Experience.ps1 and select Run with Powershell.


6) After Installing you can see the Visual Studio Shortcut on Desktop.


7) Now Open the New Visual Studio Code Editor


Thanks & Regards,
Nandesh Gowda
10 December 2016

The remote certificate is invalid according to the validation procedure SMTP NAV

Hi All,

The remote certificate is invalid according to the validation procedure

The above error may come while sending mails through SMTP in NAV.

The reason may be you have setup Secured Connection in SMTP setup in NAV, while the SMTP Server doesn't have valid certificate to accept the secure connection.

You can  install a valid certificate on Server or you can untick Secured Connection in SMTP setup to connect with unsecured connection.

Thanks & Regards,
Nandesh Gowda
There is a Communication protocol mismatch between the client and the server for NAV 2013 R2

Hi All,

There is a Communication protocol mismatch between the client and the server.

You may get above error while connecting to NAV RTC Client in NAV 2013 or NAV 2013 R2.

The error is due to the mismatch of Configuration Settings between ClientUserSettings.config file on Client with the NAV Server Instance Configuration Settings.

For Ex :  ClientServicesCredentialType is set to NavUserPassword on ClientUserSettings.config

and the Credential Type set on NAV Server Instance is Windows.


Thanks & Regards,
Nandesh Gowda

To add a Microsoft Dynamics NAV web server instance

Hi All, 

To add a Microsoft Dynamics NAV web server instance

1) On the computer or virtual machine that is running Microsoft Dynamics NAV Server, run Microsoft Dynamics NAV Administration Shell as an Administrator.

  • Choose Start, in the Search box, type Microsoft Dynamics NAV Administration Shell.
  • Right-click the related link, and then choose Run as Administrator.
2) At the command prompt, type the following command:

New-NAVWebServerInstance -WebServerInstance -Server -ServerInstance -ClientServicesCredentialType

Specifies the name that you want to give the Microsoft Dynamics NAV Web client application instance. This name will become part of the URL for the Microsoft Dynamics NAV Web client application, for example, http://MyWebServer:8080/MyWebApp/WebClient.

Specifies the name of the computer that is running the Microsoft Dynamics NAV Server to connect the Microsoft Dynamics NAV web server to. 

Specifies the name of the Microsoft Dynamics NAV Server instance to connect the web server instance to. 

Specifies the credential type that is configured for the Microsoft Dynamics NAV Web client and Microsoft Dynamics NAV Server. Valid options are NavUserPassword, Windows, UserName, and AccessControlService. The default value is NavUserPassword.
Note :
The command that is shown includes only the required parameters of the NAVWebServerInstance cmdlet. The cmdlet has several other parameters that can be used to configure the web server instance. 

3.Press Enter to run the cmdlet.

A new Microsoft Dynamics NAV web server instance with the specified name is added to the Microsoft Dynamics NAV Web client site on IIS

If you want to change the configuration of the new Microsoft Dynamics NAV web server instance after it has been added, modify the web.config file. 


Thanks & Regards, 
Nandesh Gowda


A fatal error occurred. The connection to SQL server cannot be established NAV

Hi All,

When you try to open Microsoft Dynamics NAV Web client, you get the following error:

A fatal error occurred. The connection to SQL server cannot be established or is no longer usable.

There can be various causes of this error. The most common causes are that Microsoft Dynamics NAV Server has stopped or the connection to SQL Server is not configured correctly.

Resolution :

1) Microsoft Dynamics NAV Server connects to the correct database by using the correct login account. You can verify this by using the Microsoft Dynamics NAV Server Administration tool.


2) Login account has the following permissions:


  • Set up as a user in the Microsoft Dynamics NAV database on SQL Server with the following role memberships: db_datareader, db_datawriter, and db_ddladmin. 

3) SQL Server has the following configurations:

  • TCP/IP protocol is enabled.
  • SQL Server executable file is allowed through the Windows Firewall.


  • SQL Server Browser Service is running. This is required only when Microsoft Dynamics NAV used a named database instance, such as NAVDEMO, and Microsoft Dynamics NAV Server is on a different computer than SQL Server. 

For more information, see Troubleshooting: SQL Server Connection Problems.


Thanks & Regards,
Nandesh Gowda

A server error occurred and the content cannot be displayed NAV Web Client

Hi All,

When you try to open the Microsoft Dynamics NAV Web client, you get the following error:

A server error occurred, and the content cannot be displayed. Refresh the page or open a new browser window.

In the Event Viewer of the computer that is running Microsoft Dynamics NAV Web Server components, the Windows application log includes the following event:

Message: A server was not found at “net.tcp://navserver:7046/DynamicsNAV71/Service”. Either the URL is incorrect or the server is currently not available. 

This error occurs when the Microsoft Dynamics NAV Web client cannot connect to Microsoft Dynamics NAV Server. 

To resolve this error, verify that the following conditions are met:

• The Microsoft Dynamics NAV Web client is configured to connect to the correct Microsoft Dynamics NAV Server. Also please check the Server Instance, Port No.,Credential Type,etc and other configuration settings in Web.Config File.

• The logon account of Microsoft Dynamics NAV Server has permission to log on as a service on the computer that is running Microsoft Dynamics NAV Server.

• If you are using Mozilla Firefox as your browser, then you must enable cookies in the browser. Additionally, configure the address of the Microsoft Dynamics NAV Web client as a trusted URI in Firefox. For more information, see How to: Configure Mozilla Firefox for Microsoft Dynamics NAV Clients.

• If IIS and the Microsoft Dynamics NAV Server are on separate computers, verify the following conditions:

1) If the Microsoft Dynamics NAV Web client is using Windows authentication, then the Negotiate provider must be included at the top of the providers list in the Windows authentication setup in IIS. For more information, see Configuring the Credential Type on the Microsoft Dynamics NAV Web Client Website.

2) Delegation is configured from the computer that is running IIS to the computer that is running Microsoft Dynamics NAV Server, including the following:

  • Kernel mode authentication is either disabled or configured to use the service account of Microsoft Dynamics NAV Server (Microsoft Dynamics NAV Web client only).
  • The following Service Principal Names are registered for the logon account of Microsoft Dynamics NAV Server:

DynamicsNAV/navserver:port

DynamicsNAV/navserver.domain:port

If you still get this error after verifying the setup, then disable the Use Kerberos Only option in the delegation setup and try again. The Use Kerberos Only option does not work on some network configurations with Microsoft Dynamics NAV.


Thanks & Regards,
Nandesh Gowda