Showing posts with label NAV 2016. Show all posts

06 March 2017

GST- India Released for NAV 2016

Hi All,

Microsoft has released GST- Goods & Service Tax- India which is soon going to be implemented in India with proposed date of 1st July, 2017.


The GST is included with the release of NAV 2016 Cumulative Update 17. Below is the download link for the same.
https://www.microsoft.com/en-us/download/details.aspx?id=54804

Below is the Link to White paper for GST-India
https://mbs.microsoft.com/partnersource/global/deployment/downloads/tax-regulatory-updates/nav2016gstindia


Thanks & Regards,
Nandesh Gowda

Cumulative Update 17 released for NAV 2016

Hi All,

Microsoft has released Cumulative Update 17 for NAV 2016.

Below is the link to download page for the same.
https://www.microsoft.com/en-us/download/details.aspx?id=54804


Thanks & Regards,
Nandesh Gowda

04 February 2017

Application Worksheet NAV

Hi All,

You can view and change item application entries that are automatically created between item ledger entries during item transactions.

When you post a transaction where items are moved in or out of inventory, an item application is created between each inventory increase and inventory decrease.

These applications determine the flow of costs from the goods that are received in inventory to the cost of goods going out of inventory.

Because of the way the unit cost is calculated, an incorrect item application could lead to a skewed average cost and a skewed unit cost.

You can undo an application or reapply the item ledger entries. Below scenario's may require you to do so.

  • You have forgotten to make a fixed application.
  • You have made an incorrect fixed application.
  • You have to return an item to which a sale has already been applied.

You can view the Applied Entries for an Item Ledger Entry by clicking on the Application Worksheet--> Applied Entries.
Also you can remove the Application by clicking on the Remove Application action.


To Reapply an item application: Click on Unapplied Entries and then select the Entry against which to apply and press OK


If possible, use a document to reapply an item ledger entry. For example, if you must make a purchase return of an item to which a sale has already been applied, you can reapply by creating and posting the purchase return document by using the correct application in the Appl.-to Item Entry field on the purchase return line.

You can use the Get Posted Document Lines to Reverse function or the Copy Document function in the purchase return document to make this easier. When you post the document, the item ledger entry is automatically reapplied.

If you cannot use a document to reapply, such as when you have to correct a fixed application, then use the Application Worksheet window to correct an application.

Hh176934.Warning(en-us,NAV.90).gifWarning
The following are important considerations to remember when you are working with the application worksheet:
  • You should not leave application entries unapplied for long periods of time because other users cannot process the items until you reapply the application entries or close the Application Worksheet window. Users who try to perform actions that involve a manually unapplied application entry receive the following error message:“You cannot perform this action because entries for item XXX are unapplied in the Application Worksheet by user XXX.”
  • You should only reapply item ledger entries during nonworking hours to avoid conflicts with other users who are posting transactions with the same items.
  • When you close the application worksheet, Microsoft Dynamics NAV performs a check to make sure that all entries are applied. For example, if you remove a quantity application but do not create a new application, and then you close the application worksheet, a new application is created. This helps keep the cost intact. However, if you remove a fixed application, a new fixed application is not automatically created when you close the worksheet. You must do this manually by creating a new application in the worksheet.
  • It is possible to remove applications from more than one entry at a time in the application worksheet. However, because applying entries affects the set of entries that are available for application, you cannot create an application for more than one entry at a time.
  • The application worksheet cannot make an application in the following situation: If there is not enough quantity on stock to apply, the application worksheet cannot make an application when you are trying to apply an inventory decrease entry without item tracking information to an inventory increase entry with item tracking information.


Thanks & Regards,
Nandesh Gowda

21 January 2017

Defer Revenues and Expenses, Deferral Templates NAV

Hi All,

To recognize revenues and expenses in periods other than the period in which the transaction is posted, you can use functionality to automatically defer revenues and expenses over a specified schedule.

Deferral functionality is available on sales documents, purchase documents, and in the general journal. The functionality provides benefits, such as:
  • Reduced time and effort to defer revenues and expenses after transactions are posted.
  • Easy reporting on deferred amounts for customers, vendors, and G/L accounts.

Here we will discuss on Deferring Expenses pertaining to Advertising for 1 year and how to distribute the Amount to respective period.

1)  To set up a G/L account for deferred expenses 

Go to Chart of Accounts and create a New G/L Account of Type Balance Sheet , where the deferred expenses will be posted to. Name the account, for example, Prepaid Advertising Expenses.


2) To set up a deferral template

Search for Deferral Template Page and create New Template. Select the G/L Account created in above step to post deferred expenses.


Please refer below table on how to fill in the Deferral template.
FieldDescription
Deferral Code
Identify the deferral template.
Description
Describe the deferral template.
Deferral Account
Specify the G/L account that the deferred expenses are posted to.
Deferral %
Specify how much of the total amount will be deferred.
Calc. Method
Specify how the Amount field for each period in the Deferral Schedule window is calculated. You can choose between the following options:
  • Straight-Line: The periodic deferral amounts are calculated according to the number of periods, distributed according to period length.
  • Equal Per Period: The periodic deferral amounts are calculated according to the number of periods, distributed evenly on periods.
  • Days Per Period: The periodic deferral amounts are calculated according to the number of days in the period.
  • User-Defined: The periodic deferral amounts are not calculated. You must manually fill the Amount field for each period in the Deferral Schedule window. For more information, see the “To change a deferral schedule from a purchase invoice” section.
Start Date
Specify when to start calculating deferral amounts. You can choose between the following options:
  • Posting Date: The start date used when calculating deferral amounts is the posting date of the invoice.
  • Beginning of Period: The start date used when calculating deferral amounts is the first day of the accounting period in which the posting date falls.
  • End of Period: The start date used when calculating deferral amounts is the last day of the accounting period in which the posting date falls.
  • Beginning of Next Period: The start date used when calculating deferral amounts is the first day of the accounting period that follows the accounting period in which the posting date falls.
No. of Periods
Specify how many accounting periods the total amounts will be deferred to.
Period Desc.
Specify a description that will be shown on entries for the deferral posting.
You can enter the following placeholder codes for typical values, which will be inserted automatically when the period description is displayed.
  • %1 = The day number of the period posting date
  • %2 = The week number of the period posting date
  • %3 = The month number of the period posting date
  • %4 = The month name of the period posting date
  • %5 = The accounting period name of the period posting date
  • %6 = The fiscal year of the period posting date
Example: The posting date is 02/06/2016. If you enter “Expenses deferral for %4 %6”, then the description displayed will be Expenses deferral for February 2016.

3)  To assign a deferral template to an Item, G/L Account, etc.

Assign the Deferral Template to an Expense Account


4) Create a Purchase Invoice taking the G/L Account to which we tagged Deferral Template.

As soon as we select the G/L Account, the Deferral Code is filled in by default.


Now go to Lines FastTab-->Line --> Deferral Schedule to view the Deferral Calculation.


You can see system has divided the Amount into no of periods we specified in the setup.

You can also change the Deferral Amount here as well on Header or Line and then click Calculate Schedule


5)  You can Preview how deferral expenses will be posted to GL. You can see initially the Expense will be posted to Deferral Account and then the expenses are moved to actual Expense Account for each period.


6) Now post the entries, to review posted deferrals run Purchasing Deferral Summary report.


Similarly you can  Defer Revenues to the Period of Delivery .
Please refer below link
https://msdn.microsoft.com/en-us/library/mt574363(v=nav.90).aspx


Thanks & Regards,
Nandesh Gowda

01 January 2017

Inventory Revaluation NAV


Hi All,

The inventory value of an item can change over time, for example, as a result of damage or age.

If you want to change the inventory value of an item or a specific item ledger entry, you must use the revaluation journal in NAV.

You can also use the revaluation journal to correct incorrect posted documents.

You must first run the Adjust Cost - Item Entries batch job before you revalue the inventory so that all the cost is adjusted.

To update cost of items with costing method as Standard the process is little different.

For ex : To revalue items other than Standard Costing method we can follow below process

Screenshot of Item Card


Go to Revaluation Journal Page

There are two ways of filling in the journal with information about the current, calculated value of the specified item:

You can enter a line manually and link it to an item ledger entry in the Applies-to Entry field. This will change the inventory value of all units of this item ledger entry. It will also change the inventory value of the units that are applied to this item ledger entry, regardless of their posting date.

OR

You can fill in the journal by using the Calculate Inventory Value batch job. This method allows you to specify exactly how the revaluation will change the inventory value of an item or item ledger entry. The revaluation will be valid for entries relating to this item or item ledger entry from the posting date of the revaluation journal.

Using Calculate Inventory Value batch job.


Posting Date : You can set the date on which you want to revalue.

Calculate Per : Whether you need to sum inventory value by Item (Location, variant) or Per Item Ledger Entry.

Update Standard Cost :Select this field if you want the program to update the standard cost on the item card. If the item is in stock on the posting date of the revaluation, a revaluation journal line will be created.

The standard cost on the item card will then be updated when the revaluation journal line is posted. If the item is not in stock on the posting date, then the standard cost on the item card will be updated immediately.

Calculation Base: In this field, you can specify how the revaluation journal will suggest a new value for the Unit Cost (Revalued) field.

The options are:
: The revaluation journal will suggest the same value as in the Unit Cost (Calculated) field .

• Last Direct Unit Cost: The revaluation journal will calculate the value in the field based on the Last Direct Unit Cost on the Stockkeeping Unit card or the Item card.

• Standard Cost - Assembly List: The revaluation journal will calculate the value in the field based on the bill of materials.

• Standard Cost - Manufacturing : The revaluation journal will calculate the value in the field based on the production BOM.


Now you can change the Unit Cost (Revalued) field with the new value and post the revaluation journal.


Alternatively you can enter revaluation journal  manually by selecting the Item No. and Applies-to Entry if you need to correct any single entry.


Once posted we can see the changes on Item card, system will pass a value entry and corresponding journal entries.


Process for Standard Cost Update :

1) Run the Adjust Cost - Item Entries batch job.
2) Run the Post Inventory Cost to G/L batch job.
3) Open the Standard Cost Worksheet and use one or more of the following functions:

  • Run the Suggest Item Standard Cost batch job.
  • Review the results and make changes as necessary.
  • Run the Suggest Work/Mach Ctr Std Cost batch job.
  • Review the results and make changes as necessary.

4) Run the Roll Up Standard Cost batch job.
5) Review the results and make changes as necessary.
6) Run the Implement Standard Cost Change batch job.
  • Enter the Posting Date, Document No. and the Item Journal Template & Batch.


7) Review and post the Revaluation Journal, which has been populated with entries from previous step in this process.


Thanks & Regards,
Nandesh Gowda

Item Charges NAV

Hi All,

Item Charges Functionality is used in NAV to enter/add charges such as Freight, Custom, Insurance, Clearing, etc. which is pertaining to Items and then link the charges to that Item to arrive at the exact cost of that item.

The item charge can be entered on a separate invoice or in the document where the items that the cost relates to are listed.

It is strongly recommended to pass all the expenses related to Item through Item Charges so that you can finally arrive at Landed Cost of the item being purchased instead of expensing it out using G/L Account directly.

Also, you can use Item Charges for any price difference for purchase or sale transactions.

To create a new Item Charge go to Item Charges page as shown below.

Enter the No. and Description and tag the Gen. Prod Posting Group to allow system to pick the expense account for charges.


Here we will create a separate Invoice and load the charge amount to Purchase receipt Lines.

Please create a Purchase Document and select Charge(Item) for Item Charges as shown below.
Enter the Quantity and Amount in Direct Unit Cost.


Now Go to Line and select the Item Charge Assignment Option


You can Load Charges on Purchase, Sales, Transfers and Return transactions.
Here we will load on Purchase Receipt Lines. so click on Get Receipt Lines and select the relevant Purchase Receipt Lines. Once selected click on OK.


System will give option to split the charge amount Equally or based on Amount. If you have Multiple Items or Multiple Purchase Receipts you may need to split the Charge Amount between those Item Lines.

or

Alternatively you can enter Qty to Assign to split the Amount.


After Assigning the Item Charge we will post the document and see the impact of the Item Charge on the main Item.


If you Navigate to the Purchase Receipt on which you loaded the Item Charge Amount , you will see system has created one more Value Entry with the Amount you distributed during assigning item charge. So the Cost of the Item for that particular receipt has increased by the Charge Amount.


Thanks & Regards,
Nandesh Gowda

10 December 2016

The remote certificate is invalid according to the validation procedure SMTP NAV

Hi All,

The remote certificate is invalid according to the validation procedure

The above error may come while sending mails through SMTP in NAV.

The reason may be you have setup Secured Connection in SMTP setup in NAV, while the SMTP Server doesn't have valid certificate to accept the secure connection.

You can  install a valid certificate on Server or you can untick Secured Connection in SMTP setup to connect with unsecured connection.

Thanks & Regards,
Nandesh Gowda

To add a Microsoft Dynamics NAV web server instance

Hi All, 

To add a Microsoft Dynamics NAV web server instance

1) On the computer or virtual machine that is running Microsoft Dynamics NAV Server, run Microsoft Dynamics NAV Administration Shell as an Administrator.

  • Choose Start, in the Search box, type Microsoft Dynamics NAV Administration Shell.
  • Right-click the related link, and then choose Run as Administrator.
2) At the command prompt, type the following command:

New-NAVWebServerInstance -WebServerInstance -Server -ServerInstance -ClientServicesCredentialType

Specifies the name that you want to give the Microsoft Dynamics NAV Web client application instance. This name will become part of the URL for the Microsoft Dynamics NAV Web client application, for example, http://MyWebServer:8080/MyWebApp/WebClient.

Specifies the name of the computer that is running the Microsoft Dynamics NAV Server to connect the Microsoft Dynamics NAV web server to. 

Specifies the name of the Microsoft Dynamics NAV Server instance to connect the web server instance to. 

Specifies the credential type that is configured for the Microsoft Dynamics NAV Web client and Microsoft Dynamics NAV Server. Valid options are NavUserPassword, Windows, UserName, and AccessControlService. The default value is NavUserPassword.
Note :
The command that is shown includes only the required parameters of the NAVWebServerInstance cmdlet. The cmdlet has several other parameters that can be used to configure the web server instance. 

3.Press Enter to run the cmdlet.

A new Microsoft Dynamics NAV web server instance with the specified name is added to the Microsoft Dynamics NAV Web client site on IIS

If you want to change the configuration of the new Microsoft Dynamics NAV web server instance after it has been added, modify the web.config file. 


Thanks & Regards, 
Nandesh Gowda


A fatal error occurred. The connection to SQL server cannot be established NAV

Hi All,

When you try to open Microsoft Dynamics NAV Web client, you get the following error:

A fatal error occurred. The connection to SQL server cannot be established or is no longer usable.

There can be various causes of this error. The most common causes are that Microsoft Dynamics NAV Server has stopped or the connection to SQL Server is not configured correctly.

Resolution :

1) Microsoft Dynamics NAV Server connects to the correct database by using the correct login account. You can verify this by using the Microsoft Dynamics NAV Server Administration tool.


2) Login account has the following permissions:


  • Set up as a user in the Microsoft Dynamics NAV database on SQL Server with the following role memberships: db_datareader, db_datawriter, and db_ddladmin. 

3) SQL Server has the following configurations:

  • TCP/IP protocol is enabled.
  • SQL Server executable file is allowed through the Windows Firewall.


  • SQL Server Browser Service is running. This is required only when Microsoft Dynamics NAV used a named database instance, such as NAVDEMO, and Microsoft Dynamics NAV Server is on a different computer than SQL Server. 

For more information, see Troubleshooting: SQL Server Connection Problems.


Thanks & Regards,
Nandesh Gowda

A server error occurred and the content cannot be displayed NAV Web Client

Hi All,

When you try to open the Microsoft Dynamics NAV Web client, you get the following error:

A server error occurred, and the content cannot be displayed. Refresh the page or open a new browser window.

In the Event Viewer of the computer that is running Microsoft Dynamics NAV Web Server components, the Windows application log includes the following event:

Message: A server was not found at “net.tcp://navserver:7046/DynamicsNAV71/Service”. Either the URL is incorrect or the server is currently not available. 

This error occurs when the Microsoft Dynamics NAV Web client cannot connect to Microsoft Dynamics NAV Server. 

To resolve this error, verify that the following conditions are met:

• The Microsoft Dynamics NAV Web client is configured to connect to the correct Microsoft Dynamics NAV Server. Also please check the Server Instance, Port No.,Credential Type,etc and other configuration settings in Web.Config File.

• The logon account of Microsoft Dynamics NAV Server has permission to log on as a service on the computer that is running Microsoft Dynamics NAV Server.

• If you are using Mozilla Firefox as your browser, then you must enable cookies in the browser. Additionally, configure the address of the Microsoft Dynamics NAV Web client as a trusted URI in Firefox. For more information, see How to: Configure Mozilla Firefox for Microsoft Dynamics NAV Clients.

• If IIS and the Microsoft Dynamics NAV Server are on separate computers, verify the following conditions:

1) If the Microsoft Dynamics NAV Web client is using Windows authentication, then the Negotiate provider must be included at the top of the providers list in the Windows authentication setup in IIS. For more information, see Configuring the Credential Type on the Microsoft Dynamics NAV Web Client Website.

2) Delegation is configured from the computer that is running IIS to the computer that is running Microsoft Dynamics NAV Server, including the following:

  • Kernel mode authentication is either disabled or configured to use the service account of Microsoft Dynamics NAV Server (Microsoft Dynamics NAV Web client only).
  • The following Service Principal Names are registered for the logon account of Microsoft Dynamics NAV Server:

DynamicsNAV/navserver:port

DynamicsNAV/navserver.domain:port

If you still get this error after verifying the setup, then disable the Use Kerberos Only option in the delegation setup and try again. The Use Kerberos Only option does not work on some network configurations with Microsoft Dynamics NAV.


Thanks & Regards,
Nandesh Gowda

16 November 2016

Developing Extension package NAV

Hi All,

Please refer my previous post on Extensions Overview.
https://nandeshgowda-navblog.blogspot.in/2016/11/extending-microsoft-dynamics-nav-using.html

Today we will discuss on how to develop & use Extensions.

We can build extension packages that add functionality to a Dynamics NAV deployment. Unlike the familiar development and deployment of Dynamics NAV functionality, building an extension relies on the exported version of an application to .TXT files.

We can export the application from the development environment, use the development environment commands, or use the Windows PowerShell cmdlet that is available in the Microsoft Dynamics NAV 2017 Development Shell, Export-NAVApplicationObjectLanguage.

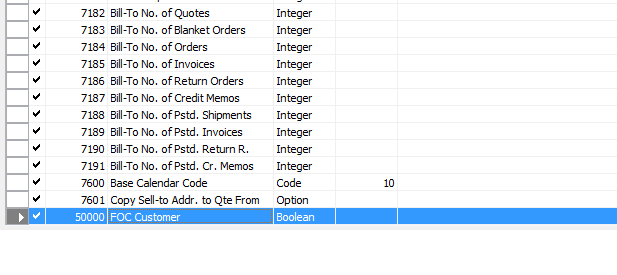
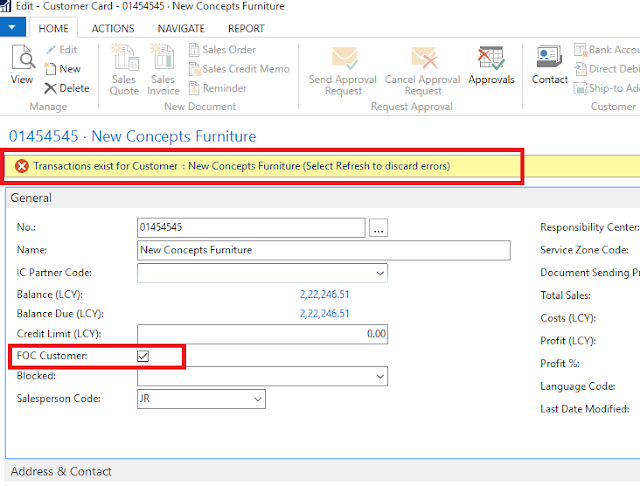
I will create a new field on Customer table and put some validation on that field using Events.

Please refer my below post on how to implement Events
https://nandeshgowda-navblog.blogspot.in/2016/09/implementing-events-in-nav-2016.html


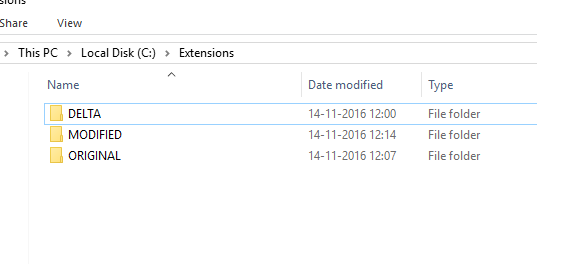
1) To start with please create a folder structure similar to below so that while creating a extension package we can use below path for Cmdlets for converting/merging and creating delta.


2)  The foundation for our extension is the exported .txt files of the objects we are modifying. We can export just the objects that we want to modify, or we can export the entire Dynamics NAV application. We can use  Export-NAVApplicationObjectLanguage cmdlet to export the objects.


3) Now we need to create a functionality using Events, In my example I have just added a field in Customer table and added a validation on onBeforeValidateEvent of new field created. I have used Events for the code changes.


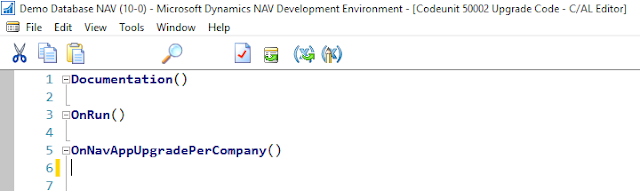
4)  Write extension upgrade code for new or modified tables. This is needed as we may get error while building the Extensions. For time being you can just create upgrade codeunit and add the functions in it.

To write upgrade code for an extension

Create new codeunit.

Important

This must be a codeunit of type Normal, not an Upgrade codeunit.

Add upgrade functions to the codeunit. Make sure the function is declared as global so that the Local property is set to No.

Add the OnNavAppUpgradePerDatabase() function if the extension contains cross-company tables.

Add the OnNavAppUpgradePerCompany() function if the extension contains per-company tables.


5)  Now I will verify whether the changes are working from RTC Client.


6) Now Export the Modified objects in text format.
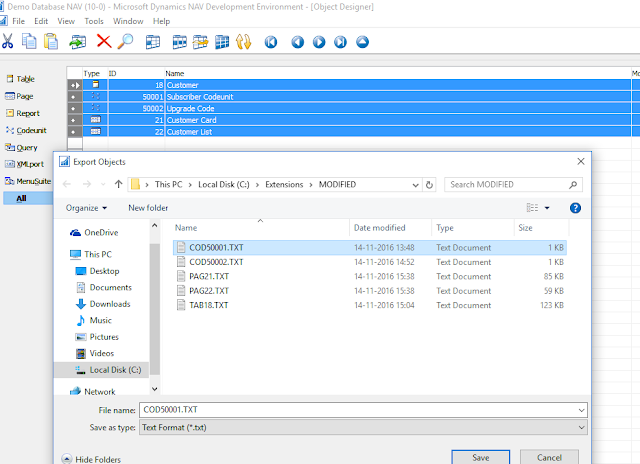


7) Our delta files must be one-to-one with the objects we have added or modified.

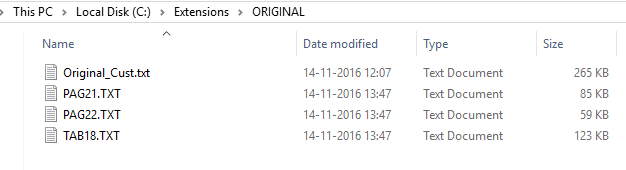
We cannot include a single merged delta file. If we output our export file as a single file use the Split-NAVAppplicationObjectFile cmdlet to create the individual files.

Go to  "Microsoft Dynamics NAV 2017 Development Shell" and type the command to split the file into individual objects



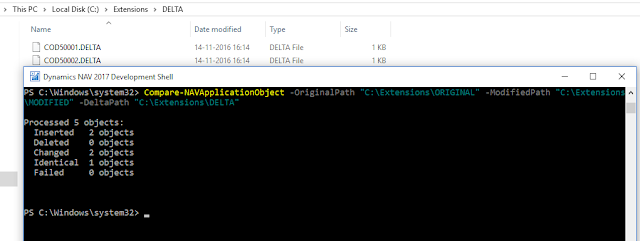
8) Create DELTA files using the Microsoft Dynamics NAV 2017 Development Shell cmdlets.

Extension packages are based on application object deltas. Again, we use the application merge utilities in the Microsoft Dynamics NAV 2017 Development Shell to distill the changes in the form of application object differences that are stored in DELTA files.

We use the Compare-NAVApplicationObject cmdlet to create these delta files.


If we will be adding Multilanguage translations for captions or constant. Use below cmdlet.

Compare-NAVAppApplicationObjectLanguage -OriginalPath MLORIGINAL -ModifiedPath MLMODIFIED -DeltaPath MLDELTA

9) Build Extension package.

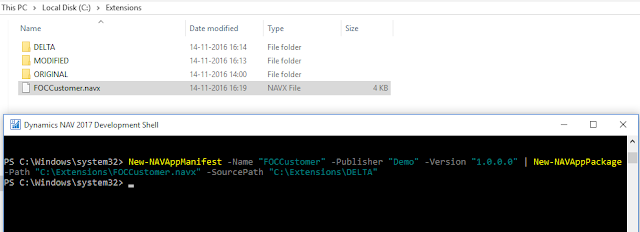
Use the New-NAVAppManifest and New-NAVAppPackage cmdlets to build the manifest and package file.

The following is an example of how to create a new extension .NAVX package file with a new manifest.


10)  Signing a NAVxfile.

Code signing is a common practice for many applications. We must have a certificate on the computer (as a file or in the certificate store) that includes code signing for the intended purpose.

It is recommended that we use a certificate from a third party certificate authority. For testing purposes, it is acceptable to create a self-signed certificate using the New-SelfSignedCertificate cmdlet in PowerShell on Windows 10 or MakeCert.

I will Skip this process of Signing in this Demo. We will use unsigned extension package to Publish and Install.


11) Publish and Install extension :

We have packaged our extension so it is ready to be published and installed on a target server.

Please take a new & clean database without any customisations done to publish and install the extensions.

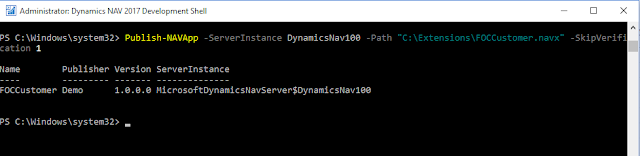
Use Publish-NAVApp cmdlet to publish the Extension for the service Instance


To Install we can use Install-NAVApp cmdlet

Install-NAVApp -ServerInstance YourDynamicsNAVServer -Name ”My Extension” –Tenant Tenant1, Tenant3

OR

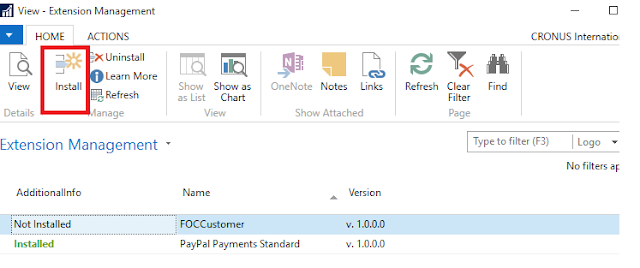
We can install the same from RTC NAV Client

Go to Extension Management and install the published extension in our case FOCCustomer.


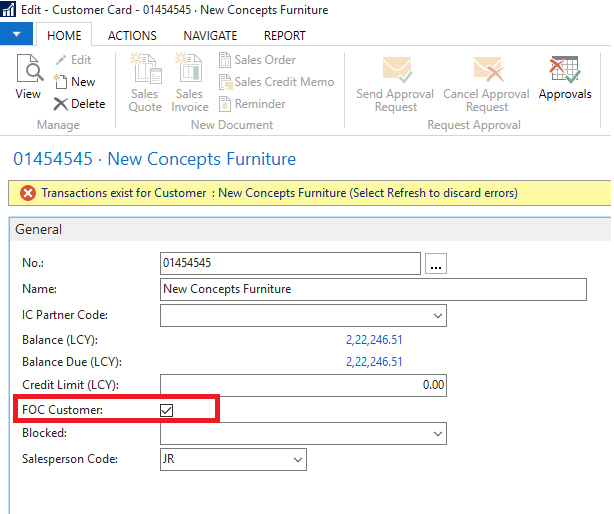
Now after installing we can verify whether our changes are reflecting on customer card.


NOTES :

1) Objects must be exported as .TXT files. We cannot build an extension based on a .FOB file.

2) DO NOT make C/AL code modifications.

3) DO use subscribing to events to execute code.

4) DO NOT change restricted page and table properties.

5) The packaging process adds a description of the extension to the manifest, such as whether it changes pages or adds tables. While not explicitly being enforced currently, this can be used to determine whether to install an extension, or not.

6) If we want to publish an unsigned extension package, we need explicitly state that by using the –SkipVerification parameter on the Publish-NAVApp cmdlet.

7) When we install an extension that includes changes to the menu suites, this does not take effect for any user until we sign out and then sign in again.


Please refer below MSDN links for Extensions

1) Developing Extensions for NAV 2017
https://msdn.microsoft.com/en-us/dynamics-nav/how-to--develop-an-extension

2) Create an Extension package for NAV 2017
https://msdn.microsoft.com/en-us/dynamics-nav/how-to--create-an-extension-package

3) Publish and Install Extension for NAV 2017
https://msdn.microsoft.com/en-us/dynamics-nav/how-to--publish-and-install-an-extension

4)  How to Write Extension Upgrade Code for NAV 2017
https://msdn.microsoft.com/en-us/dynamics-nav/extensions-upgrade-howto

5)  Extension Packages Capability Support Matrix for NAV 2017
https://msdn.microsoft.com/en-us/dynamics-nav/extension-packages-capability-support-matrix


Thanks & Regards,
Nandesh Gowda

Extending Microsoft Dynamics NAV Using Extension Packages

Hi All,

You can extend and customize a Dynamics NAV deployment without modifying the original application objects. With extension packages, you install, upgrade, and uninstall functionality in on-premises deployments or for select tenants in a multitenant deployment. Customers can easily add or remove horizontal or customized functionality to their solution that upgrade much easier than past solutions.

The main difference from classical development is that source code modifications are not allowed. Instead, you use C/AL events to extend and customize objects.

Extensions are delivered as .navx package files. A .navx package contains the various artifacts that deliver the new functionality to the Dynamics NAV deployment as well as a manifest that specifies the name, publisher, version, and other attributes of the extension. You manage .navx packages with a series of Windows PowerShell cmdlets that are available in the Microsoft Dynamics NAV 2017 Administration Shell. There are also cmdlets available to ISVs and developers in the Microsoft Dynamics NAV 2017 Development Shell that help create packages.


How Extensions Work

Extensions are in the simplest terms the runtime application of objects and object deltas for a specific combination of an extension package and a tenant. When an extension is published to a Dynamics NAV deployment, it compiles the objects in it against the current application database. Then, when the extension installs for a tenant, it stores the association and builds the relevant database schema. At runtime, Dynamics NAV simply loads the associated objects for that extension and tenant.

You can publish multiple extensions to a Dynamics NAV deployment and, in multitenant deployments, install any combination of published extensions for each tenant. For example, consider a scenario with a multitenant deployment with extensions A, B, C, and D published to it. Each tenant can have their own unique combination of extensions. So tenants 2, 3, and 4 can have the same extensions (extensions B and C) while tenants 1 and 5 only have one extension each, extension A and D, respectively. This provides for a great degree of customer functionality choice while at the same time maximizes the server hardware and administration workload.

In most cases, two extension packages can coexist and work independently of each other; however there is the possibility that two apps will try to modify the same object properties. In those cases, if the conflict cannot be resolved, the installation of the conflicting extension fails.


You can refer below MSDN Link for detailed explanation about Extensions.

https://msdn.microsoft.com/en-us/dynamics-nav/extending-microsoft-dynamics-nav-using-extension-packages


As per my understanding we will have a dilemma whether to go for extensions or use the traditional development methods.

We can have below consideration while choosing Extensions :

1) Is the database going to be heavily customized or not?

2) Is the development done can be easily maintained and monitored?

3) How frequently the changes will come in your existing extensions ?

4) What  level of IT hardware & Configuration needed for extension?

5) More the extensions used, more consideration to be given for Server hardware configuration as the extensions will be loaded by NAV at run time.

6) Upgrade Flexibility

7) Multi Tenant Environment Flexibility

8) Using extensions for third party App, ISV, etc.


Anyways we need to move forward and start using Extension packages for most of our developments.
.
I feel in future Extensions will be heavily concentrated on and improvements will come in this regard. As its obvious from NAV 2016 and NAV 2017 releases and changes w.r.t to Extensions.


Thanks & Regards,
Nandesh Gowda

Cannot add the Field Trigger or cannot add variable NAV Extensions

Hi All,

Cannot add the Field Trigger to.

Above error may come when creating Extension package using New-NAVAppPackage cmdlet.

The above error may come if you have written some code on Triggers of page or table for a field.

So please remove the code and use the Events to implement your code.

We have default trigger events available for table or page to write our code on when you subscribe to table/page object.

Cannot add variable to

Again this is similar kind of error, please remove the variable defined from the object and implement the logic using Events.

Thanks & Regards,
Nandesh Gowda

Publish-NAVApp : Merge Conflict: Could not update Codeunit NAV Extensions

Hi All,

Publish-NAVApp : Merge Conflict: Could not update Codeunit XXXX

Above error may come while using Publish-NAVApp cmdlet, if the customized objects which are added for development are already available in NAV Database.


Thanks & Regards,
Nandesh Gowda

07 November 2016

UI Elements Removal : NAV Server Configuration Setting

Hi All,

This Setting was available in NAV 2013 R2 as a boolean, later it got changed to a option field.

What is the relevance of this configuration setting :

Depending on the setting in the UI Elements Removal field in the Microsoft Dynamics NAV Server Administration tool, only user interface (UI) elements on objects in the license or on objects that the user has permissions to will appear in the user interface.

All types of UI elements will be removed if they relate to objects that are not included in the license or the user does not have the required permission to the objects:

1) Fields

2) Actions

3) Page parts

UI elements that are directly related to an object through the TableRelation or the CalcFormula property can be removed automatically according to the license file and/or user permissions.

For UI elements that are not directly related to an object, you can use the AccessByPermission property to remove the element according to the user’s permission to a related object. For more information, see How to: Remove UI Elements Using the AccessByPermission Property.

Below are the options available to select:

OptionDescription
NoneAll UI elements are displayed, even if the license file does not include the related object and the user does not have permissions to the related object.
LicenseFileA UI element is removed if the related object is not included in the license file.
LicenseFileAndUserPermissionsA UI element is removed if the related object is not included in the license file and the user does not have permissions to the object as defined in the AccessByPermission property for the related UI element.

By default, this option is selected.


Thanks & Regards,
Nandesh Gowda

03 November 2016

Build Restriction NAV Server Configuration Setting

Hi All,

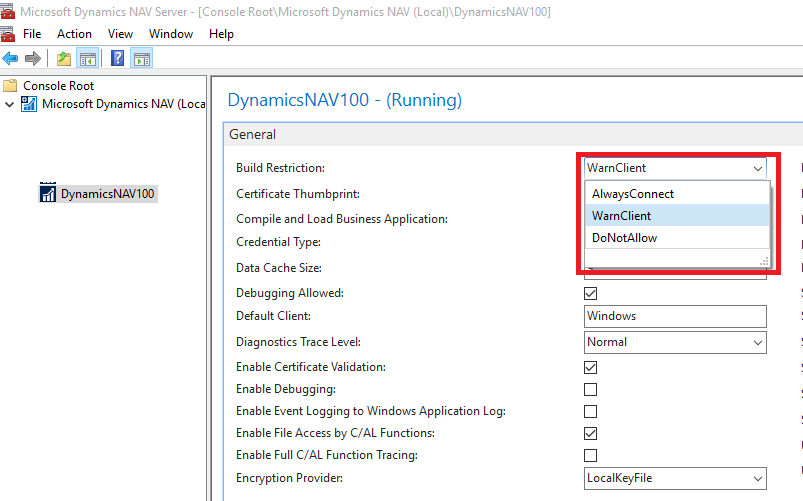
Build Restriction Configuration Setting is available in NAV 2017 as well where in we can restrict NAV Clients connecting to NAV Server having different build.

Values :

AlwaysConnect :

WarnClient :
Before connecting the client to the server instance, a message appears that informs the user that the build versions for the client and server instance are different. The user can choose to continue or cancel the connection.

DoNotAllow :
A message appears that informs the user that the client and server instance build versions are different, and the client does not connect to the server instance.

Default: WarnClient


Note: With the Microsoft Dynamics NAV Web client and Microsoft Dynamics NAV Tablet client, this setting compares the build version of the Microsoft Dynamics NAV Web Server components on IIS with the Microsoft Dynamics NAV Server instance. It controls the connection between Microsoft Dynamics NAV Web Server components and the server instance.

Thanks & Regards,
Nandesh Gowda

Disable Save as Excel or Word on Request Page of RDLC Report and Save as Button from Report Preview NAV 2017

Hi All,

Enable Save as Excel or Word on Request Page of RDLC - Layout Reports and  Enable Save from Report Preview : NAV 2017

These Configuration settings were available from previous versions but anyways we will discuss the same now with NAV 2017 as well.

When we run the report we get option on request page to Save as Excel, Word or PDF.


Similarly when we preview the report we get Save as option as shown below in Screenshot.


We can disable the Save as Word and Excel  from Print Button of Request Page of Reports and Save as option from preview Report by unticking below configuration.


Please save and restart the service. Now we can see the options are hidden.


Thanks & Regards,
Nandesh Gowda

08 October 2016

Indentation and Tree View of List Pages NAV

Hi All,

Here we will talk about the Indentation Properties available on Pages.

These properties Applies to Pages of Type = Group &  Subtype = Repeater

If you go to property of  Repeater Control, we will see few properties which controls the Indentation for List pages.


IndentationColumnName Property : 
Here we specify the column that will control the Indentation. The Data Type has to be Integer.
We can use a Table field or a Variable to set this property.


IndentationControls Property :
Here we choose columns on which we need indentation. Click on Assitbutton  and select the appropriate columns and press OK.


As you can see below the Name Column is Indented. Once you run Indent Chart of Accounts.


How does the Name column got indented, simple based on Integer table field "Indentation"  which gets updated when you run Indent Chart of Accounts.

Indentation field Value is set to a Variable NameIndent on OnAfterGetRecord trigger.

NameIndent Variable is mapped to  IndentationColumnName Property.


ShowAsTree Property :

Sets the indentation of rows on a List Page to Tree View. If you enable this property, you can expand or collapse indented rows on a List Page


Similarly we can use the above properties of Repeater Control List page to Indent or show tree view on Documents SubPage as well,


Thanks & Regards,
Nandesh Gowda