Showing posts with label NAV 2015. Show all posts

04 February 2017

Application Worksheet NAV

Hi All,

You can view and change item application entries that are automatically created between item ledger entries during item transactions.

When you post a transaction where items are moved in or out of inventory, an item application is created between each inventory increase and inventory decrease.

These applications determine the flow of costs from the goods that are received in inventory to the cost of goods going out of inventory.

Because of the way the unit cost is calculated, an incorrect item application could lead to a skewed average cost and a skewed unit cost.

You can undo an application or reapply the item ledger entries. Below scenario's may require you to do so.

  • You have forgotten to make a fixed application.
  • You have made an incorrect fixed application.
  • You have to return an item to which a sale has already been applied.

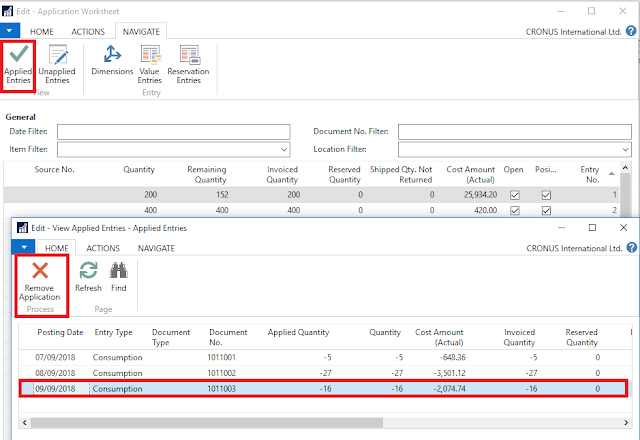
You can view the Applied Entries for an Item Ledger Entry by clicking on the Application Worksheet--> Applied Entries.
Also you can remove the Application by clicking on the Remove Application action.


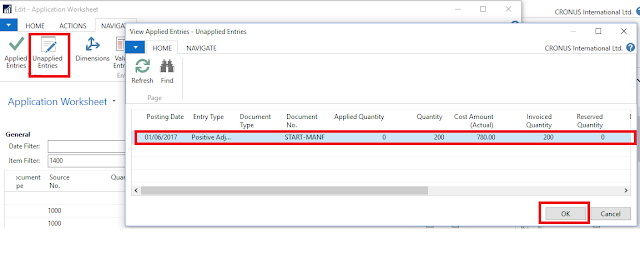
To Reapply an item application: Click on Unapplied Entries and then select the Entry against which to apply and press OK


If possible, use a document to reapply an item ledger entry. For example, if you must make a purchase return of an item to which a sale has already been applied, you can reapply by creating and posting the purchase return document by using the correct application in the Appl.-to Item Entry field on the purchase return line.

You can use the Get Posted Document Lines to Reverse function or the Copy Document function in the purchase return document to make this easier. When you post the document, the item ledger entry is automatically reapplied.

If you cannot use a document to reapply, such as when you have to correct a fixed application, then use the Application Worksheet window to correct an application.

Hh176934.Warning(en-us,NAV.90).gifWarning
The following are important considerations to remember when you are working with the application worksheet:
  • You should not leave application entries unapplied for long periods of time because other users cannot process the items until you reapply the application entries or close the Application Worksheet window. Users who try to perform actions that involve a manually unapplied application entry receive the following error message:“You cannot perform this action because entries for item XXX are unapplied in the Application Worksheet by user XXX.”
  • You should only reapply item ledger entries during nonworking hours to avoid conflicts with other users who are posting transactions with the same items.
  • When you close the application worksheet, Microsoft Dynamics NAV performs a check to make sure that all entries are applied. For example, if you remove a quantity application but do not create a new application, and then you close the application worksheet, a new application is created. This helps keep the cost intact. However, if you remove a fixed application, a new fixed application is not automatically created when you close the worksheet. You must do this manually by creating a new application in the worksheet.
  • It is possible to remove applications from more than one entry at a time in the application worksheet. However, because applying entries affects the set of entries that are available for application, you cannot create an application for more than one entry at a time.
  • The application worksheet cannot make an application in the following situation: If there is not enough quantity on stock to apply, the application worksheet cannot make an application when you are trying to apply an inventory decrease entry without item tracking information to an inventory increase entry with item tracking information.


Thanks & Regards,
Nandesh Gowda

01 January 2017

Inventory Revaluation NAV


Hi All,

The inventory value of an item can change over time, for example, as a result of damage or age.

If you want to change the inventory value of an item or a specific item ledger entry, you must use the revaluation journal in NAV.

You can also use the revaluation journal to correct incorrect posted documents.

You must first run the Adjust Cost - Item Entries batch job before you revalue the inventory so that all the cost is adjusted.

To update cost of items with costing method as Standard the process is little different.

For ex : To revalue items other than Standard Costing method we can follow below process

Screenshot of Item Card


Go to Revaluation Journal Page

There are two ways of filling in the journal with information about the current, calculated value of the specified item:

You can enter a line manually and link it to an item ledger entry in the Applies-to Entry field. This will change the inventory value of all units of this item ledger entry. It will also change the inventory value of the units that are applied to this item ledger entry, regardless of their posting date.

OR

You can fill in the journal by using the Calculate Inventory Value batch job. This method allows you to specify exactly how the revaluation will change the inventory value of an item or item ledger entry. The revaluation will be valid for entries relating to this item or item ledger entry from the posting date of the revaluation journal.

Using Calculate Inventory Value batch job.


Posting Date : You can set the date on which you want to revalue.

Calculate Per : Whether you need to sum inventory value by Item (Location, variant) or Per Item Ledger Entry.

Update Standard Cost :Select this field if you want the program to update the standard cost on the item card. If the item is in stock on the posting date of the revaluation, a revaluation journal line will be created.

The standard cost on the item card will then be updated when the revaluation journal line is posted. If the item is not in stock on the posting date, then the standard cost on the item card will be updated immediately.

Calculation Base: In this field, you can specify how the revaluation journal will suggest a new value for the Unit Cost (Revalued) field.

The options are:
: The revaluation journal will suggest the same value as in the Unit Cost (Calculated) field .

• Last Direct Unit Cost: The revaluation journal will calculate the value in the field based on the Last Direct Unit Cost on the Stockkeeping Unit card or the Item card.

• Standard Cost - Assembly List: The revaluation journal will calculate the value in the field based on the bill of materials.

• Standard Cost - Manufacturing : The revaluation journal will calculate the value in the field based on the production BOM.


Now you can change the Unit Cost (Revalued) field with the new value and post the revaluation journal.


Alternatively you can enter revaluation journal  manually by selecting the Item No. and Applies-to Entry if you need to correct any single entry.


Once posted we can see the changes on Item card, system will pass a value entry and corresponding journal entries.


Process for Standard Cost Update :

1) Run the Adjust Cost - Item Entries batch job.
2) Run the Post Inventory Cost to G/L batch job.
3) Open the Standard Cost Worksheet and use one or more of the following functions:

  • Run the Suggest Item Standard Cost batch job.
  • Review the results and make changes as necessary.
  • Run the Suggest Work/Mach Ctr Std Cost batch job.
  • Review the results and make changes as necessary.

4) Run the Roll Up Standard Cost batch job.
5) Review the results and make changes as necessary.
6) Run the Implement Standard Cost Change batch job.
  • Enter the Posting Date, Document No. and the Item Journal Template & Batch.


7) Review and post the Revaluation Journal, which has been populated with entries from previous step in this process.


Thanks & Regards,
Nandesh Gowda

Item Charges NAV

Hi All,

Item Charges Functionality is used in NAV to enter/add charges such as Freight, Custom, Insurance, Clearing, etc. which is pertaining to Items and then link the charges to that Item to arrive at the exact cost of that item.

The item charge can be entered on a separate invoice or in the document where the items that the cost relates to are listed.

It is strongly recommended to pass all the expenses related to Item through Item Charges so that you can finally arrive at Landed Cost of the item being purchased instead of expensing it out using G/L Account directly.

Also, you can use Item Charges for any price difference for purchase or sale transactions.

To create a new Item Charge go to Item Charges page as shown below.

Enter the No. and Description and tag the Gen. Prod Posting Group to allow system to pick the expense account for charges.


Here we will create a separate Invoice and load the charge amount to Purchase receipt Lines.

Please create a Purchase Document and select Charge(Item) for Item Charges as shown below.
Enter the Quantity and Amount in Direct Unit Cost.


Now Go to Line and select the Item Charge Assignment Option


You can Load Charges on Purchase, Sales, Transfers and Return transactions.
Here we will load on Purchase Receipt Lines. so click on Get Receipt Lines and select the relevant Purchase Receipt Lines. Once selected click on OK.


System will give option to split the charge amount Equally or based on Amount. If you have Multiple Items or Multiple Purchase Receipts you may need to split the Charge Amount between those Item Lines.

or

Alternatively you can enter Qty to Assign to split the Amount.


After Assigning the Item Charge we will post the document and see the impact of the Item Charge on the main Item.


If you Navigate to the Purchase Receipt on which you loaded the Item Charge Amount , you will see system has created one more Value Entry with the Amount you distributed during assigning item charge. So the Cost of the Item for that particular receipt has increased by the Charge Amount.


Thanks & Regards,
Nandesh Gowda

10 December 2016

The remote certificate is invalid according to the validation procedure SMTP NAV

Hi All,

The remote certificate is invalid according to the validation procedure

The above error may come while sending mails through SMTP in NAV.

The reason may be you have setup Secured Connection in SMTP setup in NAV, while the SMTP Server doesn't have valid certificate to accept the secure connection.

You can  install a valid certificate on Server or you can untick Secured Connection in SMTP setup to connect with unsecured connection.

Thanks & Regards,
Nandesh Gowda

To add a Microsoft Dynamics NAV web server instance

Hi All, 

To add a Microsoft Dynamics NAV web server instance

1) On the computer or virtual machine that is running Microsoft Dynamics NAV Server, run Microsoft Dynamics NAV Administration Shell as an Administrator.

  • Choose Start, in the Search box, type Microsoft Dynamics NAV Administration Shell.
  • Right-click the related link, and then choose Run as Administrator.
2) At the command prompt, type the following command:

New-NAVWebServerInstance -WebServerInstance -Server -ServerInstance -ClientServicesCredentialType

Specifies the name that you want to give the Microsoft Dynamics NAV Web client application instance. This name will become part of the URL for the Microsoft Dynamics NAV Web client application, for example, http://MyWebServer:8080/MyWebApp/WebClient.

Specifies the name of the computer that is running the Microsoft Dynamics NAV Server to connect the Microsoft Dynamics NAV web server to. 

Specifies the name of the Microsoft Dynamics NAV Server instance to connect the web server instance to. 

Specifies the credential type that is configured for the Microsoft Dynamics NAV Web client and Microsoft Dynamics NAV Server. Valid options are NavUserPassword, Windows, UserName, and AccessControlService. The default value is NavUserPassword.
Note :
The command that is shown includes only the required parameters of the NAVWebServerInstance cmdlet. The cmdlet has several other parameters that can be used to configure the web server instance. 

3.Press Enter to run the cmdlet.

A new Microsoft Dynamics NAV web server instance with the specified name is added to the Microsoft Dynamics NAV Web client site on IIS

If you want to change the configuration of the new Microsoft Dynamics NAV web server instance after it has been added, modify the web.config file. 


Thanks & Regards, 
Nandesh Gowda


A fatal error occurred. The connection to SQL server cannot be established NAV

Hi All,

When you try to open Microsoft Dynamics NAV Web client, you get the following error:

A fatal error occurred. The connection to SQL server cannot be established or is no longer usable.

There can be various causes of this error. The most common causes are that Microsoft Dynamics NAV Server has stopped or the connection to SQL Server is not configured correctly.

Resolution :

1) Microsoft Dynamics NAV Server connects to the correct database by using the correct login account. You can verify this by using the Microsoft Dynamics NAV Server Administration tool.


2) Login account has the following permissions:


  • Set up as a user in the Microsoft Dynamics NAV database on SQL Server with the following role memberships: db_datareader, db_datawriter, and db_ddladmin. 

3) SQL Server has the following configurations:

  • TCP/IP protocol is enabled.
  • SQL Server executable file is allowed through the Windows Firewall.


  • SQL Server Browser Service is running. This is required only when Microsoft Dynamics NAV used a named database instance, such as NAVDEMO, and Microsoft Dynamics NAV Server is on a different computer than SQL Server. 

For more information, see Troubleshooting: SQL Server Connection Problems.


Thanks & Regards,
Nandesh Gowda

A server error occurred and the content cannot be displayed NAV Web Client

Hi All,

When you try to open the Microsoft Dynamics NAV Web client, you get the following error:

A server error occurred, and the content cannot be displayed. Refresh the page or open a new browser window.

In the Event Viewer of the computer that is running Microsoft Dynamics NAV Web Server components, the Windows application log includes the following event:

Message: A server was not found at “net.tcp://navserver:7046/DynamicsNAV71/Service”. Either the URL is incorrect or the server is currently not available. 

This error occurs when the Microsoft Dynamics NAV Web client cannot connect to Microsoft Dynamics NAV Server. 

To resolve this error, verify that the following conditions are met:

• The Microsoft Dynamics NAV Web client is configured to connect to the correct Microsoft Dynamics NAV Server. Also please check the Server Instance, Port No.,Credential Type,etc and other configuration settings in Web.Config File.

• The logon account of Microsoft Dynamics NAV Server has permission to log on as a service on the computer that is running Microsoft Dynamics NAV Server.

• If you are using Mozilla Firefox as your browser, then you must enable cookies in the browser. Additionally, configure the address of the Microsoft Dynamics NAV Web client as a trusted URI in Firefox. For more information, see How to: Configure Mozilla Firefox for Microsoft Dynamics NAV Clients.

• If IIS and the Microsoft Dynamics NAV Server are on separate computers, verify the following conditions:

1) If the Microsoft Dynamics NAV Web client is using Windows authentication, then the Negotiate provider must be included at the top of the providers list in the Windows authentication setup in IIS. For more information, see Configuring the Credential Type on the Microsoft Dynamics NAV Web Client Website.

2) Delegation is configured from the computer that is running IIS to the computer that is running Microsoft Dynamics NAV Server, including the following:

  • Kernel mode authentication is either disabled or configured to use the service account of Microsoft Dynamics NAV Server (Microsoft Dynamics NAV Web client only).
  • The following Service Principal Names are registered for the logon account of Microsoft Dynamics NAV Server:

DynamicsNAV/navserver:port

DynamicsNAV/navserver.domain:port

If you still get this error after verifying the setup, then disable the Use Kerberos Only option in the delegation setup and try again. The Use Kerberos Only option does not work on some network configurations with Microsoft Dynamics NAV.


Thanks & Regards,
Nandesh Gowda

07 November 2016

UI Elements Removal : NAV Server Configuration Setting

Hi All,

This Setting was available in NAV 2013 R2 as a boolean, later it got changed to a option field.

What is the relevance of this configuration setting :

Depending on the setting in the UI Elements Removal field in the Microsoft Dynamics NAV Server Administration tool, only user interface (UI) elements on objects in the license or on objects that the user has permissions to will appear in the user interface.

All types of UI elements will be removed if they relate to objects that are not included in the license or the user does not have the required permission to the objects:

1) Fields

2) Actions

3) Page parts

UI elements that are directly related to an object through the TableRelation or the CalcFormula property can be removed automatically according to the license file and/or user permissions.

For UI elements that are not directly related to an object, you can use the AccessByPermission property to remove the element according to the user’s permission to a related object. For more information, see How to: Remove UI Elements Using the AccessByPermission Property.

Below are the options available to select:

OptionDescription
NoneAll UI elements are displayed, even if the license file does not include the related object and the user does not have permissions to the related object.
LicenseFileA UI element is removed if the related object is not included in the license file.
LicenseFileAndUserPermissionsA UI element is removed if the related object is not included in the license file and the user does not have permissions to the object as defined in the AccessByPermission property for the related UI element.

By default, this option is selected.


Thanks & Regards,
Nandesh Gowda

03 November 2016

Disable Save as Excel or Word on Request Page of RDLC Report and Save as Button from Report Preview NAV 2017

Hi All,

Enable Save as Excel or Word on Request Page of RDLC - Layout Reports and  Enable Save from Report Preview : NAV 2017

These Configuration settings were available from previous versions but anyways we will discuss the same now with NAV 2017 as well.

When we run the report we get option on request page to Save as Excel, Word or PDF.


Similarly when we preview the report we get Save as option as shown below in Screenshot.


We can disable the Save as Word and Excel  from Print Button of Request Page of Reports and Save as option from preview Report by unticking below configuration.


Please save and restart the service. Now we can see the options are hidden.


Thanks & Regards,
Nandesh Gowda

08 October 2016

Indentation and Tree View of List Pages NAV

Hi All,

Here we will talk about the Indentation Properties available on Pages.

These properties Applies to Pages of Type = Group &  Subtype = Repeater

If you go to property of  Repeater Control, we will see few properties which controls the Indentation for List pages.


IndentationColumnName Property : 
Here we specify the column that will control the Indentation. The Data Type has to be Integer.
We can use a Table field or a Variable to set this property.


IndentationControls Property :
Here we choose columns on which we need indentation. Click on Assitbutton  and select the appropriate columns and press OK.


As you can see below the Name Column is Indented. Once you run Indent Chart of Accounts.


How does the Name column got indented, simple based on Integer table field "Indentation"  which gets updated when you run Indent Chart of Accounts.

Indentation field Value is set to a Variable NameIndent on OnAfterGetRecord trigger.

NameIndent Variable is mapped to  IndentationColumnName Property.


ShowAsTree Property :

Sets the indentation of rows on a List Page to Tree View. If you enable this property, you can expand or collapse indented rows on a List Page


Similarly we can use the above properties of Repeater Control List page to Indent or show tree view on Documents SubPage as well,


Thanks & Regards,
Nandesh Gowda

Using Virtual Table FILE to read files and Import using XMLPort NAV

Hi All,

Using Virtual Table File  to get the files in a directory & then calling a XMLPort to Import the file in NAV.

Below are the variables to be defined


Below is the Sample Code for the same.


Thanks & Regards,
Nandesh Gowda

Checking Objects Permission using Virtual table License Permission NAV

Hi All,

There may be a need to check whether the objects are included in License or not.

We can check the Permissions by using Virtual Table "License Permission"

Create a new List Page by selecting table License Permission  table.


Run the newly created page and you will see all the objects with their permission.


Thanks & Regards,
Nandesh Gowda

Reading & writing Unicode Files NAV

Hi All, 

You can use an instance of the System.IO.StreamWriter class to write to an OutStream OR the System.IO.StreamReader class to read from an InStream

You control the encoding by using the System.Text.Encoding class where you select between Default, Unicode or UTF8 encoding.


  • Please note that XMLports directly supports importing and exporting flat text files in MS-DOS, UTF-8, UTF-16 encodings by setting the new TextEncoding property.


You can refer below MSDN blog post for more detail. 
Reading-and-writing-unicode-files-using-cal


Thanks & Regards, 
Nandesh Gowda

26 September 2016

Report Builder was unable to paste successfully RDLC/SSRS Reports

Hi All,

Report Builder was unable to paste successfully:

Many of you will be aware of above error while copying a text box or any Report Item for that matter.


This issue has been there for a quite a long time now. This issue comes when there is a Custom Code in your expression.


There is no direct method to copy an item as of now, but below are few methods to copy the text box by work around.

1) Using Apostrophe before expression so that it will be considered as a comment. After copying you need to remove the Apostrophe.

Or

Using Double Quote at start and end of expression so that it can be treated as String. After copying you need to remove the Double Quote.


2) Adding a blank text box, then select the expression. Copy & paste the expression to new text box.


Thanks & Regards,
Nandesh Gowda

13 September 2016

Formatting the Data in a Field NAV 2015, NAV 2016

Hi All, 

You can format the data by using AutoFormatType  & AutoFormatExpr property in NAV 2015, NAV 2016

https://msdn.microsoft.com/en-us/library/dn789723(v=nav.90).aspx

Thanks & Regards, 
Nandesh Gowda

12 September 2016

NotBlank Property NAV 2016, NAV 2015, NAV 2013 R2

Hi All, 

NotBlank Property: Sets a value that specifies whether users must enter a value in the selected field or text box.


Applies to :
  • Table Fields
  • Page Fields


Note :


You can use this property together with the InitValue Property to make sure that an entry is made in this field. 
This setting is evaluated for controls and fields during validation. Validation occurs only if the field or control value is updated through the UI, for example, if a value is updated on a page or if a field is updated in a table directly. 
If a field is updated through application code, then the NotBlank property is not validated.
You can set the NotBlank property to Yes on primary fields in a table. Setting the NotBlank property to Yes on other fields in a table does not cause a red star marking on the UI.
If the NotBlank property is used on other fields than primary fields, the behavior is as follows:
  • If the field is blank, and never entered, the page can be closed.
  • If the field has been entered, and the user tries to enter a blank value, a validation error occurs.


Thanks & Regards, 
Nandesh Gowda

C/AL Comments NAV 2015, NAV 2016

Hi All,

In NAV 2015, NAV 2016 you can comment code from Edit menu of Object Designer as shown in the screenshot.


Thanks & Regards,
Nandesh Gowda

ShowMandatory Property NAV 2015, NAV 2016

Hi All, 

ShowMandatory Property


Sets a value that specifies whether users must enter a value in the selected field or text box.
The field is marked on the page with a red asterisk and does not enforce any validation.
Once the field is filled, the red asterisk disappears. 
The ShowMandatory property only controls the UI and overrides any asterisk marking of the NotBlank Property.
The ShowMandatory property can be specified as truefalse, or as an expression.

Applies to: Page fields


For Ex : see below


Thanks & Regards, 
Nandesh Gowda

UpdatePropagation Property NAV 2015, NAV 2016

Hi All, 


UpdatePropagation Property


Sets a value that specifies what happens when a main page with a subpage is updated. 

The UpdatePropagation property is available on Part controls and has two options: Subpage and Both.

If UpdatePropagation is set to Subpage, an update action will update the subpage only. If UpdatePropagation is set to Both, an update action will update both the main page and the subpage. 

This is useful if a value on the subpage changes, and you want a main page total to be refreshed automatically.


Use the UpdatePropagation property to update a main page total, when the amount on the subpage lines is updated. 

Add a CurrPage.UPDATE();call, for example, in the OnValidate trigger on the subpage to have the UpdatePropagation property take effect.


Thanks & Regards, 
Nandesh Gowda