Showing posts with label NAV FUNCTIONAL. Show all posts

06 March 2017

GST- India Released for NAV 2016

Hi All,

Microsoft has released GST- Goods & Service Tax- India which is soon going to be implemented in India with proposed date of 1st July, 2017.


The GST is included with the release of NAV 2016 Cumulative Update 17. Below is the download link for the same.
https://www.microsoft.com/en-us/download/details.aspx?id=54804

Below is the Link to White paper for GST-India
https://mbs.microsoft.com/partnersource/global/deployment/downloads/tax-regulatory-updates/nav2016gstindia


Thanks & Regards,
Nandesh Gowda

Cumulative Update 17 released for NAV 2016

Hi All,

Microsoft has released Cumulative Update 17 for NAV 2016.

Below is the link to download page for the same.
https://www.microsoft.com/en-us/download/details.aspx?id=54804


Thanks & Regards,
Nandesh Gowda

04 February 2017

Application Worksheet NAV

Hi All,

You can view and change item application entries that are automatically created between item ledger entries during item transactions.

When you post a transaction where items are moved in or out of inventory, an item application is created between each inventory increase and inventory decrease.

These applications determine the flow of costs from the goods that are received in inventory to the cost of goods going out of inventory.

Because of the way the unit cost is calculated, an incorrect item application could lead to a skewed average cost and a skewed unit cost.

You can undo an application or reapply the item ledger entries. Below scenario's may require you to do so.

  • You have forgotten to make a fixed application.
  • You have made an incorrect fixed application.
  • You have to return an item to which a sale has already been applied.

You can view the Applied Entries for an Item Ledger Entry by clicking on the Application Worksheet--> Applied Entries.
Also you can remove the Application by clicking on the Remove Application action.


To Reapply an item application: Click on Unapplied Entries and then select the Entry against which to apply and press OK


If possible, use a document to reapply an item ledger entry. For example, if you must make a purchase return of an item to which a sale has already been applied, you can reapply by creating and posting the purchase return document by using the correct application in the Appl.-to Item Entry field on the purchase return line.

You can use the Get Posted Document Lines to Reverse function or the Copy Document function in the purchase return document to make this easier. When you post the document, the item ledger entry is automatically reapplied.

If you cannot use a document to reapply, such as when you have to correct a fixed application, then use the Application Worksheet window to correct an application.

Hh176934.Warning(en-us,NAV.90).gifWarning
The following are important considerations to remember when you are working with the application worksheet:
  • You should not leave application entries unapplied for long periods of time because other users cannot process the items until you reapply the application entries or close the Application Worksheet window. Users who try to perform actions that involve a manually unapplied application entry receive the following error message:“You cannot perform this action because entries for item XXX are unapplied in the Application Worksheet by user XXX.”
  • You should only reapply item ledger entries during nonworking hours to avoid conflicts with other users who are posting transactions with the same items.
  • When you close the application worksheet, Microsoft Dynamics NAV performs a check to make sure that all entries are applied. For example, if you remove a quantity application but do not create a new application, and then you close the application worksheet, a new application is created. This helps keep the cost intact. However, if you remove a fixed application, a new fixed application is not automatically created when you close the worksheet. You must do this manually by creating a new application in the worksheet.
  • It is possible to remove applications from more than one entry at a time in the application worksheet. However, because applying entries affects the set of entries that are available for application, you cannot create an application for more than one entry at a time.
  • The application worksheet cannot make an application in the following situation: If there is not enough quantity on stock to apply, the application worksheet cannot make an application when you are trying to apply an inventory decrease entry without item tracking information to an inventory increase entry with item tracking information.


Thanks & Regards,
Nandesh Gowda

Create Item from Description NAV

Hi All,

NAV can now suggest to create a new item when no item matches the description on sales documents.

Setup is available on Sales & Receivables Setup. The Items will be created based on Item Templates.


System will give a popup when you enter the Item Description if it not matches any of the Item description.


You can choose from the existing Item templates or create a new one.


Item card will open up, you can fill rest of the information and select the newly created item on sales documents.


Thanks & Regards,
Nandesh Gowda

Default Item Quantity NAV

Hi All,

We can now default Quantity field to 1 for items when you create new sales documents.

The setup is available on Sales & Receivables Setup. Once you select the No. field, quantity will get updated to 1.


Thanks & Regards,
Nandesh Gowda

21 January 2017

Defer Revenues and Expenses, Deferral Templates NAV

Hi All,

To recognize revenues and expenses in periods other than the period in which the transaction is posted, you can use functionality to automatically defer revenues and expenses over a specified schedule.

Deferral functionality is available on sales documents, purchase documents, and in the general journal. The functionality provides benefits, such as:
  • Reduced time and effort to defer revenues and expenses after transactions are posted.
  • Easy reporting on deferred amounts for customers, vendors, and G/L accounts.

Here we will discuss on Deferring Expenses pertaining to Advertising for 1 year and how to distribute the Amount to respective period.

1)  To set up a G/L account for deferred expenses 

Go to Chart of Accounts and create a New G/L Account of Type Balance Sheet , where the deferred expenses will be posted to. Name the account, for example, Prepaid Advertising Expenses.


2) To set up a deferral template

Search for Deferral Template Page and create New Template. Select the G/L Account created in above step to post deferred expenses.


Please refer below table on how to fill in the Deferral template.
FieldDescription
Deferral Code
Identify the deferral template.
Description
Describe the deferral template.
Deferral Account
Specify the G/L account that the deferred expenses are posted to.
Deferral %
Specify how much of the total amount will be deferred.
Calc. Method
Specify how the Amount field for each period in the Deferral Schedule window is calculated. You can choose between the following options:
  • Straight-Line: The periodic deferral amounts are calculated according to the number of periods, distributed according to period length.
  • Equal Per Period: The periodic deferral amounts are calculated according to the number of periods, distributed evenly on periods.
  • Days Per Period: The periodic deferral amounts are calculated according to the number of days in the period.
  • User-Defined: The periodic deferral amounts are not calculated. You must manually fill the Amount field for each period in the Deferral Schedule window. For more information, see the “To change a deferral schedule from a purchase invoice” section.
Start Date
Specify when to start calculating deferral amounts. You can choose between the following options:
  • Posting Date: The start date used when calculating deferral amounts is the posting date of the invoice.
  • Beginning of Period: The start date used when calculating deferral amounts is the first day of the accounting period in which the posting date falls.
  • End of Period: The start date used when calculating deferral amounts is the last day of the accounting period in which the posting date falls.
  • Beginning of Next Period: The start date used when calculating deferral amounts is the first day of the accounting period that follows the accounting period in which the posting date falls.
No. of Periods
Specify how many accounting periods the total amounts will be deferred to.
Period Desc.
Specify a description that will be shown on entries for the deferral posting.
You can enter the following placeholder codes for typical values, which will be inserted automatically when the period description is displayed.
  • %1 = The day number of the period posting date
  • %2 = The week number of the period posting date
  • %3 = The month number of the period posting date
  • %4 = The month name of the period posting date
  • %5 = The accounting period name of the period posting date
  • %6 = The fiscal year of the period posting date
Example: The posting date is 02/06/2016. If you enter “Expenses deferral for %4 %6”, then the description displayed will be Expenses deferral for February 2016.

3)  To assign a deferral template to an Item, G/L Account, etc.

Assign the Deferral Template to an Expense Account


4) Create a Purchase Invoice taking the G/L Account to which we tagged Deferral Template.

As soon as we select the G/L Account, the Deferral Code is filled in by default.


Now go to Lines FastTab-->Line --> Deferral Schedule to view the Deferral Calculation.


You can see system has divided the Amount into no of periods we specified in the setup.

You can also change the Deferral Amount here as well on Header or Line and then click Calculate Schedule


5)  You can Preview how deferral expenses will be posted to GL. You can see initially the Expense will be posted to Deferral Account and then the expenses are moved to actual Expense Account for each period.


6) Now post the entries, to review posted deferrals run Purchasing Deferral Summary report.


Similarly you can  Defer Revenues to the Period of Delivery .
Please refer below link
https://msdn.microsoft.com/en-us/library/mt574363(v=nav.90).aspx


Thanks & Regards,
Nandesh Gowda

Invalid file reference. The path to the file is invalid, or one or more of the referenced schemas could not be found. Configuration Package NAV

Hi All,

Invalid file reference. The path to the file is invalid, or one or more of the referenced schemas could not be found.


I got above error while trying to export to excel Item Journal Line table from configuration Packages.

After analysing, I was able to identify the field due to which this error was coming. The field name was "Line No"

But the data in that field was fine, after further analysing I realized that while exporting to excel system creates an XML Schema Mapping for all the fields.

The XML Schema Name for standard field "Line No." was "LineNo", so while creating for customized field "Line No" system was throwing this error as the Name was getting conflicted.

So finally we excluded that field and exported the data as it was not a relevant field for us.


Thanks & Regards,
Nandesh Gowda

01 January 2017

Inventory Revaluation NAV


Hi All,

The inventory value of an item can change over time, for example, as a result of damage or age.

If you want to change the inventory value of an item or a specific item ledger entry, you must use the revaluation journal in NAV.

You can also use the revaluation journal to correct incorrect posted documents.

You must first run the Adjust Cost - Item Entries batch job before you revalue the inventory so that all the cost is adjusted.

To update cost of items with costing method as Standard the process is little different.

For ex : To revalue items other than Standard Costing method we can follow below process

Screenshot of Item Card


Go to Revaluation Journal Page

There are two ways of filling in the journal with information about the current, calculated value of the specified item:

You can enter a line manually and link it to an item ledger entry in the Applies-to Entry field. This will change the inventory value of all units of this item ledger entry. It will also change the inventory value of the units that are applied to this item ledger entry, regardless of their posting date.

OR

You can fill in the journal by using the Calculate Inventory Value batch job. This method allows you to specify exactly how the revaluation will change the inventory value of an item or item ledger entry. The revaluation will be valid for entries relating to this item or item ledger entry from the posting date of the revaluation journal.

Using Calculate Inventory Value batch job.


Posting Date : You can set the date on which you want to revalue.

Calculate Per : Whether you need to sum inventory value by Item (Location, variant) or Per Item Ledger Entry.

Update Standard Cost :Select this field if you want the program to update the standard cost on the item card. If the item is in stock on the posting date of the revaluation, a revaluation journal line will be created.

The standard cost on the item card will then be updated when the revaluation journal line is posted. If the item is not in stock on the posting date, then the standard cost on the item card will be updated immediately.

Calculation Base: In this field, you can specify how the revaluation journal will suggest a new value for the Unit Cost (Revalued) field.

The options are:
: The revaluation journal will suggest the same value as in the Unit Cost (Calculated) field .

• Last Direct Unit Cost: The revaluation journal will calculate the value in the field based on the Last Direct Unit Cost on the Stockkeeping Unit card or the Item card.

• Standard Cost - Assembly List: The revaluation journal will calculate the value in the field based on the bill of materials.

• Standard Cost - Manufacturing : The revaluation journal will calculate the value in the field based on the production BOM.


Now you can change the Unit Cost (Revalued) field with the new value and post the revaluation journal.


Alternatively you can enter revaluation journal  manually by selecting the Item No. and Applies-to Entry if you need to correct any single entry.


Once posted we can see the changes on Item card, system will pass a value entry and corresponding journal entries.


Process for Standard Cost Update :

1) Run the Adjust Cost - Item Entries batch job.
2) Run the Post Inventory Cost to G/L batch job.
3) Open the Standard Cost Worksheet and use one or more of the following functions:

  • Run the Suggest Item Standard Cost batch job.
  • Review the results and make changes as necessary.
  • Run the Suggest Work/Mach Ctr Std Cost batch job.
  • Review the results and make changes as necessary.

4) Run the Roll Up Standard Cost batch job.
5) Review the results and make changes as necessary.
6) Run the Implement Standard Cost Change batch job.
  • Enter the Posting Date, Document No. and the Item Journal Template & Batch.


7) Review and post the Revaluation Journal, which has been populated with entries from previous step in this process.


Thanks & Regards,
Nandesh Gowda

Item Charges NAV

Hi All,

Item Charges Functionality is used in NAV to enter/add charges such as Freight, Custom, Insurance, Clearing, etc. which is pertaining to Items and then link the charges to that Item to arrive at the exact cost of that item.

The item charge can be entered on a separate invoice or in the document where the items that the cost relates to are listed.

It is strongly recommended to pass all the expenses related to Item through Item Charges so that you can finally arrive at Landed Cost of the item being purchased instead of expensing it out using G/L Account directly.

Also, you can use Item Charges for any price difference for purchase or sale transactions.

To create a new Item Charge go to Item Charges page as shown below.

Enter the No. and Description and tag the Gen. Prod Posting Group to allow system to pick the expense account for charges.


Here we will create a separate Invoice and load the charge amount to Purchase receipt Lines.

Please create a Purchase Document and select Charge(Item) for Item Charges as shown below.
Enter the Quantity and Amount in Direct Unit Cost.


Now Go to Line and select the Item Charge Assignment Option


You can Load Charges on Purchase, Sales, Transfers and Return transactions.
Here we will load on Purchase Receipt Lines. so click on Get Receipt Lines and select the relevant Purchase Receipt Lines. Once selected click on OK.


System will give option to split the charge amount Equally or based on Amount. If you have Multiple Items or Multiple Purchase Receipts you may need to split the Charge Amount between those Item Lines.

or

Alternatively you can enter Qty to Assign to split the Amount.


After Assigning the Item Charge we will post the document and see the impact of the Item Charge on the main Item.


If you Navigate to the Purchase Receipt on which you loaded the Item Charge Amount , you will see system has created one more Value Entry with the Amount you distributed during assigning item charge. So the Cost of the Item for that particular receipt has increased by the Charge Amount.


Thanks & Regards,
Nandesh Gowda

10 December 2016

The remote certificate is invalid according to the validation procedure SMTP NAV

Hi All,

The remote certificate is invalid according to the validation procedure

The above error may come while sending mails through SMTP in NAV.

The reason may be you have setup Secured Connection in SMTP setup in NAV, while the SMTP Server doesn't have valid certificate to accept the secure connection.

You can  install a valid certificate on Server or you can untick Secured Connection in SMTP setup to connect with unsecured connection.

Thanks & Regards,
Nandesh Gowda

There is a Communication protocol mismatch between the client and the server for NAV 2013 R2

Hi All,

There is a Communication protocol mismatch between the client and the server.

You may get above error while connecting to NAV RTC Client in NAV 2013 or NAV 2013 R2.

The error is due to the mismatch of Configuration Settings between ClientUserSettings.config file on Client with the NAV Server Instance Configuration Settings.

For Ex :  ClientServicesCredentialType is set to NavUserPassword on ClientUserSettings.config

and the Credential Type set on NAV Server Instance is Windows.


Thanks & Regards,
Nandesh Gowda

09 November 2016

Account Categories and Account Subcategories on Chart of Accounts NAV2017

Hi All,

New fields have been added on chart of accounts for categorization of Accounts.

To start with we will discuss G/L Account Category

NAV 2017 comes with five predefined Account Category.

You can add new Subcategories from G/L Account Category Page. Basically Account Subcategories are grouping under Account categories.

You can use Generate Account Schedules that will update predefined financial reports such as Balance Sheet, P&L, etc. ( through Account Schedules).


On Chart of Accounts you can see Account Category field with five predefined values

Account Category : 


Account Subcategory :

It's a variable on G/L Account Card.

It's value is picked from G/L Account Category based on the Account category selected.


Benefits of using Account Categories :
  • Various Financial Reports (Balance Sheets, P&L, etc.) are readily available from Account Categories.
  • We can group the G/L Accounts into Categories for better user understanding.
  • We can see balances as per Categories and Subcategories.
  • We can use the Categories for developing various kinds of Analysis reporting.


Thanks & Regards,
Nandesh Gowda

Notifications in UI NAV 2017

Hi All,

Notifications provide a programmatic way to send non-intrusive information to the user interface (UI) in the Dynamics NAV Web client. Notifications differ from messages initiated by the MESSAGE function. Messages are modal, which means users are typically required to address the message and take some form of corrective action before they continue working. On the other hand, notifications are non-modal. Their purpose is to give users information about a current situation, but do not require any immediate action or block users from continuing with their current task. For example, you could have a notification that a customer's credit limit is exceeded.


Notifications in the UI :

In the UI, notifications appear in the Notification bar (similar to validation errors) at the top of the page on which a user is currently working. The user can then choose to dismiss the notification, which clears it. Or if actions are defined on notification, the user can choose one of the actions.

  • There can be multiple notifications. The notifications appear chronological order from top to bottom.
  • Notifications remain for duration of the page instance or until the user dismisses them or takes action on them.
  • Notifications that are defined on sub-pages, for example in parts and FactBoxes, appear in the same Notification bar.
  • Validation errors on the page will be shown first.

Notifications in the development environment :

By using the Notification and NotificationScope data types and functions in C/AL, you can add code to send notifications to users. The following table provides an overview of the available functions. The sections that follow provide additional information about how to create notifications.


FunctionDescription
MESSAGESpecifies the content of the notification that appears in the UI.
SCOPESpecifies the scope in which the notification appears.
SENDSends the notification to be displayed by the client.
ADDACTIONAdds an action on the notification.
SETDATASets a data property value for the notification
GETDATAGets a data property value from the notification.
RECALLRecalls a sent notification.

Creating and sending a notification:


You create a notification by using the MESSAGE and SEND functions. The MESSAGE function defines the message part of the notification. When the SEND function is called, the notification is sent to the client and content of the message is displayed.
MyNotification.MESSAGE := 'This is a notification';
MyNotification.SEND;
The SEND function call should be the last statement in the notification code, after any ADDACTION or SETDATA function calls for the notification instance.

Defining the notification scope :

The scope is the realm in which a notification is broadcast in the client. There are two different scopes: LocalScope and GlobalScope.
  • LocalScope notification appears in context of the user's current task, that is, on the page the user is currently working on. LocalScope is the default.
  • GlobalScope notification is not directly related to the current task. Note:GlobalScope is currently not supported, so do not use it. This will be implemented in a future release.
The following code creates a notification in the LocalScope:
MyNotification.MESSAGE := 'This is a notification';
MyNotification.SCOPE := NOTIFICATIONSCOPE::LocalScope;
MyNotification.SEND;

Adding actions on a notification :

You add actions on notifications by using the ADDACTION function. This function provides a way for you to create interactive notifications. By default, users have the option to dismiss the notifications. However, there might be cases where you want to provide users with different actions that they can take to address the notification, like opening an associated page for modifying data.
Conceptually, a notification action calls a function in a specified codeunit, passing the notification object in the call. The function includes the business logic for handling the action.
MyNotification.MESSAGE := 'This is a notification';
MyNotification.SCOPE := NOTIFICATIONSCOPE::LocalScope;
MyNotification.ADDACTION('Action 1',CODEUNIT::"Action Handler",'RunAction1');
MyNotification.ADDACTION('Action 2',CODEUNIT::"Action Handler",'RunAction2');
MyNotification.SEND;
The basic steps for adding an action are as follows:
  1. Create a global function in a new or existing codeunit. The function must have a Notification data type parameter for receiving the notification object.
  2. Add C/AL code to the function for handling the action.
  3. Specify the codeunit and function in the ADDACTION function call.
Important
You can have more than one action on a notification. A LocalScope notification can have up to 3 actions. A GlobalScope notification can have up to 2 actions.

Sending data with a notification :


You use the SETDATA and GETDATA functions to add data to a notification, which is typically needed when actions are invoked. The SETDATA function sets, or adds, data to the notification. The data is defined as text in a key-value pair. With the GETDATA function, you can then retrieve the data again.
The following code sets data for a notification:
MyNotification.MESSAGE := 'This is a notification';
MyNotification.SCOPE := NOTIFICATIONSCOPE::LocalScope;
MyNotification.SETDATA('Created',FORMAT(CURRENTDATETIME,0,9));
MyNotification.SETDATA('ID',FORMAT(CREATEGUID,0,9));
MyNotification.ADDACTION('Action 1',CODEUNIT::"Action Handler",'RunAction1');
MyNotification.ADDACTION('Action 2',CODEUNIT::"Action Handler",'RunAction2');
MyNotification.SEND;
The following code gets the data for a notification:
DataValue := MyNotification.GETDATA('Created');
DataValue := MyNotification.GETDATA('ID');
Example :


This simple example illustrates how notifications work and provides some insight into how you can use them. This example uses page 42 Sales Order of the CRONUS International Ltd. demonstration database according to the following.
  • The code compares a customer's balance with their credit limit. If the balance exceeds the credit limit, a notification is sent to the client.
  • The notification includes an action, which has the caption Change credit limit, that opens page 21 Customer Card. This enables the user to increase the credit limit.
To complete the example, follow these steps:
  1. In C/AL code for page 42 Sales Order, add the following variables and text constants:
    Variable NameData TypeSubtype
    CustomerRecordCustomer
    CreditBalanceNotificationNotification
    OpenCustomerText
    Text Constant NameConstValue
    Text003The customer's current balance exceeds their credit limit.
    Text004Change credit limit
  2. Add the notification code on page 42 Sales Order.
    For this example, add the code on OnOpenPage tigger in C/AL .
  3. Create a codeunit, called Action Handler, for handling the notification action as follows:
    • Add a global function called OpenCustomer that has a Notification data type parameter called CreditBalanceNotification for receiving the Notification object.
    • Add the following C/AL variables to the codeunit:
      Variable NameData TypeSubtype
      CustNumberText
      CustNoText
      CustRecRecordCustomer
      CustPagePageCustomer Card
    • Add the following code to the OpenCustomer function:


Thanks & Regards,
Nandesh Gowda

07 November 2016

UI Elements Removal : NAV Server Configuration Setting

Hi All,

This Setting was available in NAV 2013 R2 as a boolean, later it got changed to a option field.

What is the relevance of this configuration setting :

Depending on the setting in the UI Elements Removal field in the Microsoft Dynamics NAV Server Administration tool, only user interface (UI) elements on objects in the license or on objects that the user has permissions to will appear in the user interface.

All types of UI elements will be removed if they relate to objects that are not included in the license or the user does not have the required permission to the objects:

1) Fields

2) Actions

3) Page parts

UI elements that are directly related to an object through the TableRelation or the CalcFormula property can be removed automatically according to the license file and/or user permissions.

For UI elements that are not directly related to an object, you can use the AccessByPermission property to remove the element according to the user’s permission to a related object. For more information, see How to: Remove UI Elements Using the AccessByPermission Property.

Below are the options available to select:

OptionDescription
NoneAll UI elements are displayed, even if the license file does not include the related object and the user does not have permissions to the related object.
LicenseFileA UI element is removed if the related object is not included in the license file.
LicenseFileAndUserPermissionsA UI element is removed if the related object is not included in the license file and the user does not have permissions to the object as defined in the AccessByPermission property for the related UI element.

By default, this option is selected.


Thanks & Regards,
Nandesh Gowda

03 November 2016

Upgrading to Microsoft Dynamics NAV 2017

Hi All,

Upgrading to Microsoft Dynamics NAV 2017

Below Link on MSDN provides an overview of how to upgrade to Microsoft Dynamics NAV 2017. The upgrade process depends on different factors, such as the version of Dynamics NAV that you are upgrading from, and the degree to which your solution differs from the standard version of Dynamics NAV. The mains tasks range from converting the database to upgrading application code and data.


https://msdn.microsoft.com/en-us/dynamics-nav/upgrading-to-microsoft-dynamics-nav-2017

Thanks & Regards,
Nandesh Gowda

Reporting data setup tool NAV 2017 using Assisted Setup

Hi All,

Reporting data setup tool NAV 2017 using Assisted Setup

Assisted Setup : Its a wizard kind of feature introduced in NAV 2017 to help users complete the setup with ease.

Below in the screenshot you can see pre defined Assisted setup's readily available in NAV 2017.


We will discuss on report data set setup in this post.

Microsoft Dynamics NAV 2017 contains an easy to use tool that enables any user the ability to create rich and impactful datasets that they may use in Excel, PowerBI, or any other reporting tool that has the ability to connect to an OData source.

The age old problem with these types of tools is that you need to have in-depth knowledge of the data structure for your financial application.  This tool is different.  Simply select from data sources that are familiar to the user, such as a customer list or sales invoice list and begin defining your data immediately.

Available Data sources include:

  • List Pages
  • Queries


1) Search for Assisted Setup Page

The assisted setup is another new feature in NAV 2017 that enables users to perform setup functionality in an easy to use wizard format.

2) From the Assisted Setup page, Please select option for Set up reporting.


3) This will open the wizard to create a new OData end point that can be used in Excel, Power BI, PowerApps, or Microsoft Flow. Click on Next.


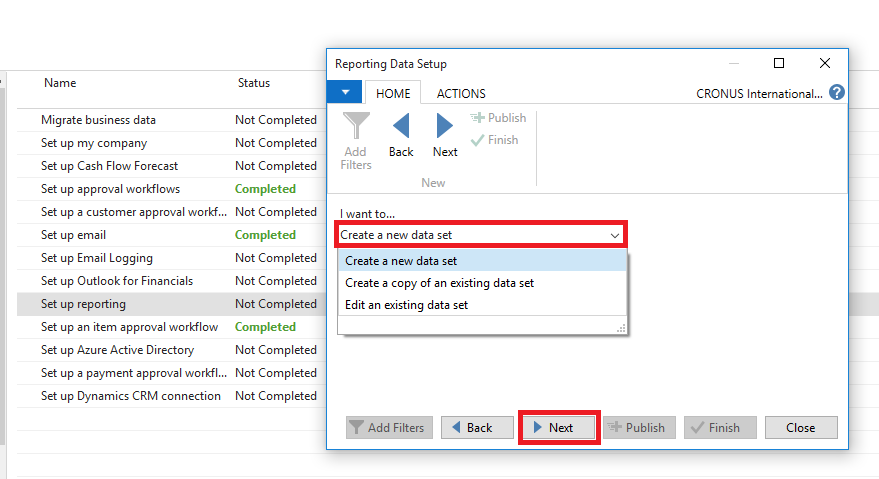
4) We will get 3 options i.e. Create a new data set, Create a copy of an existing data set and Edit an existing data set.

We will create a new reporting data set.Click on Next.


5) Please specify the Name for data set, we can choose from Page and Query Data Source Type.
I have selected Page Data Source Type and Item List page.

6) Please select the fields needed in the data set, and we can also give filters for the data set.


7) Finally Publish the data set. System will create OData Endpoint that can be used in Excel, Power BI, PowerApps, or Microsoft Flow.


8) We can verify the data set from excel. please open excel and connect to OData EndPoint


9) Connect to OData Endpoint with your NAV credentials and select the Item List data set.


10) Click on Next and then Finish. You can see the Item list data in excel.


Thanks & Regards,
Nandesh Gowda