Hi All,
Visual Studio Code and the AL Extension lets you do the following tasks
In addition there are two other configuration files; app.json and launch.json. You can define these yourself, possibly by copying the files from sample code or you can have the system autogenerate them for you.
Building the solution (Ctrl+Shift+B) will create the app.json file and publishing (F5) will generate the launch.json file. Within these files, you’ll need to set up some parameters to connect to your server.
Ex: Here we will create an Extension to an Item table with a new field and add a validation to the new field created.
1) First Create a Project Folder and select that Folder from Visual Studio Code. Or you can start from Visual Studio Code and create folder and files from there itself.
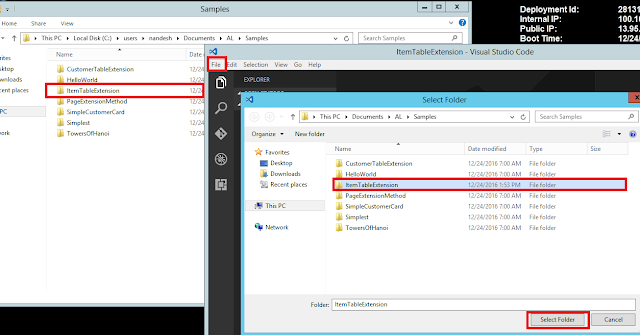
2) You can Copy the launch.json and app.json file from other sample projects or else you can allow visual studio to create it automatically during building and publishing the project.
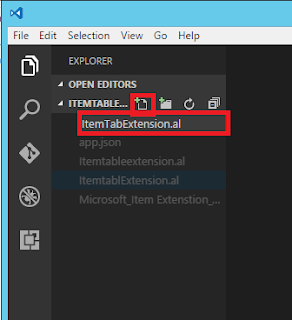
3) Add New file by clicking on New Icon and give it a Name and save it as .al extension. Saving it in .al extension will activate the AL Language Extension for Visual Studio Code. In the same file we will add our code.
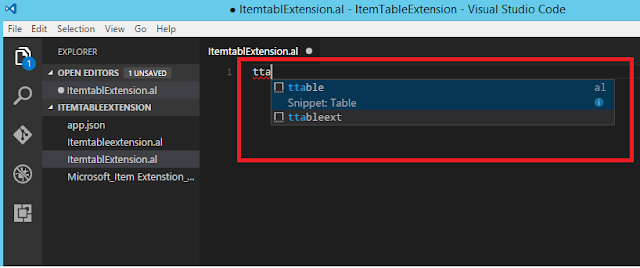
4) Now in the Code Editor type in ttableext and the IntelliSense will bring in the code snippet for you.

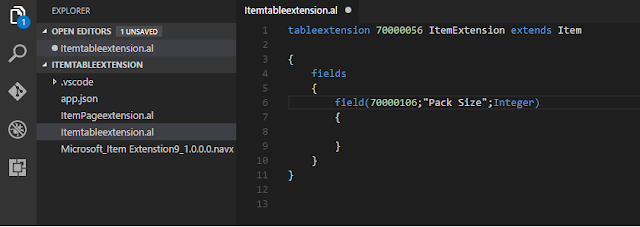
5) Now change the code to add new field on Item table and similarly add the new field on item card page with validation on it by using page extension.
Below is for table extension
Below is for page extension
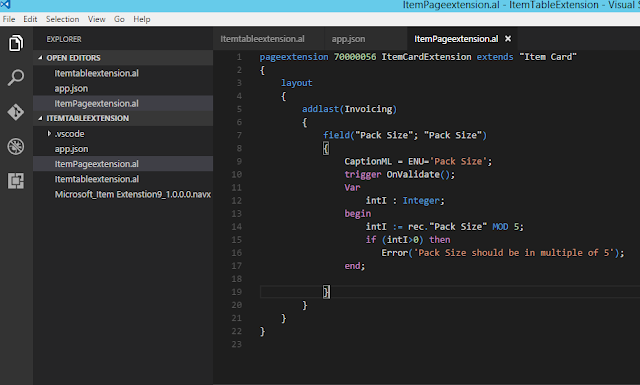
6) Now press Ctrl+Shift+B to build the solution and resolve if any errors. It will create .navx extension file.

And press F5 to publish the Package which is created on to NAV server.

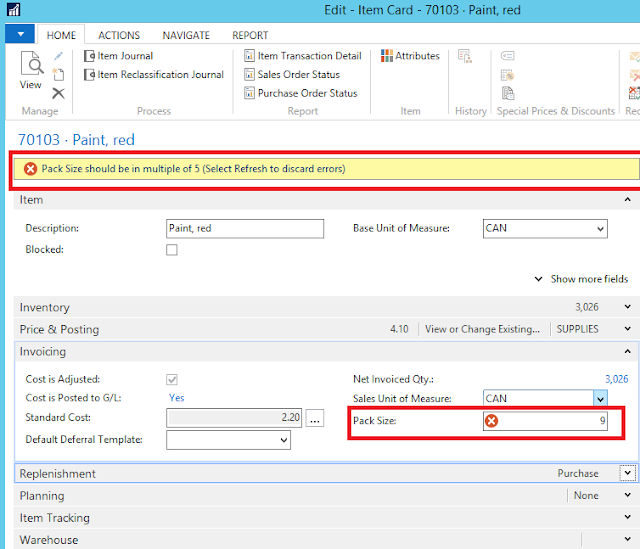
7) Now let us verify whether the field has been added from NAV RTC and whether our validation is working. You can also see the published/installed extensions under Extensions Page in NAV RTC.
Note:
Below are the settings available in app.json and launch.json files.
Thanks & Regards,
Nandesh Gowda
Visual Studio Code and the AL Extension lets you do the following tasks
- Create new files for your solution
- Get assistance with creating the appropriate configuration and setting files
- Use code snippets that provide templates for coding application objects
- Get compiler validation while coding
- Press F5 to publish your changes and see your code running
In addition there are two other configuration files; app.json and launch.json. You can define these yourself, possibly by copying the files from sample code or you can have the system autogenerate them for you.
Building the solution (Ctrl+Shift+B) will create the app.json file and publishing (F5) will generate the launch.json file. Within these files, you’ll need to set up some parameters to connect to your server.
Ex: Here we will create an Extension to an Item table with a new field and add a validation to the new field created.
1) First Create a Project Folder and select that Folder from Visual Studio Code. Or you can start from Visual Studio Code and create folder and files from there itself.

2) You can Copy the launch.json and app.json file from other sample projects or else you can allow visual studio to create it automatically during building and publishing the project.
3) Add New file by clicking on New Icon and give it a Name and save it as .al extension. Saving it in .al extension will activate the AL Language Extension for Visual Studio Code. In the same file we will add our code.

4) Now in the Code Editor type in ttableext and the IntelliSense will bring in the code snippet for you.


5) Now change the code to add new field on Item table and similarly add the new field on item card page with validation on it by using page extension.
Below is for table extension

Below is for page extension

6) Now press Ctrl+Shift+B to build the solution and resolve if any errors. It will create .navx extension file.

And press F5 to publish the Package which is created on to NAV server.

7) Now let us verify whether the field has been added from NAV RTC and whether our validation is working. You can also see the published/installed extensions under Extensions Page in NAV RTC.

Note:
Below are the settings available in app.json and launch.json files.
Settings in the
app.json file:| Setting | Mandatory | Value |
|---|---|---|
| id | Yes | The unique ID of the extension. When app.json file is automatically created, the ID is set to a new GUID value. |
| name | Yes | The unique extension name. |
| publisher | Yes | The name of your publisher, for example: NAV Partner, LLC |
| application | Yes, if base application objects are extended or referenced | The minimal supported version and locale of the base application to extend, for example: { "version": "10.0.0.0", "locale": "W1" } |
| platform | Yes, if system tables are referenced in the extension | The minimal supported version of the platform symbol package file, for example: "10.0.0.0". See the List of objects in the platform symbol file section below for the list of object symbols contained in the platform symbol package file. |
| packageCachePath | Yes, if base application is extended or system tables are referenced | The path to the folder where referenced symbol package files are located. The path could either be absolute or relative to the current extension working directory, for example: "../../resources" |
Settings in the
launch.json file:| Setting | Mandatory | Value |
|---|---|---|
| server | Yes, if connecting to an on-premises server | The HTTP URL of your server, for example: http://localhost |
| serverInstance | Yes, if connecting to an on-premises server | The instance name of your server, for example: NAV |
| port | No | The port on which the development endpoint is running on the server, default value: 7049 |
| tenant | No | The tenant ID in case the server is configured for multitenancy. |
| windowsAuthentication | No | Specifies whether Windows or Azure authentication should be used for publishing the extension. Currently only Windows authentication is supported. |
| startupObjectId | No | The ID of the startup object to launch when you press F5. Currently only objects of type Page are supported. |
Thanks & Regards,
Nandesh Gowda
No comments:
Post a Comment