Hi All,
Please refer my previous post on Extensions Overview.
https://nandeshgowda-navblog.blogspot.in/2016/11/extending-microsoft-dynamics-nav-using.html
Today we will discuss on how to develop & use Extensions.
We can build extension packages that add functionality to a Dynamics NAV deployment. Unlike the familiar development and deployment of Dynamics NAV functionality, building an extension relies on the exported version of an application to .TXT files.
We can export the application from the development environment, use the development environment commands, or use the Windows PowerShell cmdlet that is available in the Microsoft Dynamics NAV 2017 Development Shell, Export-NAVApplicationObjectLanguage.
I will create a new field on Customer table and put some validation on that field using Events.
Please refer my below post on how to implement Events
https://nandeshgowda-navblog.blogspot.in/2016/09/implementing-events-in-nav-2016.html
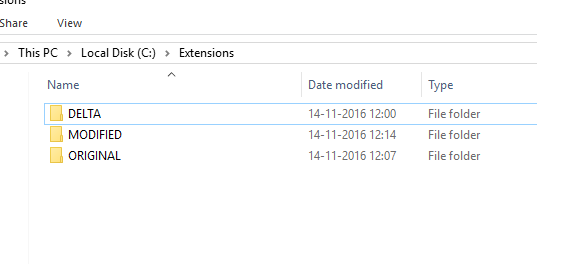
1) To start with please create a folder structure similar to below so that while creating a extension package we can use below path for Cmdlets for converting/merging and creating delta.
2) The foundation for our extension is the exported .txt files of the objects we are modifying. We can export just the objects that we want to modify, or we can export the entire Dynamics NAV application. We can use Export-NAVApplicationObjectLanguage cmdlet to export the objects.

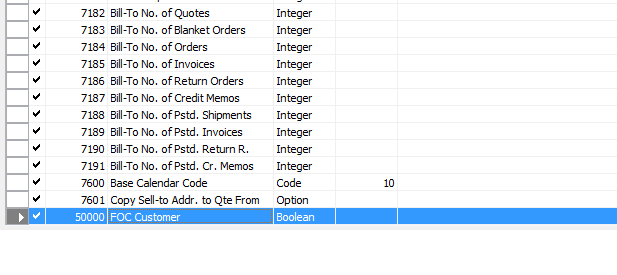
3) Now we need to create a functionality using Events, In my example I have just added a field in Customer table and added a validation on onBeforeValidateEvent of new field created. I have used Events for the code changes.
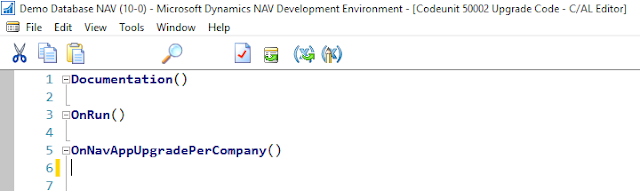
4) Write extension upgrade code for new or modified tables. This is needed as we may get error while building the Extensions. For time being you can just create upgrade codeunit and add the functions in it.
To write upgrade code for an extension
Create new codeunit.
Important
This must be a codeunit of type Normal, not an Upgrade codeunit.
Add upgrade functions to the codeunit. Make sure the function is declared as global so that the Local property is set to No.
Add the OnNavAppUpgradePerDatabase() function if the extension contains cross-company tables.
Add the OnNavAppUpgradePerCompany() function if the extension contains per-company tables.
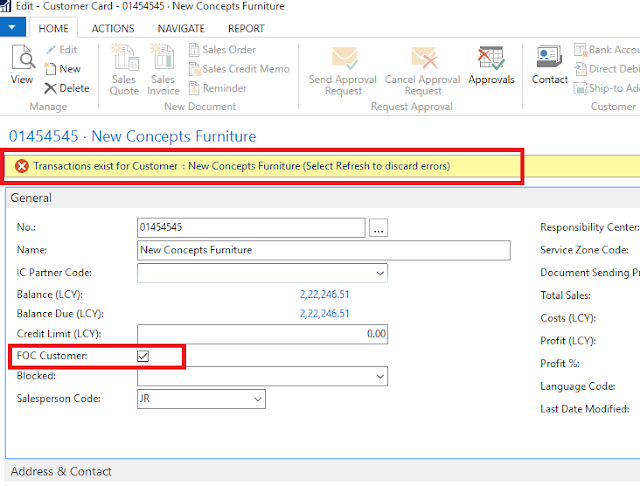
5) Now I will verify whether the changes are working from RTC Client.
6) Now Export the Modified objects in text format.
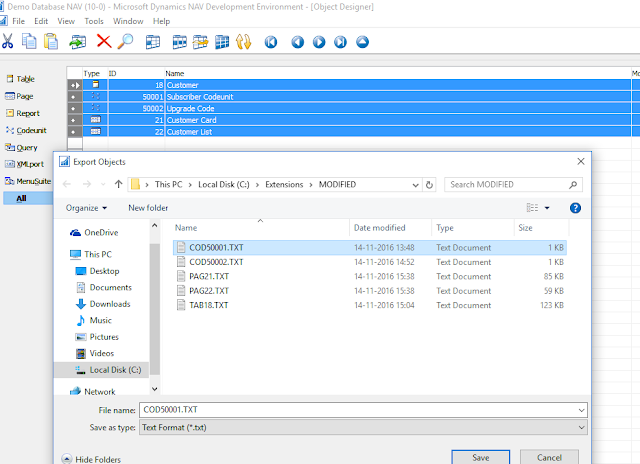
7) Our delta files must be one-to-one with the objects we have added or modified.
We cannot include a single merged delta file. If we output our export file as a single file use the Split-NAVAppplicationObjectFile cmdlet to create the individual files.
Go to "Microsoft Dynamics NAV 2017 Development Shell" and type the command to split the file into individual objects

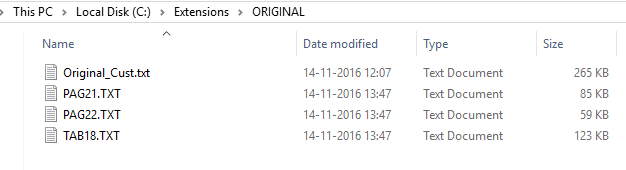
8) Create DELTA files using the Microsoft Dynamics NAV 2017 Development Shell cmdlets.
Extension packages are based on application object deltas. Again, we use the application merge utilities in the Microsoft Dynamics NAV 2017 Development Shell to distill the changes in the form of application object differences that are stored in DELTA files.
We use the Compare-NAVApplicationObject cmdlet to create these delta files.
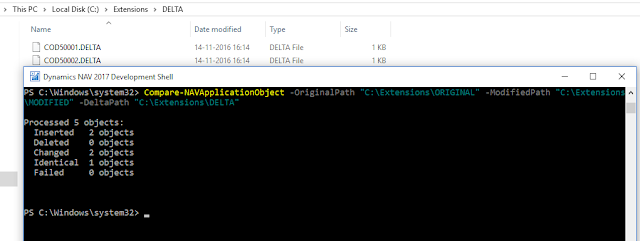
If we will be adding Multilanguage translations for captions or constant. Use below cmdlet.
Compare-NAVAppApplicationObjectLanguage -OriginalPath MLORIGINAL -ModifiedPath MLMODIFIED -DeltaPath MLDELTA
9) Build Extension package.
Use the New-NAVAppManifest and New-NAVAppPackage cmdlets to build the manifest and package file.
The following is an example of how to create a new extension .NAVX package file with a new manifest.
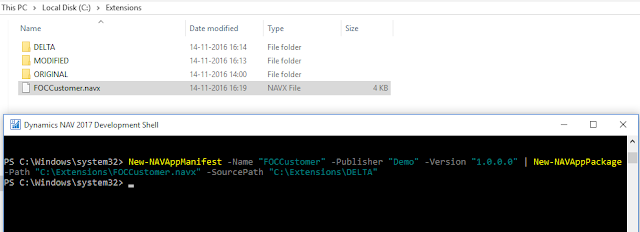
10) Signing a NAVxfile.
Code signing is a common practice for many applications. We must have a certificate on the computer (as a file or in the certificate store) that includes code signing for the intended purpose.
It is recommended that we use a certificate from a third party certificate authority. For testing purposes, it is acceptable to create a self-signed certificate using the New-SelfSignedCertificate cmdlet in PowerShell on Windows 10 or MakeCert.
I will Skip this process of Signing in this Demo. We will use unsigned extension package to Publish and Install.
11) Publish and Install extension :
We have packaged our extension so it is ready to be published and installed on a target server.
Please take a new & clean database without any customisations done to publish and install the extensions.
Use Publish-NAVApp cmdlet to publish the Extension for the service Instance
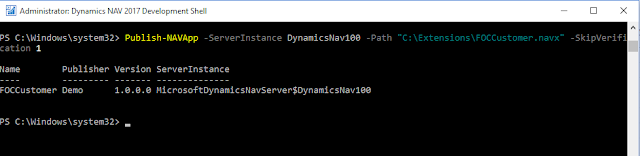
To Install we can use Install-NAVApp cmdlet
Install-NAVApp -ServerInstance YourDynamicsNAVServer -Name ”My Extension” –Tenant Tenant1, Tenant3
OR
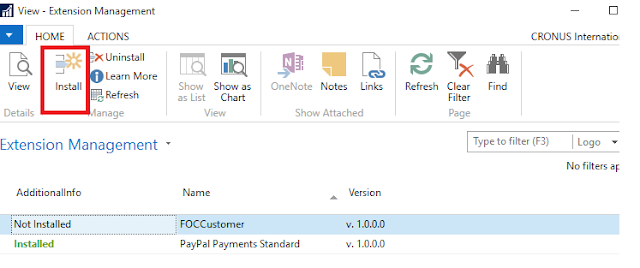
We can install the same from RTC NAV Client
Go to Extension Management and install the published extension in our case FOCCustomer.
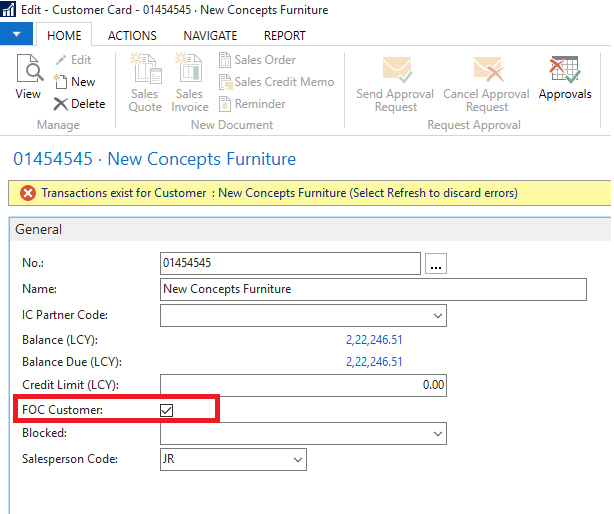
Now after installing we can verify whether our changes are reflecting on customer card.
NOTES :
1) Objects must be exported as .TXT files. We cannot build an extension based on a .FOB file.
2) DO NOT make C/AL code modifications.
3) DO use subscribing to events to execute code.
4) DO NOT change restricted page and table properties.
5) The packaging process adds a description of the extension to the manifest, such as whether it changes pages or adds tables. While not explicitly being enforced currently, this can be used to determine whether to install an extension, or not.
6) If we want to publish an unsigned extension package, we need explicitly state that by using the –SkipVerification parameter on the Publish-NAVApp cmdlet.
7) When we install an extension that includes changes to the menu suites, this does not take effect for any user until we sign out and then sign in again.
Please refer below MSDN links for Extensions
1) Developing Extensions for NAV 2017
https://msdn.microsoft.com/en-us/dynamics-nav/how-to--develop-an-extension
2) Create an Extension package for NAV 2017
https://msdn.microsoft.com/en-us/dynamics-nav/how-to--create-an-extension-package
3) Publish and Install Extension for NAV 2017
https://msdn.microsoft.com/en-us/dynamics-nav/how-to--publish-and-install-an-extension
4) How to Write Extension Upgrade Code for NAV 2017
https://msdn.microsoft.com/en-us/dynamics-nav/extensions-upgrade-howto
5) Extension Packages Capability Support Matrix for NAV 2017
https://msdn.microsoft.com/en-us/dynamics-nav/extension-packages-capability-support-matrix
Thanks & Regards,
Nandesh Gowda
Please refer my previous post on Extensions Overview.
https://nandeshgowda-navblog.blogspot.in/2016/11/extending-microsoft-dynamics-nav-using.html
Today we will discuss on how to develop & use Extensions.
We can build extension packages that add functionality to a Dynamics NAV deployment. Unlike the familiar development and deployment of Dynamics NAV functionality, building an extension relies on the exported version of an application to .TXT files.
We can export the application from the development environment, use the development environment commands, or use the Windows PowerShell cmdlet that is available in the Microsoft Dynamics NAV 2017 Development Shell, Export-NAVApplicationObjectLanguage.
I will create a new field on Customer table and put some validation on that field using Events.
Please refer my below post on how to implement Events
https://nandeshgowda-navblog.blogspot.in/2016/09/implementing-events-in-nav-2016.html
1) To start with please create a folder structure similar to below so that while creating a extension package we can use below path for Cmdlets for converting/merging and creating delta.

2) The foundation for our extension is the exported .txt files of the objects we are modifying. We can export just the objects that we want to modify, or we can export the entire Dynamics NAV application. We can use Export-NAVApplicationObjectLanguage cmdlet to export the objects.

3) Now we need to create a functionality using Events, In my example I have just added a field in Customer table and added a validation on onBeforeValidateEvent of new field created. I have used Events for the code changes.

4) Write extension upgrade code for new or modified tables. This is needed as we may get error while building the Extensions. For time being you can just create upgrade codeunit and add the functions in it.
To write upgrade code for an extension
Create new codeunit.
Important
This must be a codeunit of type Normal, not an Upgrade codeunit.
Add upgrade functions to the codeunit. Make sure the function is declared as global so that the Local property is set to No.
Add the OnNavAppUpgradePerDatabase() function if the extension contains cross-company tables.
Add the OnNavAppUpgradePerCompany() function if the extension contains per-company tables.

5) Now I will verify whether the changes are working from RTC Client.

6) Now Export the Modified objects in text format.

7) Our delta files must be one-to-one with the objects we have added or modified.
We cannot include a single merged delta file. If we output our export file as a single file use the Split-NAVAppplicationObjectFile cmdlet to create the individual files.
Go to "Microsoft Dynamics NAV 2017 Development Shell" and type the command to split the file into individual objects


8) Create DELTA files using the Microsoft Dynamics NAV 2017 Development Shell cmdlets.
Extension packages are based on application object deltas. Again, we use the application merge utilities in the Microsoft Dynamics NAV 2017 Development Shell to distill the changes in the form of application object differences that are stored in DELTA files.
We use the Compare-NAVApplicationObject cmdlet to create these delta files.

If we will be adding Multilanguage translations for captions or constant. Use below cmdlet.
Compare-NAVAppApplicationObjectLanguage -OriginalPath MLORIGINAL -ModifiedPath MLMODIFIED -DeltaPath MLDELTA
9) Build Extension package.
Use the New-NAVAppManifest and New-NAVAppPackage cmdlets to build the manifest and package file.
The following is an example of how to create a new extension .NAVX package file with a new manifest.

10) Signing a NAVxfile.
Code signing is a common practice for many applications. We must have a certificate on the computer (as a file or in the certificate store) that includes code signing for the intended purpose.
It is recommended that we use a certificate from a third party certificate authority. For testing purposes, it is acceptable to create a self-signed certificate using the New-SelfSignedCertificate cmdlet in PowerShell on Windows 10 or MakeCert.
I will Skip this process of Signing in this Demo. We will use unsigned extension package to Publish and Install.
11) Publish and Install extension :
We have packaged our extension so it is ready to be published and installed on a target server.
Please take a new & clean database without any customisations done to publish and install the extensions.
Use Publish-NAVApp cmdlet to publish the Extension for the service Instance

To Install we can use Install-NAVApp cmdlet
Install-NAVApp -ServerInstance YourDynamicsNAVServer -Name ”My Extension” –Tenant Tenant1, Tenant3
OR
We can install the same from RTC NAV Client
Go to Extension Management and install the published extension in our case FOCCustomer.

Now after installing we can verify whether our changes are reflecting on customer card.

NOTES :
1) Objects must be exported as .TXT files. We cannot build an extension based on a .FOB file.
2) DO NOT make C/AL code modifications.
3) DO use subscribing to events to execute code.
4) DO NOT change restricted page and table properties.
5) The packaging process adds a description of the extension to the manifest, such as whether it changes pages or adds tables. While not explicitly being enforced currently, this can be used to determine whether to install an extension, or not.
6) If we want to publish an unsigned extension package, we need explicitly state that by using the –SkipVerification parameter on the Publish-NAVApp cmdlet.
7) When we install an extension that includes changes to the menu suites, this does not take effect for any user until we sign out and then sign in again.
Please refer below MSDN links for Extensions
1) Developing Extensions for NAV 2017
https://msdn.microsoft.com/en-us/dynamics-nav/how-to--develop-an-extension
2) Create an Extension package for NAV 2017
https://msdn.microsoft.com/en-us/dynamics-nav/how-to--create-an-extension-package
3) Publish and Install Extension for NAV 2017
https://msdn.microsoft.com/en-us/dynamics-nav/how-to--publish-and-install-an-extension
4) How to Write Extension Upgrade Code for NAV 2017
https://msdn.microsoft.com/en-us/dynamics-nav/extensions-upgrade-howto
5) Extension Packages Capability Support Matrix for NAV 2017
https://msdn.microsoft.com/en-us/dynamics-nav/extension-packages-capability-support-matrix
Thanks & Regards,
Nandesh Gowda


