06 March 2017

GST- India Released for NAV 2016

Hi All,

Microsoft has released GST- Goods & Service Tax- India which is soon going to be implemented in India with proposed date of 1st July, 2017.


The GST is included with the release of NAV 2016 Cumulative Update 17. Below is the download link for the same.
https://www.microsoft.com/en-us/download/details.aspx?id=54804

Below is the Link to White paper for GST-India
https://mbs.microsoft.com/partnersource/global/deployment/downloads/tax-regulatory-updates/nav2016gstindia


Thanks & Regards,
Nandesh Gowda

Cumulative Update 17 released for NAV 2016

Hi All,

Microsoft has released Cumulative Update 17 for NAV 2016.

Below is the link to download page for the same.
https://www.microsoft.com/en-us/download/details.aspx?id=54804


Thanks & Regards,
Nandesh Gowda

04 February 2017

Application Worksheet NAV

Hi All,

You can view and change item application entries that are automatically created between item ledger entries during item transactions.

When you post a transaction where items are moved in or out of inventory, an item application is created between each inventory increase and inventory decrease.

These applications determine the flow of costs from the goods that are received in inventory to the cost of goods going out of inventory.

Because of the way the unit cost is calculated, an incorrect item application could lead to a skewed average cost and a skewed unit cost.

You can undo an application or reapply the item ledger entries. Below scenario's may require you to do so.

  • You have forgotten to make a fixed application.
  • You have made an incorrect fixed application.
  • You have to return an item to which a sale has already been applied.

You can view the Applied Entries for an Item Ledger Entry by clicking on the Application Worksheet--> Applied Entries.
Also you can remove the Application by clicking on the Remove Application action.


To Reapply an item application: Click on Unapplied Entries and then select the Entry against which to apply and press OK


If possible, use a document to reapply an item ledger entry. For example, if you must make a purchase return of an item to which a sale has already been applied, you can reapply by creating and posting the purchase return document by using the correct application in the Appl.-to Item Entry field on the purchase return line.

You can use the Get Posted Document Lines to Reverse function or the Copy Document function in the purchase return document to make this easier. When you post the document, the item ledger entry is automatically reapplied.

If you cannot use a document to reapply, such as when you have to correct a fixed application, then use the Application Worksheet window to correct an application.

Hh176934.Warning(en-us,NAV.90).gifWarning
The following are important considerations to remember when you are working with the application worksheet:
  • You should not leave application entries unapplied for long periods of time because other users cannot process the items until you reapply the application entries or close the Application Worksheet window. Users who try to perform actions that involve a manually unapplied application entry receive the following error message:“You cannot perform this action because entries for item XXX are unapplied in the Application Worksheet by user XXX.”
  • You should only reapply item ledger entries during nonworking hours to avoid conflicts with other users who are posting transactions with the same items.
  • When you close the application worksheet, Microsoft Dynamics NAV performs a check to make sure that all entries are applied. For example, if you remove a quantity application but do not create a new application, and then you close the application worksheet, a new application is created. This helps keep the cost intact. However, if you remove a fixed application, a new fixed application is not automatically created when you close the worksheet. You must do this manually by creating a new application in the worksheet.
  • It is possible to remove applications from more than one entry at a time in the application worksheet. However, because applying entries affects the set of entries that are available for application, you cannot create an application for more than one entry at a time.
  • The application worksheet cannot make an application in the following situation: If there is not enough quantity on stock to apply, the application worksheet cannot make an application when you are trying to apply an inventory decrease entry without item tracking information to an inventory increase entry with item tracking information.


Thanks & Regards,
Nandesh Gowda

Create Item from Description NAV

Hi All,

NAV can now suggest to create a new item when no item matches the description on sales documents.

Setup is available on Sales & Receivables Setup. The Items will be created based on Item Templates.


System will give a popup when you enter the Item Description if it not matches any of the Item description.


You can choose from the existing Item templates or create a new one.


Item card will open up, you can fill rest of the information and select the newly created item on sales documents.


Thanks & Regards,
Nandesh Gowda

Default Item Quantity NAV

Hi All,

We can now default Quantity field to 1 for items when you create new sales documents.

The setup is available on Sales & Receivables Setup. Once you select the No. field, quantity will get updated to 1.


Thanks & Regards,
Nandesh Gowda

21 January 2017

Defer Revenues and Expenses, Deferral Templates NAV

Hi All,

To recognize revenues and expenses in periods other than the period in which the transaction is posted, you can use functionality to automatically defer revenues and expenses over a specified schedule.

Deferral functionality is available on sales documents, purchase documents, and in the general journal. The functionality provides benefits, such as:
  • Reduced time and effort to defer revenues and expenses after transactions are posted.
  • Easy reporting on deferred amounts for customers, vendors, and G/L accounts.

Here we will discuss on Deferring Expenses pertaining to Advertising for 1 year and how to distribute the Amount to respective period.

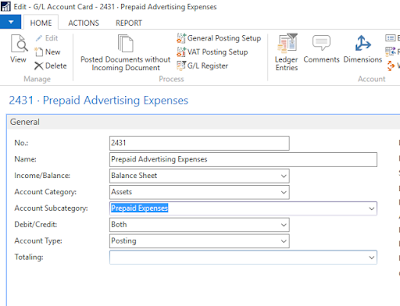
1)  To set up a G/L account for deferred expenses 

Go to Chart of Accounts and create a New G/L Account of Type Balance Sheet , where the deferred expenses will be posted to. Name the account, for example, Prepaid Advertising Expenses.


2) To set up a deferral template

Search for Deferral Template Page and create New Template. Select the G/L Account created in above step to post deferred expenses.
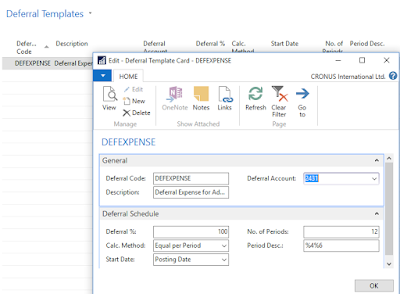


Please refer below table on how to fill in the Deferral template.
FieldDescription
Deferral Code
Identify the deferral template.
Description
Describe the deferral template.
Deferral Account
Specify the G/L account that the deferred expenses are posted to.
Deferral %
Specify how much of the total amount will be deferred.
Calc. Method
Specify how the Amount field for each period in the Deferral Schedule window is calculated. You can choose between the following options:
  • Straight-Line: The periodic deferral amounts are calculated according to the number of periods, distributed according to period length.
  • Equal Per Period: The periodic deferral amounts are calculated according to the number of periods, distributed evenly on periods.
  • Days Per Period: The periodic deferral amounts are calculated according to the number of days in the period.
  • User-Defined: The periodic deferral amounts are not calculated. You must manually fill the Amount field for each period in the Deferral Schedule window. For more information, see the “To change a deferral schedule from a purchase invoice” section.
Start Date
Specify when to start calculating deferral amounts. You can choose between the following options:
  • Posting Date: The start date used when calculating deferral amounts is the posting date of the invoice.
  • Beginning of Period: The start date used when calculating deferral amounts is the first day of the accounting period in which the posting date falls.
  • End of Period: The start date used when calculating deferral amounts is the last day of the accounting period in which the posting date falls.
  • Beginning of Next Period: The start date used when calculating deferral amounts is the first day of the accounting period that follows the accounting period in which the posting date falls.
No. of Periods
Specify how many accounting periods the total amounts will be deferred to.
Period Desc.
Specify a description that will be shown on entries for the deferral posting.
You can enter the following placeholder codes for typical values, which will be inserted automatically when the period description is displayed.
  • %1 = The day number of the period posting date
  • %2 = The week number of the period posting date
  • %3 = The month number of the period posting date
  • %4 = The month name of the period posting date
  • %5 = The accounting period name of the period posting date
  • %6 = The fiscal year of the period posting date
Example: The posting date is 02/06/2016. If you enter “Expenses deferral for %4 %6”, then the description displayed will be Expenses deferral for February 2016.

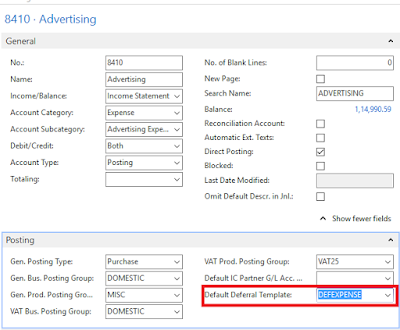
3)  To assign a deferral template to an Item, G/L Account, etc.

Assign the Deferral Template to an Expense Account


4) Create a Purchase Invoice taking the G/L Account to which we tagged Deferral Template.

As soon as we select the G/L Account, the Deferral Code is filled in by default.
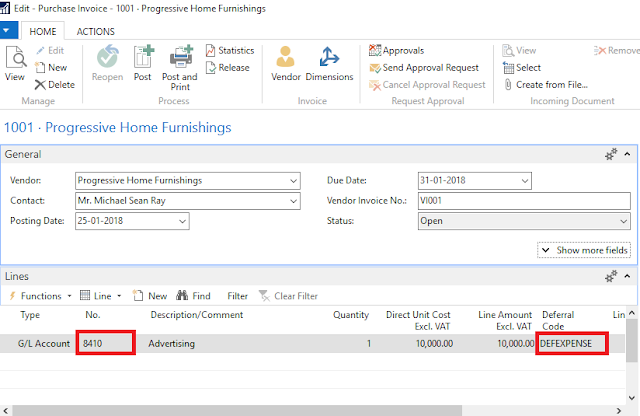


Now go to Lines FastTab-->Line --> Deferral Schedule to view the Deferral Calculation.
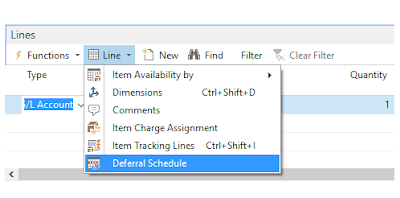

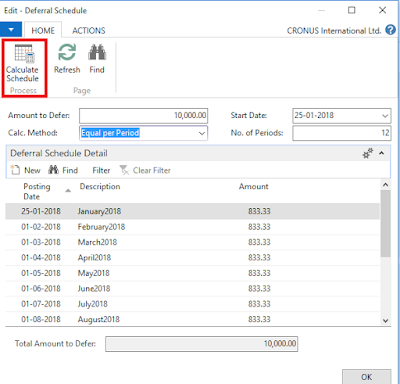
You can see system has divided the Amount into no of periods we specified in the setup.

You can also change the Deferral Amount here as well on Header or Line and then click Calculate Schedule


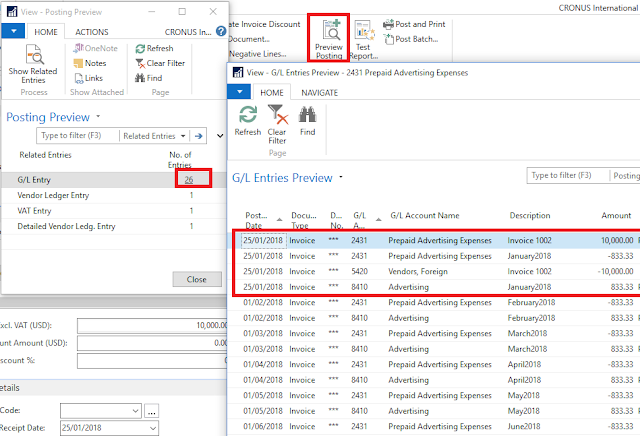
5)  You can Preview how deferral expenses will be posted to GL. You can see initially the Expense will be posted to Deferral Account and then the expenses are moved to actual Expense Account for each period.


6) Now post the entries, to review posted deferrals run Purchasing Deferral Summary report.


Similarly you can  Defer Revenues to the Period of Delivery .
Please refer below link
https://msdn.microsoft.com/en-us/library/mt574363(v=nav.90).aspx


Thanks & Regards,
Nandesh Gowda